0%

Introduction

Data Binding是Angular中最重要的概念之一。它是Angular中组件和模板间的通信机制。Angular中有四种数据绑定方式,注意数据绑定都发生在html模板中。

Interpolation

字符串插值是Angular中最简单的数据绑定形式。它使用双大括号{{}}将模板表达式包裹在其中。模板表达式是一段JavaScript代码,它会被Angular解析并插入到HTML中。

1
2
<!--app.component.html-->
<p>Hello, I'm {{name}}</p>
1
2
3
4
5
6
7
8
//app.component.ts
@Component({
//...
templateUrl: './app.component.html',
})
export class AppComponent {
name = 'Philip';
}

需要注意的是{{}}仅支持简单值的插值,比如数字,字符串,布尔值等。如果要插入对象,数组等复杂值,需要使用属性绑定。

Interpolation的数据流向是从组件传递到模板,不能反向传递。

Property Binding

Angular中属性绑定可以为HTML元素的属性赋值。属性绑定使用如下语法:

1
[property]="expression"

当Angular编译器遇到[property]时,它会对右侧的表达式expression进行求值,并将结果赋值给property属性。

比如我们要为一个图片的src属性赋值,可以使用如下代码,这里srcimg标签的一个属性,imageUrl又是组件的属性,属性绑定因此得名。

1
2
<!--app.component.html-->
<img [src]="imageUrl" alt="Angular Logo">
1
2
3
4
//app.component.ts
export class AppComponent {
imageUrl = 'https://www.angular.io/assets/images/angular.png';
}

属性绑定的数据流向是从组件传递到模板,不能反向传递。

Event Binding

事件绑定是Angular中将模板中的事件和组件中的方法关联起来的机制。事件绑定使用如下语法:

1
(event)="eventHandler()"

其中event是一个事件名,比如clickkeydownmousemove等等。eventHandler是组件中的某个方法,用来处理该事件。

下面的代码用于绑定buttonclick事件,当用户点击按钮时,Angular会调用组件中的updateName方法来更新name属性。

1
2
3
<!--app.component.html-->
<p>Hello, I'm {{name}}</p>
<button (click)="updateName('Philip Zhang')">Update name</button>
1
2
3
4
5
6
7
//app.component.ts
export class AppComponent {
name = 'Philip';
updateName(newName: string) {
this.name = newName;
}
}

在确定事件目标(event target)时,Angular首先判断指令是否有一个输出属性,如果有,Angular会调用这个输出属性,如果没有,Angular会调用DOM元素的事件。

比如下面这段代码,clickable对应一个自定义指令ClickDirective。Angular在处理myClick事件时,会首先检查ClickDirective是否有myClick输出属性,如果没有,会调用DOM元素button上的myClick事件。 — 注意myClick在这里只是一个名字,可以泛指任何事件。

1
2
<h4>myClick is an event on the custom ClickDirective:</h4>
<button type="button" (myClick)="clickHandler" clickable>click with myClick</button>

事件绑定的数据流向是从模板传递到组件,不能反向传递。

Two-way Binding

双向数据绑定是Angular中最强大的数据绑定方式,双向数据绑定使用如下语法:Angular团队给这个语法起了一个非常形象的名字,叫banana in a box。这个语法是将属性绑定和事件绑定结合在一起,实现了数据的双向绑定。

1
[(ngModel)]="property"

双向数据绑定的数据流向是双向的:

  1. 当组件内的数据变化时,页面上的内容跟着变化。
  2. 反之,当页面内容变化时,组件内的数据也会跟着变化。

下面是一个双向绑定的例子,当用户在input框中输入内容时,name属性会跟着变化,页面上显示的内容也会跟着变化。初始化的时候,name属性的值是Philip,页面上输入框内显示的内容也是Philip

1
2
3
<!--app.component.html-->
<p>Hello, I'm {{name}}</p>
<input [(ngModel)]="name" />

注意:使用双向绑定时,必须导入FormsModule模块。

1
2
3
4
5
6
7
8
9
10
11
//app.component.ts
@Component({
//...
templateUrl: './app.component.html',
imports: [
FormsModule // this is must be.
]
})
export class AppComponent {
name = 'Philip';
}

需要注意:使用双向绑定的ngModel指令时,必须在imports数组中导入FormsModule模块。

下图显示了Angular中四种数据绑定方式的数据流向。

angular-data-binding

  • [ ] - property binding
  • {{ }} - interpolation
  • ( ) - event binding
  • [( )] - two-way binding

Two-way binding between components

双向数据绑定不仅可以在组件内部使用,还可以在组件之间使用。比如下面的例子,我们定义了一个Counter组件,为了方便我们把所有代码都写到了一个文件里面。
Counter组件中的count是一个Input属性,由父组件传入。当用户点击增加或者减少按钮时,Counter组件会调用updateCount方法,更新count属性,并且通过changeCount事件将新的count值传递给父组件。

1
2
3
4
5
6
7
8
9
10
11
12
13
14
15
16
17
18
19
20
21
import {Component, EventEmitter, Input, Output} from '@angular/core';

@Component({
selector: 'app-counter',
standalone: true,
imports: [],
template: `
<button (click)="updateCount(-1)">-</button>
<span>{{ count }}</span>
<button (click)="updateCount(+1)">+</button>
`
})
export class CounterComponent {
@Input() count = 0;
@Output() countChange = new EventEmitter<number>();

updateCount(value: number) {
this.count += value;
this.countChange.emit(this.count);
}
}

需要注意的是:这里面的Output函数必须是xxxChange的形式,xxx是Input属性的名字,比如代码中的count。那么对应的Output属性就是countChange
这是Angular的约定。如果不是这个形式,Angular会认为这是一个普通的输出属性,而不是双向绑定的输出属性。(实测这种情况IDE会报错,但仍能运行)。

在父组件中调用Counter组件:

1
2
3
4
5
6
7
8
@Component({
// ...
template: `<app-counter [(count)]="initialCount"></app-counter>`,
imports: [CounterComponent]
})
export class AppComponent {
initialCount = 5;
}

@Input and @Output

Angular中的@Input和@output和属性绑定和事件绑定有些类似,但是它们是用来在父子组件之间传递数据的。@Input用来从父组件向子组件传递数据,@Output用来从子组件向父组件传递数据。
上面的例子中已经介绍了,词不赘述。

References

  1. https://angular.dev/guide/templates/binding

Introduction

<select> is a form control element that allows users to select an option from a list of options. It is used to create a drop-down list. <option> is a child element of <select>, which represents an option in a drop-down list.

Example

1
2
3
4
5
<select id="my_select">
<option value="1">1</option>
<option value="2">2</option>
<option value="3">3</option>
</select>

Default value

You can set default value to a select by adding selected to the option element.

1
2
3
4
5
<select id="my_select">
<option value="1">1</option>
<option value="2" selected>2</option> <!-- default value -->
<option value="3">3</option>
</select>

Use ul/li to create a select list

Its 2024 now, I still can’t set styles to option like padding and margin. The only way to create a custom select list is to use ul and li elements.

1
2
3
4
5
<ul id="my_select">
<li value="1">1</li>
<li value="2">2</li>
<li value="3">3</li>
</ul>

Reference

https://stackoverflow.com/a/22681234/1487475

未完,待续。。。

Install Node.js

Download and install Node.js.

Install Angular CLI

1
npm install -g @angular/cli

Create Angular project

1
ng new my-app

If you want to project with specific angular version, use the following command:

1
npx @angular/cli@15 new angular15-app

Start project

1
2
cd my-app
ng serve

Open browser

Open browser and navigate to http://localhost:4200/.

Create angular app with specific version

1
npx @angular/cli@15 new angular15-app

References:

今天从源码的角度来看一下Angular是如何启动一个应用的。

创建Angular项目

首先,参照这篇文章创建一个Angular项目

源码分析

关于如何阅读Angular源码,请参考这里如何阅读Angular源码

使用VSCode或者WebStorm打开项目,找到src/main.ts文件,这是Angular应用的入口文件。可以看到如下代码:

1
2
3
4
5
6
7
8
9
10
11
12
import { enableProdMode } from '@angular/core';
import { platformBrowserDynamic } from '@angular/platform-browser-dynamic';

import { AppModule } from './app/app.module';
import { environment } from './environments/environment';

if (environment.production) {
enableProdMode();
}

platformBrowserDynamic().bootstrapModule(AppModule)
.catch(err => console.error(err));

这里调用platformBrowserDynamic().bootstrapModule来启动Angular项目,我们到源码里面搜索bootstrapModule,找到如下代码:

packages/core/src/platform/platform_ref.ts

1
2
3
4
5
6
7
8
9
10
11
bootstrapModule<M>(
moduleType: Type<M>,
compilerOptions:
| (CompilerOptions & BootstrapOptions)
| Array<CompilerOptions & BootstrapOptions> = [],
): Promise<NgModuleRef<M>> {
const options = optionsReducer({}, compilerOptions);
return compileNgModuleFactory(this.injector, options, moduleType).then((moduleFactory) =>
this.bootstrapModuleFactory(moduleFactory, options), // <------- Here
);
}

bootstrapModule方法内部调用了 bootstrapModuleFactory 方法,我们继续搜索bootstrapModuleFactory,找到如下代码:

packages/core/src/platform/platform_ref.ts

1
2
3
4
5
6
7
8
9
10
11
12
13
14
15
16
17
18
19
20
21
22
bootstrapModuleFactory<M>(
moduleFactory: NgModuleFactory<M>,
options?: BootstrapOptions,
): Promise<NgModuleRef<M>> {
// Note: We need to create the NgZone _before_ we ins
// as instantiating the module creates some providers
// So we create a mini parent injector that just cont
// pass that as parent to the NgModuleFactory.
const ngZone = getNgZone(
options?.ngZone,
getNgZoneOptions({
eventCoalescing: options?.ngZoneEventCoalescing,
runCoalescing: options?.ngZoneRunCoalescing,
}),
);

// Note: Create ngZoneInjector within ngZone.run so that all of the instantiated services are
// created within the Angular zone
// Do not try to replace ngZone.run with ApplicationRef#run because ApplicationRef would then be
// created outside of the Angular zone.
return ngZone.run(() => {...}); // <------- Here
}

注意bootstrapModuleFactory这个方法比较长,我们简化一下,只截取其中的关键部分,首先这里创建了一个ngZone,用来做更新检测。然后调用了ngZone.run方法,这个方法是NgZone的方法,用来运行一个函数,并且确保这个函数在Angular的Zone中运行。在return ngZone.run()方法中的最后,又调用了_moduleDoBootstrap

packages/core/src/platform/platform_ref.ts

1
2
3
4
5
6
7
8
9
10
11
12
13
14
15
16
17
private _moduleDoBootstrap(moduleRef: InternalNgModuleRef<any>): void {
const appRef = moduleRef.injector.get(ApplicationRef);
if (moduleRef._bootstrapComponents.length > 0) {
moduleRef._bootstrapComponents.forEach((f) => appRef.bootstrap(f)); // <------- Here
} else if (moduleRef.instance.ngDoBootstrap) {
moduleRef.instance.ngDoBootstrap(appRef);
} else {
throw new RuntimeError(
RuntimeErrorCode.BOOTSTRAP_COMPONENTS_NOT_FOUND,
ngDevMode &&
`The module ${stringify(moduleRef.instance.constructor)} was bootstrapped, ` +
`but it does not declare "@NgModule.bootstrap" components nor a "ngDoBootstrap" method. ` +
`Please define one of these.`,
);
}
this._modules.push(moduleRef);
}

在该方法中,对于每个声明的bootstrap组件,都会调用appRef.bootstrap方法,这个方法是ApplicationRef的方法,用来启动一个组件。通常Angular程序只有一个bootstrap组件,就是AppComponent
再来看appRef.bootstrap方法:

packages/core/src/application/application_ref.ts

1
2
3
4
5
6
7
8
9
10
11
bootstrap<C>(
componentOrFactory: ComponentFactory<C> | Type<C>,
rootSelectorOrNode?: string | any,
): ComponentRef<C> {
// ...
const selectorOrNode = rootSelectorOrNode || componentFactory.selector;
const compRef = componentFactory.create(Injector.NULL, [], selectorOrNode, ngModule); // 1
// ...
this._loadComponent(compRef); // 2
// ...
}

这个方法同样很大,如前,这里省略一些细枝末节,直接展示最重要的代码。

  1. 首先根据bootstrap方法的第一个参数(通常是AppComponent)创建component。
  2. 然后调用内部方法_loadComponent来加载组件。

继续看_loadComponent方法:
packages/core/src/application/application_ref.ts

1
2
3
4
5
private _loadComponent(componentRef: ComponentRef<any>): void {
this.attachView(componentRef.hostView); // 1
this.tick(); // 2
// ...
}
  1. 首先调用attachView方法, 将组件的视图添加到视图树中。
  2. 然后调用tick方法,用来触发变更检测。

tick后续的方法调用如下:
tick -> _tick -> detectChangesInAttachedViews -> detectChangesInViewIfRequired -> detectChangesInternal

再看detectChangesInternal方法:
packages/core/src/render3/instructions/change_detection.ts

未完待续。。。

下载源码

Angular的源码托管在GitHub上,通过git clone命令下载源码。

1
git clone https://github.com/angular/angular.git

创建Angular项目

参考这里创建Angular项目

VSCode或者WebStorm打开项目,找到src/main.ts文件,这是Angular应用的入口文件。可以看到如下代码:

1
2
3
4
5
6
7
8
9
10
11
12
import { enableProdMode } from '@angular/core';
import { platformBrowserDynamic } from '@angular/platform-browser-dynamic';

import { AppModule } from './app/app.module';
import { environment } from './environments/environment';

if (environment.production) {
enableProdMode();
}

platformBrowserDynamic().bootstrapModule(AppModule)
.catch(err => console.error(err));

此处通过调用platformBrowserDynamic().bootstrapModule(AppModule)来启动应用。那么bootstrapModule是什么呢?通过在Angular源码中搜索bootstrapModule,可以找到如下代码:

1
2
3
4
5
6
7
8
9
10
11
bootstrapModule<M>(
moduleType: Type<M>,
compilerOptions:
| (CompilerOptions & BootstrapOptions)
| Array<CompilerOptions & BootstrapOptions> = [],
): Promise<NgModuleRef<M>> {
const options = optionsReducer({}, compilerOptions);
return compileNgModuleFactory(this.injector, options, moduleType).then((moduleFactory) =>
this.bootstrapModuleFactory(moduleFactory, options),
);
}

快速定位源码的位置

我的习惯是,同时打开两个IDE,一个用来查看应用代码,一个用来查看Angular源码。这样可以快速定位源码的位置。
比如对于上面的bootstrapModule, 则可以复制一份,到Angular源码所在的IDE中(WebStorm), 连按两下Shift键,然后粘贴bootstrapModule,就可以找到源码。

IDE本身提供的Go to Definition/implementation(或者按住Ctrl点击方法名)功能对于源码来说并不好用,只能定位到*.d.ts类型文件,而不能定位到源码文件。

如何调试源码

阅读源码的最好方式就是单步调试,一步一步观察程序是如何运行的。

浏览器调试

Webpack

Angular App默认使用Webpack打包,Webpack打包后的代码是经过压缩和混淆的,不利于调试。但是Webpack提供了SourceMap功能,可以将打包后的代码映射到源码,方便调试。

运行Angular程序后,在浏览器地址栏输入localhost:4200,按键盘上的F12键打开开发者工具,切换到Source选项卡,可以看到项目的源码。在Webpack结点下找到src/main.ts文件,点击行号,可以在代码中打断点。然后按F5刷新页面,就可以看到断点被触发了。
browser-debug

但是当你step into源码时,会发现并没有进入到bootstrapModule方法中,而是停在了core.mjs文件的末尾,这时我们需要在core.mjs文件中找到bootstrapModule方法,然后在方法体内打断点。注意bootstrapModule会在core.mjs文件中出现多次,有些甚至是注释,可以搜索bootstrapModule(来定位。
angular-core

ESBuild

Angular 17以后也支持esbuild打包,而且打包后的代码调试更方便,如下图。
esbuild-debug

WebStorm调试

WebStorm调试十分简单,现在代码中打上断点,然后在Run Configuration列表中选择Angular Application,点击绿色的Debug按钮,就可以开始调试了。
webstorm-debug

VSCode调试

待补充

Anchor

Anchor is a way to jump to a specific location in a page.

  1. create anchor

    1
    <a name="anchor_name"></a>
  2. jump to anchor

    1
    [Link Text](#anchor_name)

Colored text

Markdown itself support a limited features of HTML, so you can use HTML to color text.

1
2
3
<span style="color:red">red</span>
<span style="color:blue">blue</span>
<span style="color:green">green</span>

Change Detection是如何触发的?

前端框架的主要任务就是根据数据的变化来更新UI,Angular也不例外,而变更检测(Change Detection)就是完成这一任务的核心机制。

change-detection-flow

React或者Vue这类框架中,触发UI更新的操作是由开发者手动完成的,比如调用setState或者$set
React中使用setState来触发变更检测。

1
this.setState({ count: this.state.count + 1 });

Vue中使用$set来触发变更检测。

1
this.$set(this.data, 'count', this.data.count + 1);

而在Angular中,变更检测是自动触发的,那么Angular是如何实现自动触发变更检测的呢?要解释清楚这个问题,大家首先要明白javascript这门语言的特殊性,JS的行为在运行时是可以被改写的,也就是说可以做Monkey Patch,而Angular正是利用了这一特性来实现自动变更检测的。

在Angular app启动时,Angular框架会对一些底层的异步事件进行Monkey Patch(在这些事件中加入额外的逻辑),这样就可以在异步事件执行时自动触发变更检测。Angular使用Zone.js来完成这一过程。

比如下面这个addEventListener的例子,Angular会在addEventListener的回调函数执行完后,自动触发变更检测。这就是Monkey Patch的作用。

1
2
3
4
5
6
7
8
9
10
11
12
13
function addEventListener(eventName, callback) {
// call the real addEventListener
callRealAddEventListener(eventName, function() {
// first call the original callback
callback(...);
// and then run Angular-specific functionality
var changed = angular.runChangeDetection();
if (changed) {
angular.reRenderUIPart();
}
});
}

在Angular程序启动时,会创建一个Zone,很多人刚开始对Zone比较迷惑,其实它很简单,就是一个执行上下文(Execution context)这个Zone会监控所有的异步操作,当异步操作执行时,Angular会运行变更检测。Zone.js会对浏览器中的所有异步操作进行monkey patch,这样Angular就能知道何时运行变更检测。

这些被monkey patch的异步操作包括

  • setTimeout, setInterval,
  • addEventListener,
  • XMLHttpRequest,
  • fetch,
  • Promise,
  • MutationObserver
  • requestAnimationFrame
  • async/await - 这个会降级到Promise,因为Zone.js无法直接监控async/await,所以会降级到Promise。

这种方式大大降低了开发人员写代码时的心智负担,但是这种方法也有一些弊端,那就是如果某些异步操作无法被Zone.js支持的话,那么Angular就无法对这些异步操作进行变更检测。比如IndexedDB的一些回调函数。

Change Detection是如何工作的?

每一个Angular Component都有一个与之关联的change detector, 这个change detector是在Angular App启动时创建的。当变更检测触发时,Angular会对Template中的每一个Expression进行检查,这个Expression一定是包含着Component中的某个或者某些变量,当该变量的当前值和之前的值不一致时,Angular就会使用新值渲染Template,这样就完成了UI的更新。

当然,这个操作不是一次一次触发的,Angular会对所有变化了的值进行标记,比如isChanged = true,待标记完成后,一次性进行更新。Angular对新旧值进行比较时用的时looseNotIdentical()算法,也就是===,但是对于NaN有个特殊处理,也就是说NaN === NaN返回true(注意,在JS中NaN === NaN返回false)

Angular会对整个Component tree进行检测,并遵循如下原则:(不考虑OnPush的情况下)

  1. 从整个组件树的根结点进行检测。
  2. 组件树中每个结点都被检测。
  3. 检测的方向是自顶向下。
  4. 组件树的遍历算法是深度优先遍历(DFS)算法。

每个被检测到的component都会执行以下操作:

  1. 运行Life Cycle方法
  2. 更新绑定 - Updating bindings.
  3. 刷新UI

一个常见的误解是:Angular在变更检测时会重新渲染整个组件树,这是不对的。Angular足够智能,它只会更新那些发生了变化的部分,而不是整个组件树。

如何关闭某个组件的Change Detection?

很简单,只需要在组件的constructor中detach change detector即可。

1
2
3
4
5
export class MyComponent {
constructor(private cd: ChangeDetectorRef) {
cd.detach();
}
}

这是一个很偏门的需求,使用的场景很少,但是也存在,比如如果后端通过websocket发送了大量的数据,而前端不可能这儿快的实时处理这些数据,所以就折中一下,每隔5秒钟更新一下UI,那么就可以用此方法。

我们现调用detach()方法,这样就可以关闭这个组件的变更检测了,然后再使用setInterval来定时手动触发变更检测,更新UI。

1
2
3
4
5
6
7
8
export class MyComponent {
constructor(private cdf: ChangeDetectorRef) {
this.cdf.detach();
setInterval(() => {
this.cdf.detectChanges();
}, 5000);
}
}

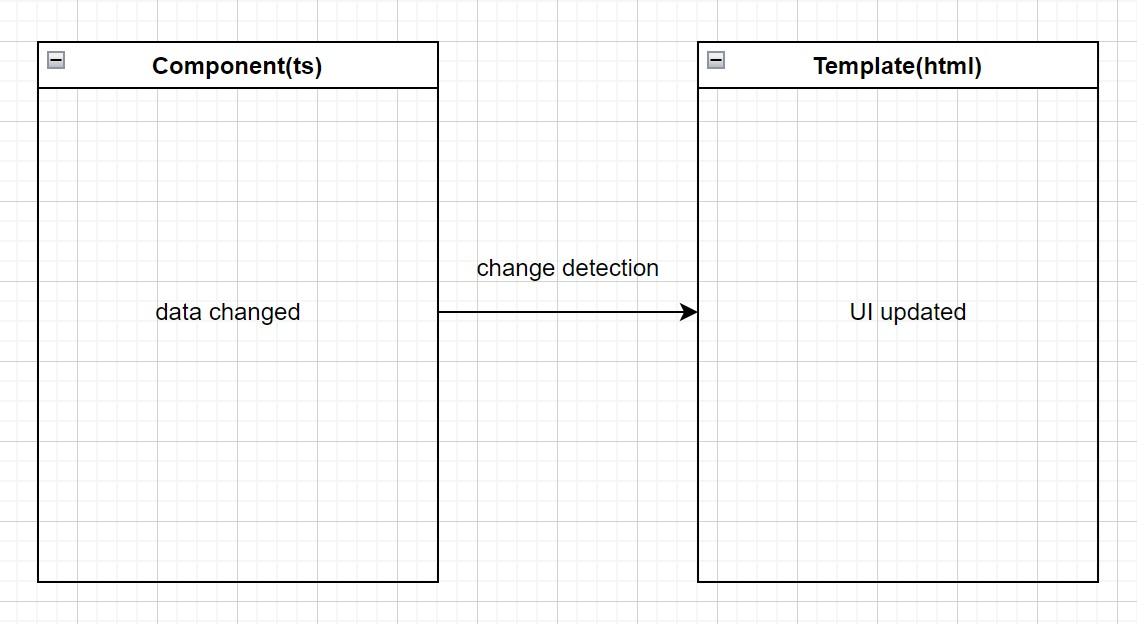
Take the DOM event as an example, when user click a button on page, Angular will run change detection to update the view. Angular will run change detection after the event handler is executed.

Here is the pseudo code, you can find the real code in packages/zone.js/lib/browser/event-target.ts in angular source code.(Note, initially, zone.js is a independent library, but it is moved to angular’s mono-repo.)

1
2
3
4
5
6
7
8
9
10
11
// Store a reference to the original addEventListener
const nativeAddEventListener = window.EventTarget.prototype.addEventListener;

// Replace the original addEventListener with a patched version
window.EventTarget.prototype.addEventListener = function(eventName, handler, options) {
// Call the native addEventListener with the provided arguments
nativeAddEventListener.call(this, eventName, handler, options);

// Additional functionality to track the state of asynchronous operations
// This could involve interacting with Zone.js's internal data structures
};

Change Detection steps

  1. An event occurs (user action, timer, AJAX response, etc.).
  2. Angular’s zone (NgZone) notifies Angular that an async operation has completed.
  3. Angular triggers change detection starting from the root component.
  4. For each component, it checks the template bindings against the current component state.
  5. If a binding has changed, Angular updates the DOM accordingly.
  6. Components using OnPush strategy only check if their inputs have changed or if marked explicitly.
  7. The process continues down the component tree until all components are checked.

What does change detection do in Angular?

  1. Update all bindings in templates.
  2. Update the view.

Angular中,每个Component都会关联一个Change Detector, 这个Change Detector是在Angular App启动时创建的(是所有Component共用一个Change Detector还是每个Component有自己的Change Detector?)。

这个Change Detector的工作就是检查每个Component的Template中的Expression是否发生了变化,如果发生了变化,就会更新View。

NgZone

Angular uses NgZone to detect changes in the application. NgZone is a class that provides a way to run code in the Angular zone. It is used to detect changes in the application.

You can easily see NgZone by logging it to the console.

1
2
3
4
5
6
export class AppComponent {
constructor(zone: NgZone) {
console.log((zone as any)._inner.name); // angular
console.log((zone as any)._outer.name); // root
}
}

NgZone is instantiated during the bootstrap phase.

How to determine when change detection is triggered in a component?

注意:下面这个结论是错误的,留在这里时刻提醒自己,不要再犯这种错误。详情请看这里

You can use the ngDoCheck lifecycle hook to determine when change detection is triggered in a component. ngDoCheck is called every time change detection is triggered in a component.

1
2
3
4
5
export class AppComponent {
ngDoCheck() {
console.log('Change detection triggered');
}
}

ngOnChanges

ngOnChanges is a lifecycle hook that is called when a component’s input properties change. It is used to detect changes in the component’s input properties.

What’s the scenarios to use ngOnChanges?

  1. When you want to detect changes in the component’s input properties.
  2. When you want to avoid function call in template. see here

References

  1. https://angular.love/the-latest-in-angular-change-detection-zoneless-signals - 这个写得太好了,仔细读之。

Install Nginx on Windows

  1. Download Nginx from Nginx official website.
  2. Extract the downloaded file to a folder, for example, C:\nginx.

Build your app

  1. Build your Angular app using the following command: This will generate the dist folder under your project root. for example, D:\codes\angular\angular-router.
    1
    ng build --prod

Setup Nginx

  1. Open a command prompt as an administrator.
  2. Navigate to the Nginx directory.
  3. Open the conf/nginx.conf file in a text editor.
  4. Find the http | server block and add the following line:
    1
    2
    3
    4
    5
    6
    7
    8
    server {
    listen 80;
    server_name localhost;
    location / {
    root D:/codes/angular/angular-router/dist;
    index index.html index.htm;
    }
    }

Start Nginx

  1. Open a command prompt as an administrator.
  2. Navigate to the Nginx directory.
  3. Start Nginx using the following command:
    1
    start nginx

Restart Nginx

1
nginx -s reload

Stop Nginx

1
nginx -s stop

Check Nginx configuration

1
nginx -t

If the configuration is valid, you will see a message like this:

1
2
nginx: the configuration file C:/nginx/conf/nginx.conf syntax is ok
nginx: configuration file C:/nginx/conf/nginx.conf test is successful

不知各位冰雪聪明的朋友们是否遇到过如下错误?

1
NG0100: Expression has changed after it was checked

大家在第一次遇到这个错误的时候是什么反应呢?反正我是一头雾水,今天我就带大家揭开这个错误的神秘面纱,我现在很困。。。非常不想写,但是我还是要写,因为我是一个有责任心的人。

1
为什么我的眼里常含泪水?因为我太困了。。。

言归正传!其实从这个错误的描述来看,聪明的你已经发现了,那就是在Angular刚刚进行完一次变更检测,你又更新了某个值。那么,有哪些场景会导致这个错误呢?我们依次来看。

先来看一个最简单的例子:

Update value in ngAfterViewInit

1
2
<!-- app.component.html -->
<div>{{ count }}</div>
1
2
3
4
// app.component.ts
ngAfterViewInit() {
this.count = 2;
}

这个例子中,我们在ngAfterViewInit生命周期钩子中更新了count的值,在ngAfterViewInit之前,Angular刚刚进行完一次变更检测,我们在ngAfterViewInit中更新了count的值,此时下一次变更检测还未开始,所以就产生了这个错误。

error

他来了,他来了,他迈着箭步走来了!
我们可以点击红框中的文件链接,查看到底哪个变量出了问题。

ng0100

既然错误已经发生了,那么该如何解决它呢?

  1. 不要在ngAfterViewInit中更新值。你可以在其他地方更新,比如用户点击了某个按钮,或者做了其他操作时。
  2. 使用ChangeDetectorRef手动触发变更检测。既然Angular不让我们在变更检测之后更新值,那么我们就在更新值以后手动触发一次变更检测,如下:
    1
    2
    3
    4
    5
    constructor(private cdr: ChangeDetectorRef) {}
    ngAfterViewInit() {
    this.count = 2;
    this.cdr.detectChanges();
    }
  3. 使用异步更新,比如用setTimeoutPromise等包裹一下更新值的操作。因为Angular内部使用zone.js对这些异步操作进行了hook,并自动加入了更新检测,所以这样做是安全的。
    1
    2
    3
    4
    5
    6
    7
    8
    9
    10
    11
    12
    13
    ngAfterViewInit() {
    setTimeout(() => {
    this.count = 2;
    });
    }

    // or

    ngAfterViewInit() {
    Promise.resolve().then(() => {
    this.count = 2;
    });
    }

Use random values in template bindings

1
2
<!-- app.component.html -->
<div>{{ randomValue }}</div>
1
2
3
4
// app.component.ts
get randomValue() {
return Math.random();
}

这个例子中,我们在模板中使用了一个随机值,每次变更检测都会重新计算这个值,所以就会产生这个错误。

Update parent component property from child component

We declare a name property in parent component and show it on html template.

1
2
3
4
5
// parent.component.ts
name: string;
constructor() {
this.name = 'Tom';
}
1
2
3
<!-- parent.component.html -->
<p>I'm Father, my name is: {{ name }}</p>
<app-child (onChangeName)="changeName($event)" [age]=30 [name]="'Philip'"></app-child>

Then we update the name property in child component.

1
2
3
4
5
<!-- child.component.html -->
@Output() onChangeName = new EventEmitter<string>();
ngOnInit(): void {
this.onChangeName.emit('Jerry');
}

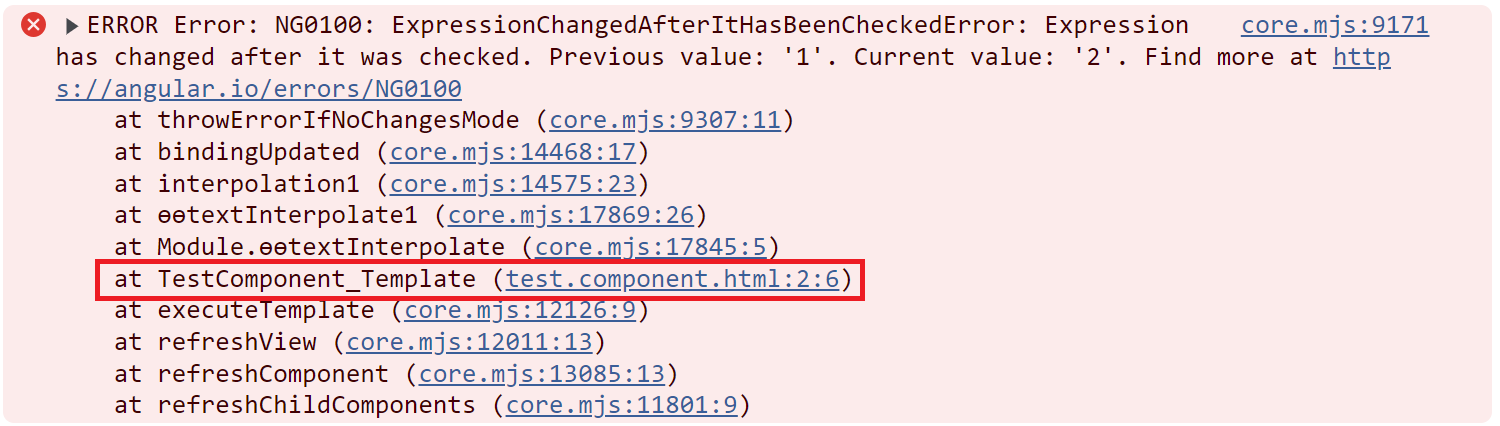
Run the application, you will see the error in the console.

1
core.mjs:9171 ERROR Error: NG0100: ExpressionChangedAfterItHasBeenCheckedError: Expression has changed after it was checked. Previous value: 'Tom'. Current value: 'Jerry'

Conclusion

There are several scenarios that produce this error.

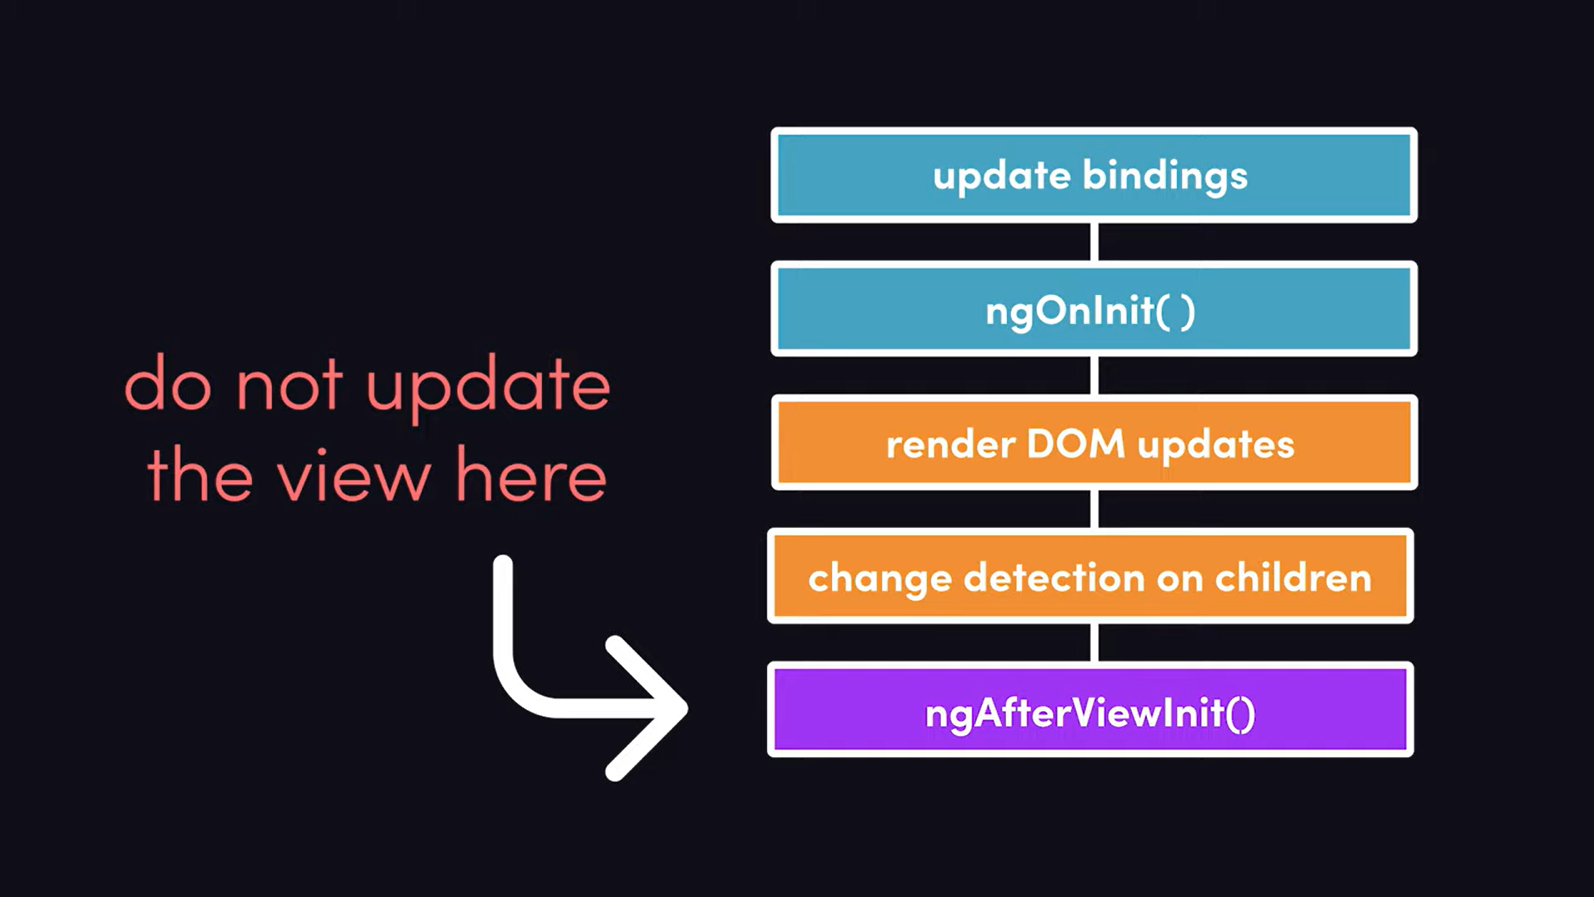
  1. value in ngAfterViewInit.
  2. Use random values in template bindings
  3. Update parent component property from child component.

How to solve this problem

  1. Refactor ngAfterViewInit lifecycle hook.
  2. Use ChangeDetectorRef to manually trigger change detection.
  3. Make getters idempotent.
  4. Make the update async(last resort)

Reference

https://angular.io/errors/NG0100

后记

话说我现在实在太困了,睁不开眼睛,写这破玩意能涨工资吗?大概率不能!但是老话儿说的好,凡事求个明白!不扯了,睡觉去了。

你也许在Angular的文档或者某些博客中看到过这样一句话:
Every application has at least one Angular module, the root module, which must be present for bootstrapping the application on launch. By convention and by default, this NgModule is named AppModule

在Angular 14之前,这句话是正确的。但是从Angular 14开始,你可以不用AppModule,因为standalone component可以替代它。下面我们来看看,如何移除AppModule

创建一个Angular项目

1
ng new my-app

将app component设置为standalone

首先要将app.component.ts中的standalone设置为true。如果使用了router,还需要将RouterModule导入到component中。否则在html中使用router-outlet或者routerLink会报错。

1
2
3
4
5
6
7
8
9
10
11
12
13
import {Component} from '@angular/core';
import {RouterModule} from "@angular/router";

@Component({
standalone: true, // set standalone to true
selector: 'app-root',
imports: [RouterModule], // import RouterModule if you use router
templateUrl: './app.component.html',
styleUrls: ['./app.component.css']
})
export class AppComponent {
title = 'angular-router';
}

创建routes文件

新建一个app-routes.ts文件,用来定义路由,就是将原本在app-routing.module.ts中定义的路由移到这个文件中。

1
2
3
4
5
6
7
8
9
10
11
import {Routes} from "@angular/router";
import {HomeComponent} from "./home/home.component";
import {AboutComponent} from "./about/about.component";
import {NotFoundComponent} from "./not-found/not-found.component";

export const routes: Routes = [
{path: 'home', component: HomeComponent},
{path: 'product', loadChildren: () => import('./product/product.module').then(m => m.ProductModule)},
{path: 'about', component: AboutComponent},
{path: '**', component: NotFoundComponent},
];

删除AppModule

经过上面的改造,我们已经将AppModule中的内容移到了AppComponent中,现在可以删除AppModule了。

  1. 删除app module文件:src/app/app.module.ts
  2. 删除route文件:src/app/app-routing.module.ts。(如果创建项目时选择了router)

修改main.ts

最后,我们还需要修改main.tsmain.ts是app的入口文件,它本来引入的是AppModule,我们需要修改它来引入standalone component

  1. bootstrapModule替换为bootstrapApplication
  2. AppModule替换为AppComponent
  3. 引入importProvidersFrom来加载路由。

修改前

1
2
3
4
5
6
7
8
9
10
11
12
import { enableProdMode } from '@angular/core';
import { platformBrowserDynamic } from '@angular/platform-browser-dynamic';

import { AppModule } from './app/app.module';
import { environment } from './environments/environment';

if (environment.production) {
enableProdMode();
}

platformBrowserDynamic().bootstrapModule(AppModule)
.catch(err => console.error(err));

修改后

1
2
3
4
5
6
7
8
9
10
11
12
13
14
15
16
17
18
import {enableProdMode, importProvidersFrom} from '@angular/core';

import {environment} from './environments/environment';
import {RouterModule} from "@angular/router";
import {routes} from "./app/app.routes";
import {bootstrapApplication} from "@angular/platform-browser";
import {AppComponent} from "./app/app.component";

if (environment.production) {
enableProdMode();
}

bootstrapApplication(AppComponent, {
providers: [
importProvidersFrom(RouterModule.forRoot(routes))
]
})
.catch(err => console.error(err));

Angular 17+

从Angular 17开始,使用Angular CLI创建的app默认就是standalone component,不需要再做上面的修改。一个新的Angular 17+项目结构如下:

1
2
3
4
5
6
7
8
9
10
11
12
13
my-app/
├─ node-modules/
├─ src/
│ ├─ app/
│ │ ├─ app.component.css
│ │ ├─ app.component.html
│ │ ├─ app.component.ts
│ │ ├─ app.config.ts
│ │ ├─ app.routes.ts
│ ├─ index.html
│ ├─ main.ts
├─ angular.json
├─ package.json
1
2
3
4
5
6
7
8
9
10
11
12
13
14
15
// app.component.ts
import { Component } from '@angular/core';
import { RouterOutlet } from '@angular/router';

@Component({
selector: 'app-root',
standalone: true,
imports: [RouterOutlet],
templateUrl: './app.component.html',
styleUrl: './app.component.css'
})
export class AppComponent {
title = 'my-app';
}

1
2
3
4
5
6
7
8
9
10
// app.config.ts
import { ApplicationConfig } from '@angular/core';
import { provideRouter } from '@angular/router';

import { routes } from './app.routes';

export const appConfig: ApplicationConfig = {
providers: [provideRouter(routes)]
};

1
2
3
4
5
6
7
8
9
10
11
12
13
// app.routes.ts
import { Routes } from '@angular/router';

export const routes: Routes = [
{
path: 'home',
component: HomeComponent,
},
{
path: 'product',
component: ProductComponent,
}
];
1
2
3
4
5
6
7
8
// main.ts
import { bootstrapApplication } from '@angular/platform-browser';
import { appConfig } from './app/app.config';
import { AppComponent } from './app/app.component';

bootstrapApplication(AppComponent, appConfig)
.catch((err) => console.error(err));