0%

不知各位冰雪聪明的朋友们是否遇到过如下错误?

1
NG0100: Expression has changed after it was checked

大家在第一次遇到这个错误的时候是什么反应呢?反正我是一头雾水,今天我就带大家揭开这个错误的神秘面纱,我现在很困。。。非常不想写,但是我还是要写,因为我是一个有责任心的人。

1
为什么我的眼里常含泪水?因为我太困了。。。

言归正传!其实从这个错误的描述来看,聪明的你已经发现了,那就是在Angular刚刚进行完一次变更检测,你又更新了某个值。那么,有哪些场景会导致这个错误呢?我们依次来看。

先来看一个最简单的例子:

Update value in ngAfterViewInit

1
2
<!-- app.component.html -->
<div>{{ count }}</div>
1
2
3
4
// app.component.ts
ngAfterViewInit() {
this.count = 2;
}

这个例子中,我们在ngAfterViewInit生命周期钩子中更新了count的值,在ngAfterViewInit之前,Angular刚刚进行完一次变更检测,我们在ngAfterViewInit中更新了count的值,此时下一次变更检测还未开始,所以就产生了这个错误。

error

他来了,他来了,他迈着箭步走来了!
我们可以点击红框中的文件链接,查看到底哪个变量出了问题。

ng0100

既然错误已经发生了,那么该如何解决它呢?

  1. 不要在ngAfterViewInit中更新值。你可以在其他地方更新,比如用户点击了某个按钮,或者做了其他操作时。
  2. 使用ChangeDetectorRef手动触发变更检测。既然Angular不让我们在变更检测之后更新值,那么我们就在更新值以后手动触发一次变更检测,如下:
    1
    2
    3
    4
    5
    constructor(private cdr: ChangeDetectorRef) {}
    ngAfterViewInit() {
    this.count = 2;
    this.cdr.detectChanges();
    }
  3. 使用异步更新,比如用setTimeoutPromise等包裹一下更新值的操作。因为Angular内部使用zone.js对这些异步操作进行了hook,并自动加入了更新检测,所以这样做是安全的。
    1
    2
    3
    4
    5
    6
    7
    8
    9
    10
    11
    12
    13
    ngAfterViewInit() {
    setTimeout(() => {
    this.count = 2;
    });
    }

    // or

    ngAfterViewInit() {
    Promise.resolve().then(() => {
    this.count = 2;
    });
    }

Use random values in template bindings

1
2
<!-- app.component.html -->
<div>{{ randomValue }}</div>
1
2
3
4
// app.component.ts
get randomValue() {
return Math.random();
}

这个例子中,我们在模板中使用了一个随机值,每次变更检测都会重新计算这个值,所以就会产生这个错误。

Update parent component property from child component

We declare a name property in parent component and show it on html template.

1
2
3
4
5
// parent.component.ts
name: string;
constructor() {
this.name = 'Tom';
}
1
2
3
<!-- parent.component.html -->
<p>I'm Father, my name is: {{ name }}</p>
<app-child (onChangeName)="changeName($event)" [age]=30 [name]="'Philip'"></app-child>

Then we update the name property in child component.

1
2
3
4
5
<!-- child.component.html -->
@Output() onChangeName = new EventEmitter<string>();
ngOnInit(): void {
this.onChangeName.emit('Jerry');
}

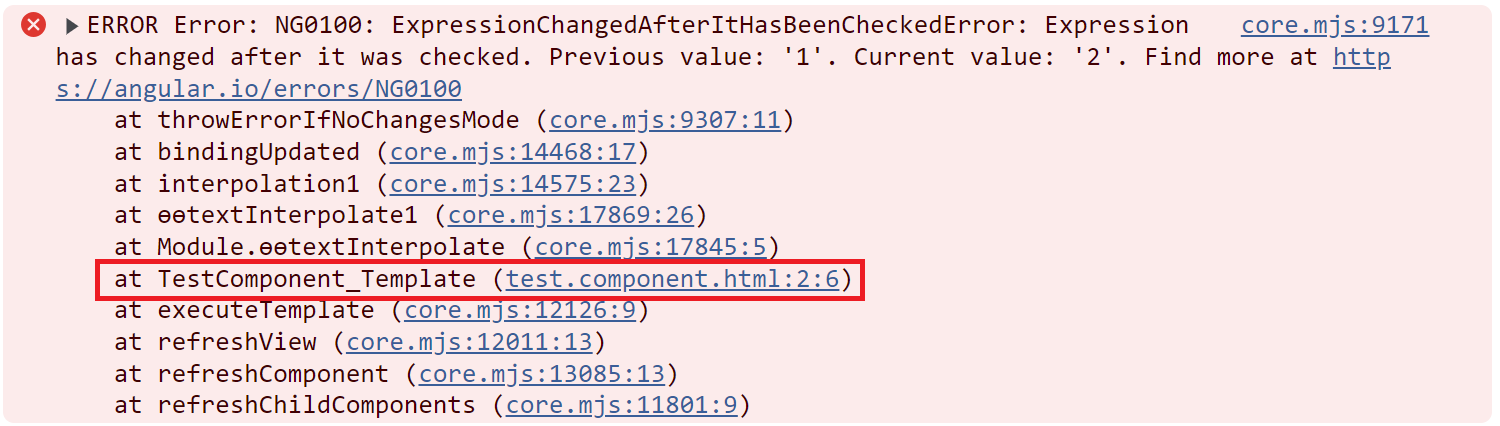
Run the application, you will see the error in the console.

1
core.mjs:9171 ERROR Error: NG0100: ExpressionChangedAfterItHasBeenCheckedError: Expression has changed after it was checked. Previous value: 'Tom'. Current value: 'Jerry'

Conclusion

There are several scenarios that produce this error.

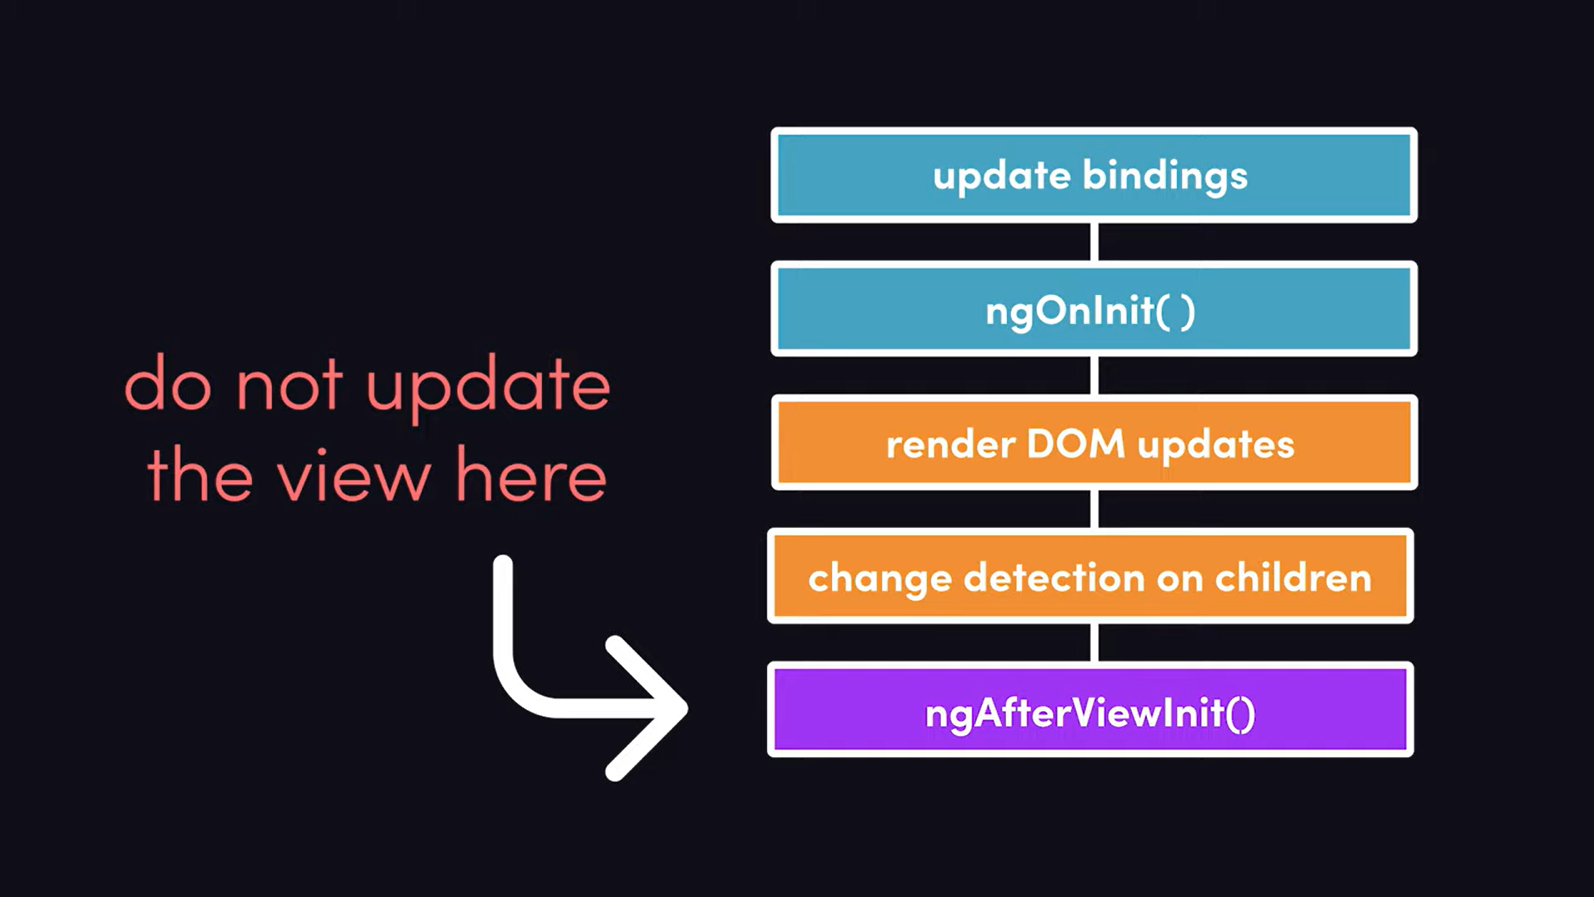
  1. value in ngAfterViewInit.
  2. Use random values in template bindings
  3. Update parent component property from child component.

How to solve this problem

  1. Refactor ngAfterViewInit lifecycle hook.
  2. Use ChangeDetectorRef to manually trigger change detection.
  3. Make getters idempotent.
  4. Make the update async(last resort)

Reference

https://angular.io/errors/NG0100

后记

话说我现在实在太困了,睁不开眼睛,写这破玩意能涨工资吗?大概率不能!但是老话儿说的好,凡事求个明白!不扯了,睡觉去了。

你也许在Angular的文档或者某些博客中看到过这样一句话:
Every application has at least one Angular module, the root module, which must be present for bootstrapping the application on launch. By convention and by default, this NgModule is named AppModule

在Angular 14之前,这句话是正确的。但是从Angular 14开始,你可以不用AppModule,因为standalone component可以替代它。下面我们来看看,如何移除AppModule

创建一个Angular项目

1
ng new my-app

将app component设置为standalone

首先要将app.component.ts中的standalone设置为true。如果使用了router,还需要将RouterModule导入到component中。否则在html中使用router-outlet或者routerLink会报错。

1
2
3
4
5
6
7
8
9
10
11
12
13
import {Component} from '@angular/core';
import {RouterModule} from "@angular/router";

@Component({
standalone: true, // set standalone to true
selector: 'app-root',
imports: [RouterModule], // import RouterModule if you use router
templateUrl: './app.component.html',
styleUrls: ['./app.component.css']
})
export class AppComponent {
title = 'angular-router';
}

创建routes文件

新建一个app-routes.ts文件,用来定义路由,就是将原本在app-routing.module.ts中定义的路由移到这个文件中。

1
2
3
4
5
6
7
8
9
10
11
import {Routes} from "@angular/router";
import {HomeComponent} from "./home/home.component";
import {AboutComponent} from "./about/about.component";
import {NotFoundComponent} from "./not-found/not-found.component";

export const routes: Routes = [
{path: 'home', component: HomeComponent},
{path: 'product', loadChildren: () => import('./product/product.module').then(m => m.ProductModule)},
{path: 'about', component: AboutComponent},
{path: '**', component: NotFoundComponent},
];

删除AppModule

经过上面的改造,我们已经将AppModule中的内容移到了AppComponent中,现在可以删除AppModule了。

  1. 删除app module文件:src/app/app.module.ts
  2. 删除route文件:src/app/app-routing.module.ts。(如果创建项目时选择了router)

修改main.ts

最后,我们还需要修改main.tsmain.ts是app的入口文件,它本来引入的是AppModule,我们需要修改它来引入standalone component

  1. bootstrapModule替换为bootstrapApplication
  2. AppModule替换为AppComponent
  3. 引入importProvidersFrom来加载路由。

修改前

1
2
3
4
5
6
7
8
9
10
11
12
import { enableProdMode } from '@angular/core';
import { platformBrowserDynamic } from '@angular/platform-browser-dynamic';

import { AppModule } from './app/app.module';
import { environment } from './environments/environment';

if (environment.production) {
enableProdMode();
}

platformBrowserDynamic().bootstrapModule(AppModule)
.catch(err => console.error(err));

修改后

1
2
3
4
5
6
7
8
9
10
11
12
13
14
15
16
17
18
import {enableProdMode, importProvidersFrom} from '@angular/core';

import {environment} from './environments/environment';
import {RouterModule} from "@angular/router";
import {routes} from "./app/app.routes";
import {bootstrapApplication} from "@angular/platform-browser";
import {AppComponent} from "./app/app.component";

if (environment.production) {
enableProdMode();
}

bootstrapApplication(AppComponent, {
providers: [
importProvidersFrom(RouterModule.forRoot(routes))
]
})
.catch(err => console.error(err));

Angular 17+

从Angular 17开始,使用Angular CLI创建的app默认就是standalone component,不需要再做上面的修改。一个新的Angular 17+项目结构如下:

1
2
3
4
5
6
7
8
9
10
11
12
13
my-app/
├─ node-modules/
├─ src/
│ ├─ app/
│ │ ├─ app.component.css
│ │ ├─ app.component.html
│ │ ├─ app.component.ts
│ │ ├─ app.config.ts
│ │ ├─ app.routes.ts
│ ├─ index.html
│ ├─ main.ts
├─ angular.json
├─ package.json
1
2
3
4
5
6
7
8
9
10
11
12
13
14
15
// app.component.ts
import { Component } from '@angular/core';
import { RouterOutlet } from '@angular/router';

@Component({
selector: 'app-root',
standalone: true,
imports: [RouterOutlet],
templateUrl: './app.component.html',
styleUrl: './app.component.css'
})
export class AppComponent {
title = 'my-app';
}

1
2
3
4
5
6
7
8
9
10
// app.config.ts
import { ApplicationConfig } from '@angular/core';
import { provideRouter } from '@angular/router';

import { routes } from './app.routes';

export const appConfig: ApplicationConfig = {
providers: [provideRouter(routes)]
};

1
2
3
4
5
6
7
8
9
10
11
12
13
// app.routes.ts
import { Routes } from '@angular/router';

export const routes: Routes = [
{
path: 'home',
component: HomeComponent,
},
{
path: 'product',
component: ProductComponent,
}
];
1
2
3
4
5
6
7
8
// main.ts
import { bootstrapApplication } from '@angular/platform-browser';
import { appConfig } from './app/app.config';
import { AppComponent } from './app/app.component';

bootstrapApplication(AppComponent, appConfig)
.catch((err) => console.error(err));

To Do List

  1. typescript tag not found on github pages tags.

  2. Angular, AOT vs JIT and Ivy

  3. Angular, How ngc works?

  4. Angular, ngc vs ngcc.

  5. Angular change detection

    1. https://angularindepth.com/posts/1513/from-zone-js-to-zoneless-angular-and-back-how-it-all-works
    2. https://blog.angular-university.io/how-does-angular-2-change-detection-really-work/
    3. https://justangular.com/blog/a-new-era-for-angular-zoneless-change-detection?source=post_page-----babdeb6bc84e--------------------------------
  6. Angular zone

    1. https://dev.to/vivekdogra02/angular-zonejs-change-detection-understanding-the-core-concepts-16ek
    2. https://angularindepth.com/posts/1135/i-reverse-engineered-zones-zone-js-and-here-is-what-ive-found
    3. https://justangular.com/blog/a-change-detection-zone-js-zoneless-local-change-detection-and-signals-story
    4. https://justangular.com/blog/its-ok-to-use-function-calls-in-angular-templates
  7. Angular polyfill(under project root)

  8. Angular data binding.

  9. What’s new in Angular 15

  10. What’s new in Angular 16

  11. What’s new in Angular 17

  12. angular.json - projects - architect - build - options - tsConfig

  13. Angular router: resolver = https://medium.com/@singhkrishnapal0818/angular-resolver-with-example-cf23f6d38f7f

  14. Never use function call in angular template: https://medium.com/showpad-engineering/why-you-should-never-use-function-calls-in-angular-template-expressions-e1a50f9c0496

  15. https://medium.com/ngconf/accessing-route-params-in-angular-1f8e12770617

  16. Angular service scope providedIn: ‘root’, ‘platform’, ‘any’ - https://dev.to/christiankohler/improved-dependeny-injection-with-the-new-providedin-scopes-any-and-platform-30bb, https://angular.io/guide/providers#limiting-provider-scope-with-components

  17. Good angular post:

    1. https://justangular.com/blog
    2. https://blog.angular.io/
    3. https://angulararchitects.io/en/blog
  18. What is browserlist in Angular: https://github.com/browserslist/browserslist

  19. Angular, what is matrix parameters: https://stackoverflow.com/questions/2048121/url-matrix-parameters-vs-query-parameters

SSR in Angular

多页应用
http://www.guoxue.com/shibu/24shi/hansu/hsu_002.htm

  1. https://medium.com/@nishtha.viitorcloud/ssr-server-side-rendering-in-angular-a68bee12cb0d
  2. https://medium.com/@mbleigh/when-should-i-server-side-render-c2a383ff2d0f
  3. https://solutionshub.epam.com/blog/post/what-is-server-side-rendering

Module Federation

  1. code example: https://github.com/module-federation/module-federation-examples
  2. https://medium.com/swlh/webpack-5-module-federation-a-game-changer-to-javascript-architecture-bcdd30e02669 - need pay
  3. https://medium.com/@scriptedalchemy/understanding-webpack-module-federation-a-deep-dive-efe5c55bf366
  4. https://www.angulararchitects.io/en/blog/micro-frontends-with-modern-angular-part-1-standalone-and-esbuild/
  5. https://module-federation.io/
  6. https://www.youtube.com/watch?v=-ei6RqZilYI
  7. https://vugar-005.medium.com/module-federation-series-part-1-a-little-in-depth-258f331bc11e

Native module federation

https://github.com/angular-architects/module-federation-plugin/blob/main/libs/native-federation/README.md

Angular Elements

Angular elements are Angular components packaged as custom elements (also called Web Components), a web standard for defining new HTML elements in a framework-agnostic way

Pure ESM package

https://gist.github.com/sindresorhus/a39789f98801d908bbc7ff3ecc99d99c

Angular CLI

https://angular.dev/cli

dynamic import

https://medium.com/unalai/%E8%AA%8D%E8%AD%98-dynamic-import-3a6f75da2fc9
https://developer.mozilla.org/en-US/docs/Web/JavaScript/Reference/Operators/import

Angular lazy loading

https://angular.dev/guide/ngmodules/lazy-loading

Write tools

ASCII tree
markdown table generator, convert table cell contains multiple lines of code to markdown text, see What's new in angular 17 for details

本文讲解一下如何在Angular项目中使用router

路由配置(NgModule based apps)

创建一个Angular项目

1
ng new angular-router

在创建过程中,Angular CLI会询问是否使用router,选择Yes

创建三个组件。

使用WebStorm或者VSCode打开上面创建的项目,呼出Terminal,执行以下命令。

1
2
3
ng generate component home
ng generate component product
ng generate component about

然后打开app-routing.module.ts文件,创建路由。注意,path不能以/开头。

1
2
3
4
5
6
7
8
9
10
11
12
13
14
15
16
17
18
19
20
21
// app-routing.module.ts
import {NgModule} from '@angular/core';
import {RouterModule, Routes} from '@angular/router';
import {HomeComponent} from "./home/home.component";
import {ProductComponent} from "./product/product.component";
import {AboutComponent} from "./about/about.component";

// Add Routes here
const routes: Routes = [
{path: '', redirectTo: 'home', pathMatch: 'full'},
{path: 'home', component: HomeComponent},
{path: 'product', component: ProductComponent},
{path: 'about', component: AboutComponent}
];

@NgModule({
imports: [RouterModule.forRoot(routes)],
exports: [RouterModule]
})
export class AppRoutingModule {
}

添加导航链接

打开app.component.html文件,添加导航链接。注意,routerLink的值要和path一致。如果是根路由,可以使用/。文档末尾的router-outlet是用来显示路由对应的组件的。当点击某一个链接的时候,Angular会找到对应的组件,并将其加载到router-outlet中。所以router-outlet相当于一个占位符,与html中的slot类似。

1
2
3
4
5
6
7
8
9
<h1>Angular Router Demo</h1>
<nav>
<ul>
<li><a routerLink="/home">Home</a></li>
<li><a routerLink="/product">Product</a></li>
<li><a routerLink="/about">About</a></li>
</ul>
</nav>
<router-outlet></router-outlet>

运行项目

Terminal中执行以下命令。打开浏览器,输入http://localhost:4200,就可以看到导航链接了。依次点击页面上的Home,Product,About链接,可以看到页面跳转了,并且浏览器中的地址也发生了变化。

1
ng serve

基于ROUTES的路由配置

ROUTES是Angular内置的一个Injection Token,在一些比较老的Angular app中,也有使用ROUTES来配置路由的,现举例如下:

1
2
3
4
5
6
7
8
9
10
11
12
13
14
15
16
17
18
19
20
21
22
23
24
25
26
27
28
@NgModule({
declarations: [
AppComponent,
ProductComponent,
ParentComponent,
ChildComponent,
HomeComponent,
AboutComponent,
],
imports: [
BrowserModule,
RouterModule.forRoot([]), // This line is must!
],
providers: [
{
provide: ROUTES,
useFactory: () => [
{path: 'home', component: HomeComponent},
{path: 'product', component: ProductComponent},
{path: 'about', component: AboutComponent}
],
multi: true, // This line is must!
},
],
bootstrap: [AppComponent]
})
export class AppModule {
}

useFactory后面跟的是一个工厂函数,这个函数我们直接返回一个路由数组。
使用这种方法后,我们就不需要路由文件app-routing.module.ts了,可以将它删除掉。

路由配置(Standalone apps)

基于standalone组件的app,路由配置稍有不同。

  1. main.ts文件中启动app时会传递appConfig进去,我们的路由配置就在这个appConfig中。
1
2
3
4
5
6
7
// main.ts
import {bootstrapApplication} from '@angular/platform-browser';
import {appConfig} from './app/app.config';
import {AppComponent} from './app/app.component';

bootstrapApplication(AppComponent, appConfig)
.catch((err) => console.error(err));
  1. app.config.ts文件中通过provideRouter函数提供路由。
1
2
3
4
5
6
7
8
9
10
// app.config.ts
import {provideRouter} from '@angular/router';
import {routes} from './app.routes';

export const appConfig: ApplicationConfig = {
providers: [
// ...
provideRouter(routes),
]
};
  1. app.routes.ts文件中定义路由。
1
2
3
4
5
6
// app.routes.ts
export const routes: Routes = [
{path: 'home', component: HomeComponent},
{path: 'product', component: ProductComponent},
{path: 'about', component: AboutComponent}
];

可见,路由的结构是十分清晰的。

添加404页面

如果我们在浏览器中随意输入一个不存在的路径,比如http://localhost:4200/abc,会发现页面是空白的。这是因为我们没有处理404页面。我们可以在app-routing.module.ts中添加一个**路径,用来匹配所有路径,然后将其重定向到一个404组件。

创建404页面组件

1
ng generate component not-found

修改404页面内容

打开not-found.component.html,输入以下内容。

1
<p>404: Not Found!</p>

添加404路由

1
2
3
4
5
6
7
// app-routing.module.ts
const routes: Routes = [
{path: 'home', component: HomeComponent},
{path: 'product', component: ProductComponent},
{path: 'about', component: AboutComponent},
{path: '**', component: NotFoundComponent}
];

此时,如果在浏览器里面输入一个不存在的路径,比如http://localhost:4200/abc,则会显示404: Not Found!

嵌套路由

如果我们想要在product组件中添加两个子路由,product-aproduct-a,可以在app-routing.module.ts中添加如下代码。

新建两个组件

1
2
ng generate component product-a
ng generate component product-b

在product页面添加router-outlet

这个router-outlet用来显示ProductA和ProductB对应的的组件。

1
2
3
<!-- product.component.html -->
<p>product works!</p>
<router-outlet></router-outlet>

添加子路由

1
2
3
4
5
6
7
8
9
10
11
12
13
14
15
const routes: Routes = [
{path: 'home', component: HomeComponent},
{
path: 'product',
// pathMatch: 'full', 注意这一句不能写!否则子路由无法匹配,会导致404!
component: ProductComponent,
children: [
{path: 'a', component: ProductAComponent},
{path: 'b', component: ProductBComponent}
]
},
{path: 'about', component: AboutComponent},
{path: 'about-me', component: AboutmeComponent},
{path: '**', component: NotFoundComponent}
];

此时,如果在浏览器中输入http://localhost:4200/product/a,会显示ProductA works!,输入http://localhost:4200/product/b,会显示ProductB works!。同时也会显示product works!,因为product.component.html中除了有<router-outlet></router-outlet>。还有<p>product works!</p>

严格匹配

上面的例子中,product的path不能使用严格匹配选项pathMath: 'full',否则子路由无法匹配,会导致404。这是为什么呢?
因为匹配子路由的时候,必须先匹配父级路由,而由于父级路由使用了pathMatch: 'full',所以无法匹配,父级路由无法匹配导致子路由的匹配无法进行,所以导致了404!

如果你非要使用pathMatch: 'full',可以如下定义路由表。

1
2
3
4
5
6
7
8
9
10
11
12
13
14
15
const routes: Routes = [
{path: 'home', component: HomeComponent},
{
path: 'product',
pathMatch: 'full',
component: ProductComponent,
},
{
path: 'product/a', component: ProductAComponent
},
{path: 'product/b', component: ProductBComponent},
{path: 'about', component: AboutComponent},
{path: 'about-me', component: AboutmeComponent},
{path: '**', component: NotFoundComponent}
];

这样就可以使用pathMatch: 'full'了。但是这么做也有一个弊端,就是a和b从逻辑上讲不再是product子路由了。而是平级路由,只不过路径中包含了字符串product而已。这会导致product页面的内容无法显示。通常父级路由都会显示一些公共信息,差异化的信息放到子路由中。如果你使用了pathMatch: 'full',则会导致父级页面内容无法显示。请酌情使用此方法。

注意,如果你使用了嵌套路由,或者lazy load, 请谨慎使用pathMatch: 'full'。详情请看这里:detail

路由拆分

如果product中的子路由越来越多,都放到一个文件中会显得很臃肿。这时候我们可以将子路由拆分到单独的文件中。将子路由定义到product组件中。

基于NgModule的路由拆分

进入product文件夹,执行以下命令。

1
2
ng generate module product-routing --flat
ng generate module product --flat

--flat选项表示不创建文件夹。

product-routing.module.ts中添加如下代码。

1
2
3
4
5
6
7
8
9
10
11
12
13
14
15
16
17
18
19
20
21
22
23
24
25
26
27
28
// product-routing.module.ts
import {NgModule} from '@angular/core';
import {CommonModule} from '@angular/common';
import {ProductBComponent} from "../product-b/product-b.component";
import {ProductAComponent} from "../product-a/product-a.component";
import {ProductComponent} from "./product.component";
import {RouterModule, Routes} from "@angular/router";

const routes: Routes = [
{
path: '', // 注意这里不能写product,因为`app-routing.module.ts`中已经定义了product路由, 并且指定了path: 'product'
component: ProductComponent,
children: [
{path: 'a', component: ProductAComponent},
{path: 'b', component: ProductBComponent}
]
}
];

@NgModule({
imports: [
CommonModule,
RouterModule.forChild(routes),
],
exports: [RouterModule]
})
export class ProductRoutingModule {
}

product.module.ts文件中添加如下代码,导入ProductRoutingModule

1
2
3
4
5
6
7
8
9
10
11
12
13
14
15
16
17
18
19
20
import {NgModule} from '@angular/core';
import {CommonModule} from '@angular/common';
import {ProductComponent} from './product.component';
import {ProductRoutingModule} from './product-routing.module';
import {ProductAComponent} from '../product-a/product-a.component';
import {ProductBComponent} from '../product-b/product-b.component';

@NgModule({
declarations: [
ProductComponent,
ProductAComponent,
ProductBComponent
],
imports: [
CommonModule,
ProductRoutingModule
]
})
export class ProductModule {
}

修改app-routing.module.ts
注意,这里必须使用loadChildren, 否则子路由无法显示。

1
2
3
4
5
// app-routing.module.ts
const routes: Routes = [
{path: 'product', loadChildren: () => import('./product/product.module').then(m => m.ProductModule)},
// ...
];

这样就可以将product中的子路由拆分到单独的文件中了。

基于Standalone组件的路由拆分

如果你的组件是standalone的,没有对应的module文件,那么可以使用如下方法拆分路由。注意loadChildren中加载的是路由文件,而不是module文件,也不是component文件。

1
2
// app.routers.ts
{path: 'product', loadChildren: () => import('./product/product.routers').then((routes) => routes.productRouters)},

在Product组件文件夹下新建路由文件product.routers.ts,添加如下代码。

1
2
3
4
5
6
7
8
9
// product.routers.ts
import {Routes} from "@angular/router";
import {ProductComponent} from "./product.component";
import {ProductDetailComponent} from "../product-detail/product-detail.component";

export const productRouters: Routes = [
{path: '', component: ProductComponent},
{path: 'product-detail', component: ProductDetailComponent},
]

注意这种方式下,点击product-detail链接时,会显示product-detail组件。product组件的内容不会显示。

如果要显示product组件的内容,需要将product-detail组件定义为product组件的子路由。如下所示。这种方式在导航时很方便,比如左侧是导航菜单,点击不同菜单显示不同的组件。对于整个页面来说,导航菜单一直显示,而右侧的内容会随着导航的变化而变化。

1
2
3
4
5
6
7
8
9
10
11
12
// product.routers.ts
import {Routes} from "@angular/router";
import {ProductComponent} from "./product.component";
import {ProductDetailComponent} from "../product-detail/product-detail.component";

export const productRouters: Routes = [
{
path: '', component: ProductComponent, children: [
{path: 'product-detail', component: ProductDetailComponent},
]
},
]

监听路由变化

如果我们想要在路由变化的时候做一些事情,比如打印路由信息,可以在app.component.ts中添加如下代码。此时会监听整个app所有路由的变化,如果只想监控某个组件的路由变化,那么可以在该组件中添监听代码。

1
2
3
4
5
6
7
// app.component.ts
constructor(private router: Router) {}
ngOnInit() {
this.router.events.subscribe((event) => {
console.log('Route:', event);
});
}

路由变化时会依次触发以下事件:

  • NavigationStart
  • RoutesRecognized
  • GuardsCheckStart
  • ChildActivationStart
  • ActivationStart
  • GuardsCheckEnd
  • ResolveStart
  • ResolveEnd
  • ActivationEnd
  • ChildActivationEnd
  • NavigationEnd

我们一般在NavigationEnd事件中做一些事情。

1
2
3
4
5
router.events.subscribe((event) => {
if (event instanceof NavigationEnd) {
// do something
}
});

注意

即使使用了skipLocationChange选项,也可以通过以上方法获取完整的路由信息,因为skipLocationChange只是不改变浏览器地址栏的URL,但是路由信息还是会变化的。

获取路由信息

如果想要获取路由对应的url,路由中的参数等信息,可以在组件中注入ActivatedRoute服务。

使用ActivatedRoute.snapshot获取路由信息

1
2
// app.routers.ts
{ path: 'product/:id', component: ProductDetailComponent },
1
2
<!-- product.component.html -->
<p>This is product: {{id}}</p>
1
2
3
4
5
6
7
8
9
10
11
12
// product-detail.component.ts
export class ProductDetailComponent implements OnInit {
id: number = -1;
constructor(private activatedRoute: ActivatedRoute) {}

ngOnInit() {
const id = this.activatedRoute.snapshot.paramMap.get('id');
if (id) {
this.id = parseInt(id);
}
}
}

使用ActivatedRoute.params订阅路由变化

1
2
3
4
5
6
7
8
9
10
11
// product-detail.component.ts
export class ProductDetailComponent implements OnInit {
id: number = -1;
constructor(private activatedRoute: ActivatedRoute) {}

ngOnInit() {
this.activatedRoute.params.subscribe((params) => {
this.id = parseInt(params.id);
});
}
}

snapshop和params的区别:

  • snapshot只会获取一次路由信息,它是静态的,获取之后就不会再变化了。
  • params会订阅路由变化,当路由变化时,会重新获取路由信息。

params和queryParams的区别:

  • params: 获取路由中的参数,比如/product/1中的1
  • queryParams: 获取路由中的查询参数,比如/product?id=1&name=zdd中的id, name
  • matrixParameters: 获取路由中的矩阵参数,比如/product;id=1;name=zdd中的id, name

queryParams和matrixParameters的区别

  • queryParams: 使用?开头,使用&分隔每组参数,比如/product?id=1&name=zdd
  • matrixParameters: 使用;开头,使用;分隔每组参数,比如/product;id=1;name=zdd
  • 两者都以=分隔键值对。

路由守卫

待整理

路由传递数据

定义Router时发送数据

1
2
3
4
5
6
// app.routers.ts
{
path: 'product',
component: ProductComponent,
data: {category: 'digital'} // send data to component
},

组件中接收数据

1
2
3
4
5
6
7
8
9
10
11
12
13
14
15
// product.component.ts
export class ProductComponent implements OnInit {
constructor(private activatedRoute: ActivatedRoute) {}
ngOnInit() {
const {category} = this.activatedRoute.snapshot.data;
console.log(category);

// or

this.activatedRoute.data.subscribe((data) => {
const {category} = data;
console.log(category);
})
}
}
1
this.router.navigate(['/product'], {state: {category: 'digital'}});

组件中接收数据

After Angular 16, must call this on constructor or you will get null, see here for detail

1
2
3
4
5
6
7
8
// product.component.ts
export class ProductComponent implements OnInit {
constructor(private router: Router) {
const state = this.router.getCurrentNavigation()?.extras.state;
const {category} = state || {category: 'none'};
console.log(category);
}
}

定义routerLink时发送数据

1
<a [routerLink]="['/product']" [state]="{category: 'digital'}">Product</a>

组件中接收数据

1
2
3
4
5
6
7
8
// product.component.ts
export class ProductComponent implements OnInit {
constructor(private router: Router) {
const state = this.router.getCurrentNavigation()?.extras.state;
const {category} = state || {category: 'none'};
console.log(category);
}
}

保持Fragment不丢失

Url中#后面紧跟的内容为Fragment,比如http://localhost:4200/book#b123中的b123就是Fragment

首先在Component中定义Fragment变量

1
2
3
export class AppComponent implements OnInit {
bookId = 'b123';
}

在routerLink中添加Fragment

1
<a [routerLink]="['book', {}]" [fragment]="bookId">Book</a>

在navigate中添加Fragment

1
this.router.navigate(['book'], {fragment: this.bookId});

激活后路由为:http://localhost:4200/book#b123

保持Fragment不变

当我们从一个带Fragment的路由跳转到其他路由时(比如辅助路由),Fragment会丢失。如果我们想要保持Fragment不变,可以在navigate中添加preserveFragment选项。

1
this.router.navigate([{outlets: {primary: 'book/book1/book2', detail: 'book-detail'}}, {preserveFragment: true}]);

此时路由变为:http://localhost:4200/book(detail:book-detail//list:book-list)#b123 - 注意Fragment在url末尾。

注意关闭辅助路由时,也要添加此选项,否则Fragment仍会丢失。

1
this.router.navigate([{outlets: {list: null}}], {preserveFragment: true}); 

此时路由变为:http://localhost:4200/book(detail:book-detail)#b123

1
this.router.navigate([{outlets: {detail: null}}], {preserveFragment: true});

此时路由变为:http://localhost:4200/book#b123

路由三要素

  1. 路由对应的路径及组件 - Routes配置文件
  2. 路由显示的位置 - Outlet
  3. 路由的触发方式
    • 点击触发,比如routerLink, button等。
    • 编程触发,比如navigatenavigateByUrl等。
    • 动态加载,比如动态创建组件并加载。

待商榷:

  1. 没有module时如何拆分router文件? - 可以直接使用路由module文件,不需要组件对应的module文件。目前standalone组件无法做到路由文件的拆分,必须有module支持。

https://www.angulararchitects.io/en/blog/routing-and-lazy-loading-with-standalone-components/

Angular中如何实现嵌套路由。

需求,一个Angular App,根路由包含三个组件,home, product, aboutproduct组件下有两个子路由product-listproduct-detail。如何实现这个需求呢?

首先定义路由文件:

1
2
3
4
5
6
7
8
9
10
11
12
13
14
15
16
17
18
19
20
21
22
23
24
25
26
27
28
29
30
31
32
33
34
35
36
37
38
39
40
// app-routing.module.ts
import { NgModule } from '@angular/core';
import { Routes, RouterModule } from '@angular/router';
import { HomeComponent } from './home/home.component';
import { AboutComponent } from './about/about.component';
import { HelpComponent } from './help/help.component';
import { AbcComponent } from './home/abc/abc.component';
import { DefComponent } from './home/def/def.component';

const routes: Routes = [
{
path: 'home',
component: HomeComponent,

},
{
path: 'about',
component: AboutComponent,
},
{
path: 'product',
component: HelpComponent,
children: [
{
path: 'product-list',
component: AbcComponent,
},
{
path: 'product-detail',
component: DefComponent,
},
],
},
];

@NgModule({
imports: [RouterModule.forRoot(routes)],
exports: [RouterModule]
})
export class AppRoutingModule { }

然后在template文件中定义导航链接:

1
2
3
4
5
6
7
<!-- app.component.html -->
<nav>
<a routerLink="/home">Home</a>
<a routerLink="/about">About</a>
<a routerLink="/product">Product</a>
</nav>
<router-outlet></router-outlet>

最后在根模块中引入路由模块:

1
2
3
4
5
6
7
8
9
10
11
12
13
14
15
16
17
18
19
20
21
22
23
24
// app.component.ts
import { NgModule } from '@angular/core';
import { BrowserModule } from '@angular/platform-browser';
import { AppRoutingModule } from './app-routing.module';
import { AppComponent } from './app.component';
import { HomeComponent } from './home.component';
import { AboutComponent } from './about.component';
import { ProductComponent } from './product.component';

@NgModule({
declarations: [
AppComponent,
AboutComponent,
ProductComponent,
],
imports: [
BrowserModule,
AppRoutingModule,
],
providers: [],
bootstrap: [AppComponent],
})
export class AppModule {}

product组件的模板文件中定义子路由导航:

1
2
3
4
5
6
<!-- product.component.html -->
<nav>
<a routerLink="/product/product-list">Product List</a>
<a routerLink="/product/product-detail">Product Detail</a>
</nav>
<router-outlet></router-outlet>

策略模式

策略模式是一种行为设计模式,它定义了一系列算法,将每个算法封装到一个类中,并使它们可以相互替换。策略模式让算法独立于使用它的客户端。

现实中的例子

假设我们经营一家电影院,目前是销售淡季,我们推出了各种折扣,学生票八折,儿童票九折,VIP会员半价。我们要设计一个系统,根据不同的折扣算法计算电影票的价格。

不假思索的你可能写下了如下代码:

1
2
3
4
5
6
7
8
9
10
11
12
13
14
15
16
17
18
19
20
21
22
23
24
25
26
27
28
29
30
31
32
enum UserType {
Regular,
Student,
Child,
VIP,
}

class MovieTicket {
private ticketPrice = 100;
private userType?: UserType;

setUserType(userType: UserType) {
this.userType = userType;
}

getPrice() {
switch (this.userType) {
case UserType.Student:
return this.ticketPrice * 0.8;
case UserType.Child:
return this.ticketPrice * 0.9;
case UserType.VIP:
return this.ticketPrice * 0.5;
default:
return this.ticketPrice;
}
}
}

const ticket = new MovieTicket();
ticket.setUserType(UserType.Student);
console.log(ticket.getPrice());

我们来看看这段代码有什么问题:

  1. 违反了开闭原则。如果我们要添加新的折扣类型,比如老年人票,就需要修改MovieTicket类,违反了开闭原则。
  2. 违反了单一职责原则。MovieTicket类不仅负责计算价格,还负责判断折扣类型,违反了单一职责原则。
  3. 耦合性太高,不易维护。如果折扣算法发生变化,需要修改MovieTicket类,不易维护。
  4. 其他类如果想要使用折扣算法的话,只能复制粘贴一份,导致代码重复。

下面我们通过策略模式来重构这段代码,策略模式的精髓就是将算法和使用算法的类解耦,使得算法可以独立于使用它的类进行变化。

完整代码

1
2
3
4
5
6
7
8
9
10
11
12
13
14
15
16
17
18
19
20
21
22
23
24
25
26
27
28
29
30
31
32
33
34
35
36
37
38
39
40
41
42
interface Discount {
getDiscount(): number;
}

class StudentDiscount implements Discount {
getDiscount(): number {
return 0.8;
}
}

class ChildrenDiscount implements Discount {
getDiscount(): number {
return 0.9;
}
}

class VIPDiscount implements Discount {
getDiscount(): number {
return 0.5;
}
}

class MovieTicket {
private ticketPrice = 100;
private discount?: Discount;

setDiscount(discount: Discount) {
this.discount = discount;
}

getPrice() {
if (this.discount) {
return this.ticketPrice * this.discount.getDiscount();
}

throw new Error("No discount set");
}
}

const ticket = new MovieTicket();
ticket.setDiscount(new StudentDiscount());
console.log(ticket.getPrice());

代码解析:

  1. 首先定义一个接口Discount,它有一个getDiscount方法,返回折扣值。所有具体的折扣类都要实现这个接口。
  2. 然后定义三个具体的折扣类:StudentDiscountChildrenDiscountVIPDiscount。在每个折扣类中,我们实现了getDiscount方法,返回不同的折扣值。
  3. 最后定义一个MovieTicket类,它有一个ticketPrice属性,表示电影票的价格,还有一个discount属性,表示折扣。我们定义了一个setDiscount方法,用来设置折扣。getPrice方法用来计算折扣后的价格。

这种实现使得折扣算法和使用折扣的类解耦,使得折扣算法可以独立于使用它的类进行变化。好处如下:

  1. 便于扩展,可以很容易地添加新的折扣类。只要这个类实现了Discount接口,就可以被MovieTicket类使用。
  2. 由于折扣算法和使用折扣的类解耦,所以折扣算法可以独立于使用它的类进行变化。如果折扣算法发生变化,只需要修改折扣类即可,不需要修改使用折扣的类, 比如儿童票从9折改成8折,只需要修改ChildrenDiscount类使其返回0.8即可。
  3. 如果有其他类想使用折扣算法的话,也可以直接使用。

以上代码其实使用了依赖注入的方式,MovieTicket类依赖于Discount接口,我们通过Setter的方式将具体的折扣类注入到MovieTicket类中。

注意这里discount属性是可选的,因为我们在getPrice方法中判断了discount是否存在,如果不存在就抛出异常。这样做是为了防止忘记设置折扣而导致的错误。如果不设置为可选的话会报错:Property 'discount' has no initializer and is not definitely assigned in the constructor. 由于TypeScript配置文件默认开启了strictPropertyInitialization选项导致的。

策略模式UML图

image

  • Context:消费策略的类相当于上例中的MovieTicket类,内涵一个抽象策略类,相当于上例中的Discount接口。
  • Strategy:抽象策略类,相当于上例中的Discount接口。
  • ConcreteStrategy:具体策略类,相当于上例中的StudentDiscountChildrenDiscountVIPDiscount类。
  • execute:执行策略的方法,相当于上例中的getDiscount方法。

策略模式的应用场景

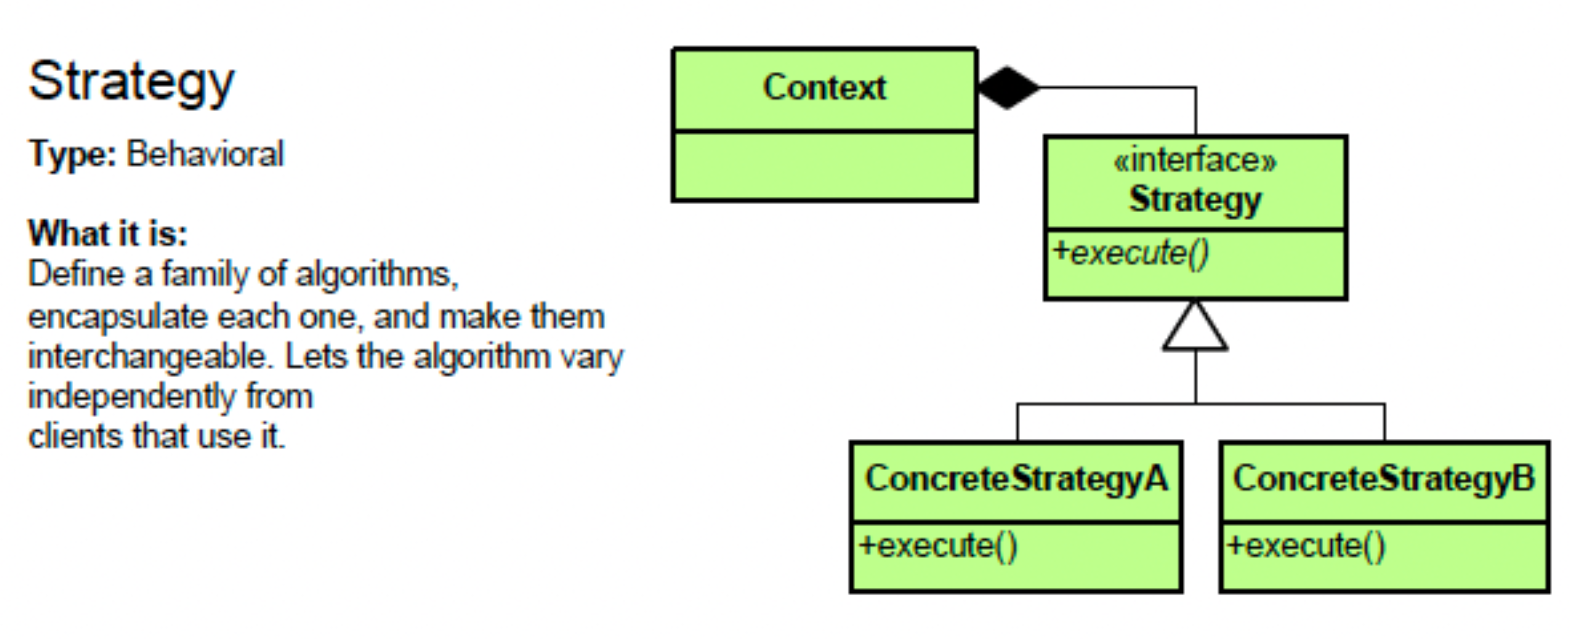
  1. Sorting Algorithms: If you have a collection of data that can be sorted in several ways, you can use the Strategy pattern to switch between sorting algorithms (like quicksort, merge sort, heap sort) at runtime.
  2. Payment Methods: In an e-commerce application, you can use the Strategy pattern to switch between different payment methods (like credit card, PayPal, Bitcoin) at runtime.
  3. Compression Algorithms: If you have a file that can be compressed using different algorithms (like zip, rar, 7z), you can use the Strategy pattern to choose the compression algorithm at runtime.
  4. Travel Planning: If you have a travel planning application, you can use the Strategy pattern to switch between different travel strategies (like by car, by train, by plane) at runtime.

ES5

strict mode

1
"use strict";

JSON

1
2
3
const obj = { a: 1, b: 2, c: 3 };
const json = JSON.stringify(obj);
console.log(json); // {"a":1,"b":2,"c":3}

New array methods:

  • forEach
  • map
  • filter
  • reduce
  • reduceRight

Property getters and setters

1
2
3
4
5
6
7
8
9
10
11
const obj = {
get a() {
return this._a;
},
set a(value) {
this._a = value;
}
};

obj.a = 1;
console.log(obj.a); // 1

Function binding: bind

1
2
3
4
function foo() {
console.log(this);
}
foo.bind({ a: 1 });

ES6(ECMAScript 2015)

ES7(ECMAScript 2016)

Array.prototype.includes

1
2
const arr = [1, 2, 3];
console.log(arr.includes(2)); // true

Exponentiation Operator

1
console.log(2 ** 3); // 8

ES8(ECMAScript 2017)

Object.values

1
2
const obj = { a: 1, b: 2, c: 3 };
console.log(Object.values(obj)); // [1, 2, 3]

Object.entries

1
2
const obj = { a: 1, b: 2, c: 3 };
console.log(Object.entries(obj)); // [["a", 1], ["b", 2], ["c", 3]]

Object.getOwnPropertyDescriptors

1
2
3
4
5
6
7
const obj = { a: 1, b: 2, c: 3 };
console.log(Object.getOwnPropertyDescriptors(obj));
// {
// a: { value: 1, writable: true, enumerable: true, configurable: true },
// b: { value: 2, writable: true, enumerable: true, configurable: true },
// c: { value: 3, writable: true, enumerable: true, configurable: true }
// }

String padding

1
2
console.log("hello".padStart(10, "123")); // 12312hello
console.log("hello".padEnd(10, "123")); // hello12312

Trailing commas in function parameter lists and calls

1
2
3
4
function foo(a, b, c,) {
console.log(a, b, c);
}
foo(1, 2, 3);

ES9(ECMAScript 2018)

Asynchronous Iteration

ES10(ECMAScript 2019)

Array.prototype.flat()

1
2
const arr = [1, 2, [3, 4, [5, 6]]];
console.log(arr.flat()); // [1, 2, 3, 4, [5, 6]]

Array.prototype.flatMap()

1
2
3
const arr = [1, 2, 3];
console.log(arr.map(x => [x * 2])); // [[2], [4], [6]]
console.log(arr.flatMap(x => [x * 2])); // [2, 4, 6]

Object.fromEntries()

1
2
3
const obj = { a: 1, b: 2, c: 3 };
console.log(Object.entries(obj)); // [["a", 1], ["b", 2], ["c", 3]]
console.log(Object.fromEntries(Object.entries(obj))); // { a: 1, b: 2, c: 3 }

String.prototype.trimStart() and String.prototype.trimEnd()

1
2
3
const str = "  hello  ";
console.log(str.trimStart()); // "hello "
console.log(str.trimEnd()); // " hello"

Optional Catch Binding

1
2
3
4
5
try {
throw new Error("error");
} catch {
console.log("caught");
}

JSON.stringify() replacer parameter

The second arguments [“a”, “b”] is a replacer array, which specifies the properties to include in the JSON string.

1
2
const obj = { a: 1, b: 2, c: 3 };
console.log(JSON.stringify(obj, ["a", "b"])); // {"a":1,"b":2}

JSON.stringify() space parameter

The third argument 2 is a space parameter, which specifies the number of spaces to use for indentation.

1
2
3
4
5
6
7
const obj = { a: 1, b: 2, c: 3 };
console.log(JSON.stringify(obj, null, 2));
// {
// "a": 1,
// "b": 2,
// "c": 3
// }

The output is {"a":1,"b":2,"c":3} without the third argument.

ES11(ECMAScript 2020)

BigInt

1
2
3
4
5
const max = Number.MAX_SAFE_INTEGER;
console.log(max); // 9007199254740991
console.log(max + 1); // 9007199254740992
console.log(max + 2); // 9007199254740992
console.log(max + 3n); // 9007199254740994n

Dynamic import

1
const module = await import('./module.js');

Optional chaining operator (?.)

1
2
const obj = { a: { b: { c: 1 } } };
console.log(obj.a?.b?.c); // 1

Nullish coalescing operator (??)

  • leftExpr ?? rightExpr, this expression will return its right-hand side operand when the left-hand side operand is null or undefined. Otherwise, it will return its left-hand side operand.
  • leftExpr || rightExpr, return true if and only if one of the operands is true. Otherwise return false.
1
2
3
4
5
6
7
8
9
const obj = { a: 0, b: "", c: null, d: undefined };
console.log(obj.a || "default"); // default
console.log(obj.b || "default"); // default
console.log(obj.c || "default"); // default
console.log(obj.d || "default"); // default
console.log(obj.a ?? "default"); // 0
console.log(obj.b ?? "default"); // ""(empty string)
console.log(obj.c ?? "default"); // default
console.log(obj.d ?? "default"); // default

Promise.allSettled()

1
2
3
4
5
6
7
8
const promise1 = new Promise((resolve, reject) => setTimeout(resolve, 1000));
const promise2 = new Promise((resolve, reject) => setTimeout(reject, 1000));
Promise.allSettled([promise1, promise2])
.then(results => console.log(results));
// [
// { status: "fulfilled", value: undefined },
// { status: "rejected", reason: undefined }
// ]

globalThis

1
console.log(globalThis);

String.prototype.matchAll()

1
2
3
4
5
6
const str = "hello world";
const regex = /\w+/g;
const matches = str.matchAll(regex);
for (const match of matches) {
console.log(match);
}

ES12(ECMAScript 2021)

Numeric separators

1
2
const num = 1_000_000;
console.log(num); // 1000000

String.prototype.replaceAll()

1
2
const str = "hello world";
console.log(str.replaceAll("o", "0")); // hell0 w0rld

Promise.any()

1
2
3
4
const promise1 = new Promise((resolve, reject) => setTimeout(reject, 1000));
const promise2 = new Promise((resolve, reject) => setTimeout(resolve, 500));
Promise.any([promise1, promise2])
.then(value => console.log(value));

WeakRef

1
2
3
4
let obj = { name: "John" };
const weakRef = new WeakRef(obj);
obj = null;
console.log(weakRef.deref()); // { name: "John" }

FinalizationRegistry

1
2
3
4
let obj = { name: "John" };
const finalizationRegistry = new FinalizationRegistry(key => console.log(key));
finalizationRegistry.register(obj, "custom key");
obj = null;

ES13(ECMAScript 2022)

Top-level await

Private instance fields, methods, and accessors

Static class fields and methods

Static class initialization blocks

Error.cause

Array, String, and TypedArray .at() method

Object.hasOwn()

The Object.hasOwn() static method returns true if the specified object has the indicated property as its own property. If the property is inherited, or does not exist, the method returns false.

1
2
3
4
const obj = { a: 1};
console.log(Object.hasOwn(obj, "a")); // true
console.log(Object.hasOwn(obj, "b")); // false
console.log(Object.hasOwn(obj, "toString")); // false

Object.hasOwn is intended as a replacement of Object.prototype.hasOwnProperty.

RegExp match /d flag

References:

Prefer const over let and var

Bad

1
2
3
4
var array = [1, 2, 3];
for (let num of array) {
console.log(num);
}

Good

1
2
3
4
const array = [1, 2, 3];
for (const num of array) {
console.log(num);
}

Note, If you access array by index, you can’t use const:

1
2
3
4
const array = [1, 2, 3];
for (let i = 0; i < array.length; i++) {
console.log(array[i]);
}

在JavaScript中,apply, call, bind是三个非常重要的方法,它们的一个重要作用是在调用函数时改变this的值。注意:箭头函数的this值无法修改。

  1. Function.prototype.apply()
  2. Function.prototype.call()
  3. Function.prototype.bind()

apply

假设我们有一个函数用来计算两数之和:

1
2
3
function add(a, b) {
return a + b;
}

我们可以正常调用这个函数:

1
add(1, 2); // 3

也可以使用apply方法来调用这个函数,第一个参数是this的值,第二个参数是一个数组,数组中的元素是函数的参数。这里我们不需要this,所以第一个参数传入null

1
add.apply(null, [1, 2]); // 3

call

call方法和apply方法类似,只是参数的传递方式不同,call方法的参数是一个个传递的,而不是通过数组传递。还是以上面的求和函数为例,使用call方法调用,第一个参数是this的值,后面的参数是函数的参数。这里我们不需要this,所以第一个参数传入null

1
add.call(null, 1, 2); // 3

bind

bind的调用方式与call类似,参数也是一个一个传递的。但是与callapply直接调用函数不同,bind会创建一个新的函数并返回该函数,所以在使用bind时,我们通常会用一个变量接收bind返回的函数,再通过这个变量调用函数。

1
2
3
fn.call(thisValue, arg1, arg2, ...);
fn.apply(thisValue, [arg1, arg2, ...]);
fn.bind(thisValue)(arg1, arg2, ...);

还记得前面的例子吗?将对象方法赋值给普通函数时,this指向了全局对象,而全局对象上没有name属性,所以输出undefined

1
2
3
4
5
6
7
8
9
const person = {
name: 'Philip',
sayName() {
console.log(this.name);
},
};

const sayName = person.sayName;
sayName(); // undefined

我们只要用bind修改一下this,让它绑定到person对象,就可以输出Philip了。

1
2
3
4
5
6
7
8
9
10
const person = {
name: 'Philip',
sayName() {
console.log(this.name);
},
};

// 通过sayName接收bind返回的函数。
const sayName = person.sayName.bind(person);
sayName(); // Philip

call, apply, bind的使用场景

我们知道,函数中有一个隐含对象arguments,包含了函数调用时传入的所有参数。它是一个类数组对象,我们无法对它使用数组的方法,比如map, filter, reduce等。但是我们可以通过call, apply, bind方法将数组的方法应用到arguments上。

比如下面这个求和函数,在函数体内部,我们可以使用reduce方法来计算所有参数的和。

1
2
3
function sum() {
return Array.prototype.reduce.call(arguments, (acc, cur) => acc + cur, 0);
}

注意,上面的例子仅作演示只用,一个更加规范的写法是:

1
2
3
function sum(...args) {
return args.reduce((acc, cur) => acc + cur, 0);
}

再看一个class中使用bind的例子:

1
2
3
4
5
6
7
8
9
10
11
12
13
14
15
16
17
18
19
20
21
22
23
24
class CountDown {
count = 0;
interval = null;

constructor(count) {
this.count = count;
}

decrement() {
console.log(this.count);
this.count -= 1;
if (this.count < 0) {
console.log("Done");
clearInterval(this.interval);
}
}

start() {
this.interval = setInterval(this.decrement, 1000);
}
}

const foo = new CountDown(10);
foo.start();

上面的代码中,this.interval是一个定时器,每隔1秒调用this.decrement方法,但是setInterval这个函数比较特殊,当我们将一个函数传递给setInterval时,这个函数的this值会指向全局对象,所以this.count会输出undefined。详情请参考这里

解决方法有两种,一种是在start方法中使用bind方法,将this绑定到CountDown类。

1
2
3
start() {
this.interval = setInterval(this.decrement.bind(this), 1000);
}

另一种方法是将setInterval的回调函数改为箭头函数,因为箭头函数没有自己的this binding, 所以this指向其parent scope,也就是CountDown。个人推荐使用这种方法。

1
2
3
start() {
this.interval = setInterval(() => this.decrement(), 1000);
}

当然,也可以将decrement方法改为箭头函数,因为箭头函数没有自己的this binding, 所以this指向其parent scope,也就是CountDown

1
2
3
4
5
6
7
8
decrement = () => {
console.log(this.count);
this.count -= 1;
if (this.count < 0) {
console.log("Done");
clearInterval(this.interval);
}
}

Conclusion

  • applycall的作用是改变函数的this值,apply的参数是一个数组,call的参数是一个个传递的。这里有一个小窍门,applya开头的,数组array也是a开头的,所以apply的参数是一个数组。
  • bind传递参数的方法和call类似(这个经常被忽略),但是bind会创建一个新的函数并返回该函数,所以在使用bind时,我们通常会用一个变量接收bind返回的函数,再通过这个变量调用函数。

What is functional programming?

Functional programming is a programming paradigm that treats computation as the evaluation of mathematical functions and avoids changing state and mutable data.

Functional programming concepts

Pure functions

A function is called pure function if it returns the same result for the same arguments and has no side effects.

And here is the full definition of a pure function from WikiPedia

In computer programming, a pure function is a function that has the following properties

the function return values are identical for identical arguments (no variation with local static variables, non-local variables, mutable reference arguments or input streams, i.e., referential transparency), and
the function has no side effects (no mutation of local static variables, non-local variables, mutable reference arguments or input/output streams).

pure function

1
2
3
function add(a, b) {
return a + b;
}

non-pure function

In the following example, the calculateTax function depends on the external variable taxRate. This means that if taxRate changes, the output of calculateTax changes even if the input remains the same. Therefore, calculateTax is not a pure function.

1
2
3
4
const taxRate = 0.1;
function calculateTax(amount) {
return amount * taxRate;
}

Is the following function pure?

1
2
3
function mergeArray(arr1, arr2) {
return arr1.push(...arr2);
}

No, the function mergeArray is not pure because it modifies the arr1 array in place using the push method.

How to make the mergeArray function pure?

1
2
3
function mergeArray(arr1, arr2) {
return [...arr1, ...arr2];
}

Immutable data

In functional programming, data is immutable, which means it cannot be changed once it’s created. Instead of modifying existing data, we create new data with the desired changes.

Side effects

A function is said to have a side effect if it modifies some state or variable outside its scope.

1
2
3
4
5
6
7
8
let count = 0;

function incrementCount() {
count += 1;
}

incrementCount();
console.log(count); // Outputs: 1

In this example, the function incrementCount has a side effect because it modifies the global variable count. This is a side effect because it’s changing state outside of its own scope.

Referential transparency

A function is called referentially transparent if it can be replaced with its value without changing the program’s behavior.

1
2
3
4
function add(a, b) {
return a + b;
}
console.log(add(2, 3)); // Outputs: 5

In this example, the function add is referentially transparent because we can replace add(2, 3) with 5 without changing the program’s behavior.

First-class functions

In JavaScript, functions are first-class citizens. It means we can assign functions to variables, pass functions as arguments to other functions, and return functions from other functions.

function as variable

1
2
3
4
5
const add = function(a, b) {
return a + b;
};

console.log(add(2, 3)); // Outputs: 5

function as argument

1
2
3
4
5
6
7
8
const nums = [1, 2, 3, 4, 5];

function isEven(num) {
return num % 2 === 0;
}

const evens = nums.filter(isEven);
console.log(evens);

function as return value

1
2
3
4
5
6
7
8
function createGreeter() {
return function(name) {
return `Hello, ${name}!`;
};
}

const greet = createGreeter();
console.log(greet('John'));

Higher-order functions

A function that takes one or more functions as arguments or returns a function is called a higher-order function.
There are many functions in javascript that are higher-order functions, such as map, filter, reduce, forEach, sort, etc.

declarative vs imperative

Declarative programming is a programming paradigm that expresses the logic of a computation without describing its control flow. In contrast, imperative programming is a programming paradigm that uses statements that change a program’s state.

Example:
Given an array of numbers, multiply all even numbers by 10 and return the sum of them.

Imperative way:

1
2
3
4
5
6
7
8
9
10
const numbers = [1, 2, 3, 4, 5, 6];

let sum = 0;
for (let i = 0; i < numbers.length; i++) {
if (numbers[i] % 2 === 0) {
sum += numbers[i] * 10;
}
}

console.log(sum); // 60

Declarative way:

1
2
3
4
5
6
7
8
const numbers = [1, 2, 3, 4, 5, 6];

const sum = numbers
.filter(num => num % 2 === 0)
.map(num => num * 10)
.reduce((acc, num) => acc + num, 0);

console.log(sum); // 60

Benefits of functional programming

  • Easy to test
  • Easy to run in parallel(concurrency)
  • Easy to cache

References

Wikipedia