0%

Dependency injection(DI) - 是Angular的核心概念之一 is a design pattern that allows us to remove the hard-coded dependencies and make our application loosely coupled, maintainable, and testable. It is a way to achieve Inversion of Control (IoC) in our application.

DI is widely used in Angular, React, and other modern frameworks. In Angular, we can inject services, components, and other dependencies into our components, services, and directives.

Some terms:

  • Dependency 依赖
  • Injector 注入器
  • Registry 注册中心
  • DI - Dependency Injection
  • IoC - Inversion of Control

Ways to implement DI:

  • Constructor Injection
  • Setter Injection
  • Interface Injection

Angular Dependency Injection

Angular通过一个叫做Injector(注入器)的服务来实现DI。注入器相当于依赖的生产者和依赖的消费者之间的桥梁。Angular会在启动时创建一个应用级别的注入器(也叫root injector),当然也会创建其他的injector(如果需要的话)。

当需要一个依赖时,Angular首先会检查其注册中心是否有这个依赖,如果有则直接返回,如果没有则会根据依赖的类型创建一个实例并返回。同时将其加入到注册中心中,以便下次使用。

在依赖注入中有两个主要的角色,一个是依赖的生产者,比如用来获取后台数据的Service,一个是依赖的消费者,比如使用这个ServiceComponent。而Injector就是这两者之间的桥梁。有了Injector,依赖生产者和依赖消费者之间便实现了解耦。

Inversion of control

控制反转 - 到底怎么个反转呢?
在没有依赖注入之前,对象自己管理自己的依赖。

1
2
3
4
5
6
class Car {
private engine: Engine;
constructor() {
this.engine = new Engine(); // 直接创建依赖
}
}

有了依赖注入之后,对象不在负责依赖的管理,而是交给Angular框架来管理,把管理依赖的职责由对象转移到外层框架,依赖的查找、注入都由框架负责,这就是控制反转。

1
2
3
4
5
6
7
8
@Component({
selector: 'app-car',
template: '...',
providers: [Engine] // 依赖配置在外部, 如果依赖有{provideIn: 'root'},则不需要配置这里
})
class CarComponent {
constructor(private engine: Engine) {} // 依赖由 Angular 注入
}

Provide a dependency

在Angular中,有三种方式提供一个依赖。

provideIn

创建依赖

1
2
3
4
@Injectable({
providedIn: 'root'
})
class HeroService {}

使用依赖

1
constructor(private heroService: HeroService) {}

使用provideIn:'root'方式提供的依赖有如下特点:

  1. 该依赖是全局共享的的,只有一个实例。
  2. 所有组件、指令、服务等都可以使用该依赖。
  3. 支持tree shaking, 如果该依赖没有被使用,则不会被打包到最终的bundle中。

providers

创建依赖

1
2
@Injectable() // <--- 注意这里没有provideIn
class HeroService {}

使用依赖

1
2
3
4
@NgModule({
providers: [HeroService]
})
class AppModule {}

使用providers方式提供的依赖有如下特点:

  1. 每个使用该依赖的模块对应的实例都会创建一个该依赖的实例。
  2. 该依赖是局部的,只有在提供了providers的模块中才能使用。
  3. 不支持tree shaking, 无论是否使用,都会被打包到最终的bundle中。
  4. 此依赖实例的生命周期和组件相同,当组件销毁时,该依赖实例也销毁。

注意,如果当前组件引入了一个依赖,比如一个Service,那么这个依赖:

  • 在当前模块可用
  • 在当前模块的模板中的所有组件中也可用

举个例子:当前组件是ProductComponent,其模板中引用了ProductDetailComponent。ProductComponent引入了一个ProductService,那么:

ApplicationConfig

创建依赖

1
2
@Injectable() // <--- 注意这里没有provideIn
class HeroService {}

使用依赖

1
2
3
4
5
6
export const appConfig: ApplicationConfig = {
providers: [
{ provide: HeroService },
]
};
bootstrapApplication(AppComponent, appConfig)

使用ApplicationConfig方式提供的依赖有如下特点:

  1. 该依赖是全局共享的的,只有一个实例。
  2. 所有组件、指令、服务等都可以使用该依赖。
  3. 不支持tree shaking, 无论是否使用,都会被打包到最终的bundle中。

此方式与providedIn: 'root'颇为相似,不同的是这种方式不支持tree shaking。

NgModule based configuration

创建依赖

1
2
@Injectable() // <--- 注意这里没有provideIn
class HeroService {}

使用依赖

1
2
3
4
@NgModule({
providers: [HeroService]
})
class AppModule {}

A service provided in a module is available to all declarations of the module, or to any other modules which share the same ModuleInjector. To understand all edge-cases, see Hierarchical injectors.

Pros of DI:

  • Loose coupling
  • Easy to test
  • Easy to maintain

references:

JavaScript Tricks

1. typeof null === 'object'. This is a known bug in JavaScript.

2. typeof NaN === 'number'. But, this is true.

3. ... perform a shallow copy(only the first level is copied by value, other levels is copied by reference).

1
2
3
4
5
6
7
8
const arr = [1, 2, [3, 4]];
const newArr = [...arr];

newArr[1] = 3;
console.log(arr); // [1, 2, [3, 4]]

newArr[2][0] = 5;
console.log(arr); // [1, 2, [5, 4]]

4. There is no pass by reference in JavaScript, only pass by value.

5. In JavaScript, everything is object - this is not true.

6. type print or window.print in Browser console, you will get a print dialog.

7. |0 can be used to remove the fractional part of a number.

It has the same effect as Math.floor().

1
2
3
const num = 3.14;
console.log(num | 0); // 3
console.log(Math.floor(num)); // 3

8. !! can be used to convert a value to a boolean.

1
2
3
const a = 1;
console.log(!!a); // true
console.log(!!0); // false

9. How to quit node.js REPL?

1
> .exit
1
> process.exit()

Jest useFakeTimer

Jest’s useFakeTimers function is used to mock timers in JavaScript. This is particularly useful when you have code that uses setTimeout, setInterval, or Date objects, and you want to control the passage of time in your tests.

Basic Usage

To use Jest’s useFakeTimers function, you need to call it before the code you want to test. You can then advance the timers using the advanceTimersByTime function.

Advance Timers

待测试代码:

1
2
3
4
5
6
7
somethingDone = false;

doSomethingAfter1Second() {
setTimeout(() => {
this.somethingDone = true;
}, 1000);
}

测试代码:

1
2
3
4
5
6
7
8
9
10
it('test doSomethingAfter1Second', () => {
jest.useFakeTimers();

const component = new Component();
component.doSomethingAfter1Second();
expect(component.somethingDone).toBe(false);

jest.advanceTimersByTime(1000);
expect(component.somethingDone).toBe(true);
});

Run all timers

Jest.runAllTimers() will run all pending timers. This is useful when you have multiple timers that need to be run in sequence. (Note, it will not work for nested timers)

待测试代码:

1
2
3
4
5
6
7
8
9
10
11
12
13
somethingDone = false;

doSomethingAfter1Second() {
setTimeout(() => {
this.somethingDone = true;
}, 1000);

setTimeout(() => {
this.somethingDone = false;
}, 2000);

// other timers...
}

测试代码:

1
2
3
4
5
6
it('test doSomethingAfter1Second', () => {
jest.useFakeTimers();
component.doSomethingAfter1Second();
jest.runAllTimers();
expect(component.somethingDone).toBe(false);
});

Run only pending timers

There are also scenarios where you might have a recursive timer – that is a timer that sets a new timer in its own callback.

Jest.runOnlyPendingTimers() will only run the timers that are currently pending. This is useful when you want to run the timers that are currently in the queue, but not the ones that are scheduled to run in the future.

If you use jest.runAllTimers here, it will run all the timers and end up with an infinite loop.

待测试代码:

1
2
3
4
5
6
7
8
9
10
11
12
13
firstRound = false;
secondRound = false;

infiniteTimerGame() {
setTimeout(() => {
this.firstRound = true;
// Schedule the next game in 10 seconds
setTimeout(() => {
this.secondRound = true;
this.infiniteTimerGame();
}, 10000);
}, 1000);
}

测试代码:

1
2
3
4
5
6
7
8
9
10
11
it('test infiniteTimerGame', () => {
jest.useFakeTimers();
component.infiniteTimerGame();
// This will only run the timers that are currently pending(the outer timer)
jest.runOnlyPendingTimers();
expect(component.firstRound).toBe(true);

// or jest.runOnlyPendingTimers(); This will run the newly created timer
jest.advanceTimersByTime(10000);
expect(component.secondRound).toBe(true);
});

Selective faking

Sometimes your code may require to avoid overwriting the original implementation of one or another API. If that is the case, you can use doNotFake option. For example, here is how you could provide a custom mock function for performance.mark() in jsdom environment:

1
2
3
4
5
6
7
8
const mockPerformanceMark = jest.fn();
window.performance.mark = mockPerformanceMark;

test('allows mocking `performance.mark()`', () => {
jest.useFakeTimers({doNotFake: ['performance']});

expect(window.performance.mark).toBe(mockPerformanceMark);
});

Restore timers

After you have finished testing, you should restore the original timers using jest.useRealTimers(), This can be done by invoking jest.useRealTimers() in the afterEach hook.

1
2
3
afterEach(() => {
jest.useRealTimers();
});

You can also do this at the end of a test:

1
2
3
4
5
6
7
8
9
10
11
12
it('test doSomethingAfter1Second', () => {
jest.useFakeTimers();

const component = new Component();
component.doSomethingAfter1Second();
expect(component.somethingDone).toBe(false);

jest.advanceTimersByTime(1000);
expect(component.somethingDone).toBe(true);

jest.useRealTimers(); // restore to use real timers
});

现实的例子

现实生活中适配器的例子,比如笔记本电脑的电源适配器,可以将 220V 电压转换为笔记本电脑需要的 12V 电压。在软件设计模式中,适配器模式也是类似的,它可以将一个类的接口转换为另一个类的接口,让原本由于接口不兼容而不能一起工作的类可以一起工作。

适配器模式解决什么问题

接口不兼容问题:当一个类的接口与另一个类的接口不兼容时,可以使用适配器模式将一个类的接口转换为另一个类的接口。比如新开发的系统要接入旧系统的某些功能时,就可以使用适配器模式。

示例讲解

有一个类Target,它有一个operation方法,但是现在需要将使用一个类AdapteespecificOperation方法。此时可以借助Adapter模式,我们创建一个类Adapter,继承Target类,并持有一个Adaptee类的实例。在Adapter类的operation方法中,调用AdapteespecificOperation方法。

UML

完整代码

1
2
3
4
5
6
7
8
9
10
11
12
13
14
15
16
17
18
19
20
21
22
23
24
25
26
27
28
29
30
31
32
33
34
35
36
class Target {
public operation() {
console.log(`Target: The default operation.`);
}
}

class Adaptee {
public specificOperation() {
console.log("Adaptee: Specific operation.");
}
}

class Adapter extends Target {
private adaptee: Adaptee;

constructor(adaptee: Adaptee) {
super();
this.adaptee = adaptee;
}

public operation() {
this.adaptee.specificOperation();
}
}

// test code
function clientCode(target: Target) {
target.operation();
}

const target = new Target();
clientCode(target);

const adaptee = new Adaptee();
const adapter = new Adapter(adaptee);
clientCode(adapter);

Creational Design Patterns

Factory Method

Define an interface for creating an object, but let subclasses decide which class to instantiate. Lets a class defer instantiation to subclasses.

Abstract Factory

Provides an interface for creating families of related or dependent objects without specifying their concrete class.

Builder

Separate the construction of a complex object from its representing so that the same construction process can create different representations.

Prototype

Specify the kinds of objects to create using a prototypical instance, and create new objects by copying this prototype.

Singleton

Ensure a class only has one instance and provide a global point of access to it. implementation

Application scenarios:

  1. Logging: Singleton can be used to create a single log object that writes to a log file. This object can be used across the application without creating additional instances.

  2. Database Connections: Singleton can be used to create a single database connection that is shared across the application. This can help to prevent an over-allocation of resources.

  3. Configuration Settings: If your application has a set of configuration settings that need to be accessed in multiple places, a Singleton can be used to store these settings in one location.

  4. Caching: Singleton can be used to create a cache that is accessible throughout the application. This can be useful for storing data that is expensive or time-consuming to fetch.

  5. Shared Resource Access: If your application needs to control access to a shared resource, such as a printer or a file, you can use a Singleton to ensure that only one object is able to access the resource at a time.

Structural Design Patterns
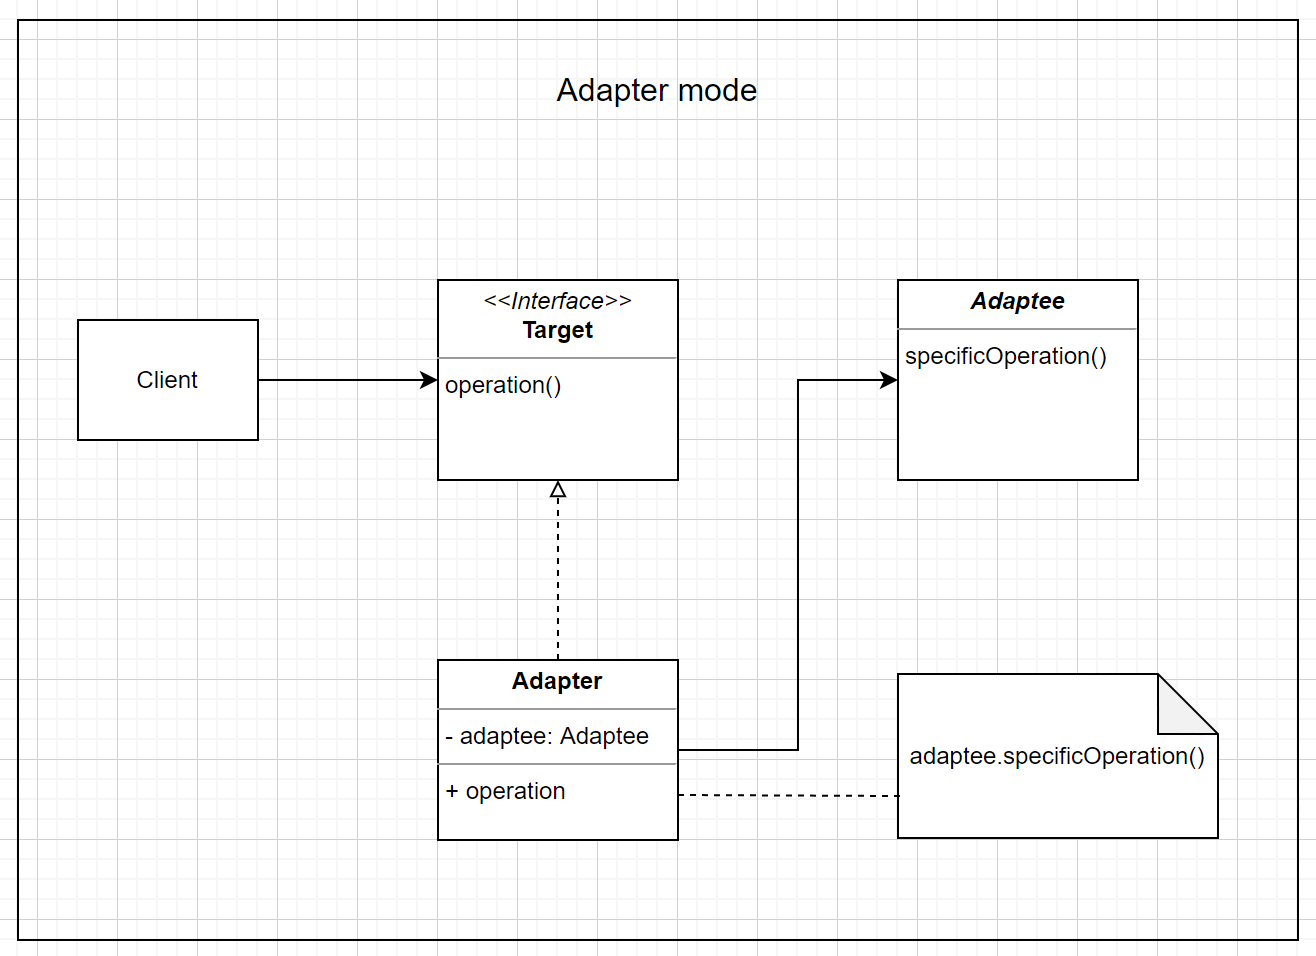
Adapter

Convert the interface of a class into another interface clients expect. Lets classes work together that couldn’t otherwise because of incompatible interfaces. implementation

Bridge

Decouple an abstraction from its implementation so that the two can vary independently.

Composite

Compose objects into tree structures to represent part-whole hierarchies. Lets clients treat individual objects and compositions of objects uniformly.

Decorator

Attach additional responsibilities to an object dynamically. Provide a flexible alternative to extending functionality.

Facade

Provide unified interface to a set of interfaces in a subsystem. Defines a high-level interface that makes the subsystem easier to use.

Flyweight

Using sharing to support large numbers of fine grained objects efficiently.

Proxy

Provide a surrogate or placeholder for another object to control access to it.

Behavioral Design Patterns

Chain of Responsibility

Avoid coupling the sender of a request to its receiver by giving more than one object a chance to handle the request. Chian the receiving objects and pass the request along the chain until an object handles it.

Command

Encapsulate a request as an object, thereby letting you parameterize clients with queues, queue or log requests, ans support undoable operations.

Interpreter

Given a language, define a representation for its grammar along with an interpreter that uses the representation to interpret sentences in the language.

Iterator

Provide a way to access the elements of an aggregate object sequentially without exposing its underlying representation.

Mediator

Define an object that encapsulates how a set of objects interact. Promotes loose coupling by keeping objects from referring to each other explicitly, and it lets you vary their interaction independently.

Memento

Without violating encapsulation, capture and externalize an object’s internal state so that the object can be restored to this state later.

Observer

Define a one-to-many dependency between objects so that when on object changes state, all its dependents are notified and updated automatically.(Also known as Publish/Subscribe or Event-Subscriber pattern)
implementation

Application scenarios

  1. Event Handling: This is the most common use case in JavaScript. DOM events like clicks, key presses, form submissions etc., are handled using the Observer pattern.

  2. Model-View-Controller (MVC) Architecture: In MVC architecture, the model notifies the view and the controller about changes in the data. This is done using the Observer pattern.

  3. Web Sockets: Web sockets use the Observer pattern to listen for new messages from the server and update the UI accordingly.

  4. React/Redux: In Redux, the store is the subject and the React components are the observers. When the state in the store changes, the components are notified to re-render.

  5. Angular: Angular uses the Observer pattern in its event system and its HTTP module.

State

Allow an object to alter its behavior when its internal state changes. The object will appear to change its class.

Strategy

Define a family of algorithms, encapsulate each one, and make them interchangeable. Lets the algorithm vary independently from clients that use it. implementation

Template Method

Define the skeleton of an algorithm in an operation, deferring some steps to subclasses. Lets subclasses redefine certain steps of an algorithm without changing the algorithm’s structure.

Visitor

Represent an operation to be performed on the elements of an object structure. Lets ou define a new operation without changing the classes of the elements on which it operates.

This in javascript

在JavaScript中,this是一个非常重要的概念,它代表了函数或方法执行时所处的上下文,this的值取决于函数的调用方式,而不是定义的位置,所以this是在运行时确定的。(箭头函数另议)

this的值

概括来说,this的值受以下因素影响

函数或方法的调用方式

作为普通函数调用

当函数做为普通函数调用时,this指向全局对象,此时又分为严格模式和非严格模式。

  • 严格模式:this的值为undefined
  • 非严格模式:浏览器中为window对象,Node.js中为global对象。

以下代码,在Browser环境运行时,输出window对象,在Node.js环境运行时,输出global对象。

1
2
3
4
5
function globalFunction() {
console.log(this);
}

globalFunction(); // window or global

而以下代码在浏览器和Node.js中则都输出undefined

1
2
3
4
5
6
'use strict';
function globalFunction() {
console.log(this);
}

globalFunction(); // undefined

作为对象方法调用

当函数作为对象的方法调用时,this指向调用该方法的对象。

1
2
3
4
5
6
7
8
const person = {
name: 'Philip',
sayName() {
console.log(this.name);
}
}

person.sayName(); // Philip

需要注意的是,如果将对象方法赋值给普通函数,那么调用普通函数时,this将指向全局对象。
下面的代码,虽然person.sayName是对象方法,但是它被赋值给了普通函数sayName,所以this指向全局对象。但是全局对象上没有name属性,所以无论是Browser环境还是Node.js环境,都输出undefined

1
2
3
4
5
6
7
8
9
10
11
const person = {
name: 'Philip',
sayName() {
console.log(this.name);
}
}

const sayName = person.sayName;
// or const sayName = person['sayName'];
// or const {sayName} = person;
sayName(); // undefined

作为构造函数调用

当函数作为构造函数调用时,this指向新创建的对象。(除非构造函数返回了另外一个对象),在JS中如果函数的首字母大写,表示这是一个构造函数。

1
2
3
4
5
function Person(name) {
this.name = name;
}
const person = new Person('zdd');
console.log(person.name); // zdd

使用原型链定义的构造函数也一样

1
2
3
4
5
6
7
8
function Person(name) {
this.name = name;
}
Person.prototype.sayName = function () {
console.log(this.name);
}
const person = new Person('Philip');
person.sayName(); // 输出:Philip,此时 this 指向 person 实例

需要注意:使用原型链定义函数时,不要用箭头函数,因为箭头没有自己的this绑定,而是继承其parent的this,下面代码中,this指向全局对象,会导致name值为undefined。

1
2
3
4
5
6
Person.prototype.sayName = () => {
console.log(this.name);
};

const john = new Person('Philip');
john.sayName(); // 输出:undefined,此时 this 指向全局对象

如果构造函数返回了一个对象,那么this指向这个返回的对象,而不是新创建的对象。

1
2
3
4
5
6
7
8
function Foo() {
this.name = 'Philip';

return {age: 18};
}

const foo = new Foo();
console.log(foo.name); // undefined

在这里,this指向了返回的对象{age: 18},而不是新创建的对象foo。而新创建的对象上没有name属性,所以输出undefined

函数类型

普通函数

上面已经讲过,不再赘述。

箭头函数

与普通函数不同,箭头函数没有自己的this绑定(注意,不是没有this),箭头函数的this继承自它的父级作用域this(定义时就确定了), 所以箭头函数的this是在定义时确定的,而不是在运行时确定的。
以下代码中,sayName是一个箭头函数,它的this继承自它的父级this,也就是全局对象,而全局对象上没有name属性,所以输出undefined

1
2
3
4
5
6
7
8
const person = {
name: 'Philip',
sayName: () => {
console.log(this.name);
},
};

person.sayName(); // undefined

箭头函数的this继承自它的父级作用域this,这里的父级作用域必须是函数或者全局作用域,不能是对象。比如下面的代码:arrowFunction输出undefined。因为outer是对象,并不是它的父级作用域,所以this指向全局对象。

1
2
3
4
5
6
7
8
9
10
11
12
13
14
15
const outer = {
name: 'outer',
inner: {
name: 'inner',
regularFunction() {
console.log(this.name); // 'inner'
},
arrowFunction: () => {
console.log(this.name); // undefined
},
},
};

outer.inner.regularFunction(); // inner
outer.inner.arrowFunction(); // undefined

思考题1:下面代码输出什么?

1
2
3
4
5
6
7
8
9
10
11
12
13
14
15
function outer() {
this.name = 'outer';

this.inner = function () {
this.name = 'inner';
return {
printName() {
console.log(this.name);
},
};
};
}

const outerObj = new outer();
outerObj.inner().printName();

答案:undefined, 原因:

  1. inner function最终返回一个对象,对象中的printName是一个对象方法。
  2. 返回的对象上没有name属性,所以输出undefined

思考题2:下面代码输出什么?

1
2
3
4
5
6
7
8
9
10
11
12
13
function outer() {
this.name = 'outer';
this.inner = function () {
this.name = 'inner';
return {
printName: () => {
console.log(this.name);
},
};
};
}
const outerObj = new outer();
outerObj.inner().printName();

答案:inner, 因为printName是一个箭头函数,它的this继承自它的父级this,也就是inner函数的this,所以输出inner

你可以使用bind, call, apply来调用箭头函数,但是这些方法无法改变箭头函数的this值,因为箭头函数的this值是在定义时确定的。

1
2
3
4
5
6
7
8
9
10
11
const globalObject = this;
const foo = () => this;
const obj = {name: 'Philip'};
console.log(foo() === globalObject); // true

//bind
const boundFoo = foo.bind(obj);
console.log(boundFoo() === globalObject); // true

console.log(foo.call(obj) === globalObject); // true
console.log(foo.apply(obj) === globalObject); // true

Arrow functions create a closure over the this value of its surrounding scope, which means arrow functions behave if they are “auto-bound” — no matter how it’s invoked, this is bound to what it was when the function was created (the example above, the global object). The same applies to arrow functions created inside other functions: their thremains that of the enclosing lexical context.

箭头函数与普通函数this的区别

函数类型 this指向 this确定时机 是否可以更改this
普通函数 取决于调用情况 运行时确定 可以
箭头函数 取决于父级this 定义时确定 不可以

运行环境

由上面的代码可知,Browser环境与Node.js环境,this的值也不同。

模块类型

CommonJS模块

在CommonJS模块中,top-level this的值为空对象{}。以下代码在输出{}。(可以在Node.js中新建test.js文件,然后运行如下代码)

1
console.log(this);

ES6模块

在ES6模块中,top level this的值为undefined。以下代码在输出undefined。(可以在Node.js中新建test.mjs文件,然后运行如下代码)

1
console.log(this); // undefined

注意,下面这个this不是top level this, 因为它位于函数内部,所以它指向全局对象global.

1
2
3
4
5
function foo() {
console.log(this); // global this.
}

foo(); // undefined

Strict mode

我们以上的讨论都是基于非strict mode下,在严格模式下,全局this的值为undefined。注意strict mode并不影响对象方法及构造函数调用,只影响普通函数调用。

1
2
3
4
5
6
7
'use strict';

function test() {
console.log(this); // undefined
}

test();

globalThis

无论在哪个环境,都可以使用globalThis来获取全局对象。

1
console.log(globalThis);

global this vs globalThis

In Node.js, the this keyword inside a module (a file) refers to the current module's exports, not the global object. This is because each file in Node.js is treated as a separate module and has its own scope.
On the other hand, globalThis is a standard built-in object in JavaScript that always refers to the global object, regardless of where it is called. In the case of Node.js, globalThis refers to the global object which is global
看以下代码

1
console.log(this === globalThis); // true in browser, false in Node.js
1
2
console.log(this); // window in browser, {}(empty object) in Node.js, undefined in ES module
console.log(globalThis); // window in browser, global object in Node.js

DOM中的this

DOM事件处理函数中的this指向绑定事件的元素。以下示例以Chrome浏览器为准。
输出myButton,原因是this指向了绑定事件的元素。

1
2
3
<body>
<button id="myButton" onclick="alert(this.id)">OK</button>
</body>

下面的代码同样输出myButton,原因是this指向了绑定事件的元素。

1
2
3
4
5
6
7
<button id="myButton">OK</button>
<script>
const myButton = document.getElementById("myButton");
myButton.addEventListener("click", function () {
alert(this.id);
});
</script>

下面的代码输出undefined. 因为onButtonClick是普通函数,所以this指向了全局对象。

1
2
3
4
5
6
7
8
<body>
<button id="myButton" onclick="onButtonClick()">OK</button>
<script>
function onButtonClick() {
alert(this.id);
}
</script>
</body>

在实际代码中,我们一般不这样使用this,而是通过event.target来获取元素。

1
2
3
4
5
6
<button id="myButton">OK</button>
<script>
const myButton = document.getElementById("myButton");
myButton.addEventListener("click", function (event) {
alert(event.target.id);
});

也可以使用箭头函数:

1
2
3
4
5
6
7
8
9
<body>
<button id="myButton">OK</button>
<script>
const myButton = document.getElementById("myButton");
myButton.addEventListener("click", (event) => {
alert(event.target.id);
});
</script>
</body>

class中的this,注意super。

手动改变this的值

JS中call, apply, bind这三个函数都可以改变this的值。详情请看这里

总结:

  1. 普通函数调用,this指向全局对象,在浏览器环境下,严格模式this是undefined, 非严格模式下,是 window对象。

  2. 通过对象调用函数,this指向调用函数的对象,如果是链式调用,则指向离函数最近的对象。(如果将对象方法赋值给普通函数,那么遵循第一条)

  3. 调用构造函数时,this指向新创建的对象。

  4. 通过apply/call/bind调用的函数,this指向apply/call/bind绑定的对象,也即第一个参数。

    注意,bind 与apply/call的区别,bind会重新创建一个函数。

  5. 箭头函数中的this,指向箭头函数所在的上下文环境,比如包含箭头函数的函数或者全局上下文。

Global this

  • global context - Outside of any functions or classes(may be defined as an block or arrow functions in global scope)
  • global scope - In a programming environment, the global scope is the scope that contains, and is visible in, all other scopes.
    In client-side JavaScript, the global scope is generally the web page inside which all the code is being executed.
  • global object - A global object is an object that exists in global scope.
    • Browser - window
    • Node.js - global
    • Worker - self
  • globalThis - The global property allow one to access the global object regardless of the current environment.

总结

最后我们用一个表格总结一下本文的内容:

  1. strict mode只影响普通函数调用,不影响对象方法及构造函数调用。

    Mode non-strict mode strict mode
    Environment Browser Node.js Browser Node.js
    this in regular function window global object undefined undefined
  2. top level this

    Environment Browser Node.js ES6 Module
    Top level this window {} undefined

Promise被reject时,then方法会执行吗?

promise.protyto.then什么时候会执行?我的印象里只有promise状态为fullfilled时才会执行,其实是不对的,promise状态为reject时,同样可以执行then方法。

先来看一个最常见的场景,我们在写代码时都是thencatch配合使用的。

1
2
3
4
5
6
7
8
9
10
11
12
13
const fetchData = async () => {
return new Promise((resolve, reject) => {
setTimeout(() => {
resolve('success in fetchData');
}, 100);
});
};

fetchData().then((data) => {
console.log(data);
}).catch((error) => {
console.log(error);
});

上面的代码中,我们在fetchData中使用setTimeout模拟了一个异步操作,100ms后resolve,这时then中的回调函数会被执行,打印出success in fetchData

同理,假设100ms后reject这个promise,那么会打印出: error in fetchData

1
2
3
4
5
6
7
8
9
10
11
12
13
const fetchData = async () => {
return new Promise((resolve, reject) => {
setTimeout(() => {
reject('error in fetchData');
}, 100);
});
};

fetchData().then((data) => {
console.log(data);
}).catch((error) => {
console.log(error);
});

在常规使用中,我们只给then传了一个方法作为参数,但是then其实可以接受两个参数的。如果我们传递了第二个参数,那么当promise状态为reject时,第二个参数对应的方法会被执行。

1
2
then(onFulfilled)
then(onFulfilled, onRejected)

所以,修改一下上面的代码,我们可以这样写:

1
2
3
4
5
6
7
8
9
10
11
12
13
const fetchData = async () => {
return new Promise((resolve, reject) => {
setTimeout(() => {
reject('error in fetchData');
}, 100);
});
};

fetchData().then((data) => {
console.log(data);
}, (error) => {
console.log(error);
});

这样,当promise状态为reject时,第二个参数对应的方法会被执行,打印出error in fetchData。这和使用catch的效果是一样的。

那么如果我们既传递了then中的第二个参数onRejected又使用了catch,结果会怎样呢?我们来看一下:

1
2
3
4
5
6
7
8
9
10
11
12
13
14
15
const fetchData = async () => {
return new Promise((resolve, reject) => {
setTimeout(() => {
reject('error in fetchData');
}, 100);
});
};

fetchData().then((data) => {
console.log(data);
}, (error) => {
console.log(error);
}).catch((error) => {
console.log('catch:', error);
});

此时打印出的结果是error in fetchData,因为then中的第二个参数会优先被执行,catch不会被执行。

Promise.then中抛出的异常会被catch捕获吗?

Promise.then中抛出的异常会被catch捕获吗?我们来看一个例子:

1
2
3
4
5
6
7
8
9
10
11
12
13
14
const fetchData = async () => {
return new Promise((resolve, reject) => {
setTimeout(() => {
resolve('success in fetchData');
}, 100);
});
};

fetchData().then((data) => {
console.log(data);
throw new Error('error in then');
}).catch((error) => {
console.log(error);
});

then中,我们抛出了一个异常,这个异常会被catch捕获吗?答案是会的,打印出Error: error in then

javascript destruction

1. Object destruction

1
2
3
4
5
6
7
8
9
10
11
12
13
14
const response = {
code: 200,
status: 'success',
data: {
name: 'zdd',
age: 18
}
}

const { code, status, data: { name, age } } = response;
console.log(code); // 200
console.log(status); // "success"
console.log(name); // "zdd"
console.log(age); // 18

2. String destruction

1
2
3
const [a, b, c, d, e] = 'hello';
console.log(a); // "h"
console.log(b); // "e"

3. rename on destruction

1
2
3
4
5
6
const person = {
name: 'zdd',
age: 18
}
const { name: myName } = person;
console.log(myName); // "zdd"

4. default value on destruction

1
2
3
4
5
6
7
8
9
const person = {
name: 'zdd',
age: 18,
};

const { name, age = 20, gender = 'male' } = person;
console.log(name); // 'zdd'
console.log(age); // 18
console.log(gender); // 'male'

Note: Each destructed property can have a default value if and only if the property is not present or its value is undefined.

1
2
3
4
5
6
7
8
9
10
const person = {
name: 'zdd',
age: 18,
address: null
};

const { name, address = 'Dalian', gender = 'male' } = person;
console.log(name); // zdd
console.log(address); // null
console.log(gender); // male

In the above code, address is present in the person object, but its value is null, so the default value Dalian is not used.

如果解构中的属性值为null,则无法进行嵌套解构,会报错。

1
2
3
4
5
6
7
8
9
const person = {
name: 'zdd',
address: null
};

const { name, address: { city = 'Dalian', street = 'Jiefang Road' } = {} } = person;
console.log(name); // zdd
console.log(city); // Cannot read properties of null (reading 'city')
console.log(street); // Cannot read properties of null (reading 'street')

注意,以上代码会报错,虽然我们给了address一个默认值{},但是address的原始值是null,所以默认值无法生效,这导致了citystreet的解构报错。(相当于在null值中读取citystreet

要想解决这个问题,只能将嵌套解构变为二次解构。

1
2
3
4
5
6
7
8
9
10
const person = {
name: 'zdd',
address: null
};

const { name, address = {} } = person;
const { city = 'Dalian', street = 'Jiefang Road' } = address || {};
console.log(name); // zdd
console.log(city); // Dalian
console.log(street); // Jiefang Road

第一次解构后,address的值为null,所以我们给address一个默认值{},然后再次解构citystreet,这样就不会报错了。

5. rename and default value at the same time

1
2
3
4
5
6
7
8
9
const person = {
name: 'zdd',
age: 18,
};

const { name: myName, age: myAge = 20, gender: myGender = 'male'} = person;
console.log(myName); // 'zdd'
console.log(myAge); // 18
console.log(myGender); // 'male'

6. Array destruction

1
2
3
4
5
const nums = [1, 2, 3];
const [a, b, c] = nums;
console.log(a); // 1
console.log(b); // 2
console.log(c); // 3

数组解构与对象解构不同,不需要指定属性名,只需要按照顺序解构即可。

1
2
3
4
const colors = ['red', 'green', 'blue'];
const [firstColor, secondColor] = colors;
console.log(firstColor); // 'red'
console.log(secondColor); // 'green'

7. get element at specific position

The following code get the color at the third position, ignore the first two colors.

1
2
3
const colors = ['red', 'green', 'blue'];
const [, , thirdColor] = colors;
console.log(thirdColor); // 'blue'

8. ignore some elements

Get all elements in array except the first two.

1
2
3
const colors = ['red', 'green', 'blue', 'yellow'];
const [, , ...restColors] = colors;
console.log(restColors); // ['blue', 'yellow']

注意:数组解构中,不定元素必须放在最后,如果不定元素后面还有其他元素,会报错。

1
2
const colors = ['red', 'green', 'blue', 'yellow'];
const [...restColors, lastColor] = colors; // SyntaxError: Rest element must be last element

9. Copy array

ES5

1
2
3
const colors = ['red', 'green', 'blue'];
const newColors = colors.slice(); // or colors.concat();
console.log(newColors); // ['red', 'green', 'blue']

ES6

1
2
3
const colors = ['red', 'green', 'blue'];
const [...newColors] = colors;
console.log(newColors); // ['red', 'green', 'blue']

9. swap two variables

Before ES6, we must introduce a temporary variable to swap two variables. But with destruction, we can swap two variables easily.

1
2
3
4
5
let a = 1;
let b = 2;
[a, b] = [b, a];
console.log(a); // 2
console.log(b); // 1

10. Nested array destruction

1
2
3
4
5
6
const nums = [1, [2, 3], 4];
const [a, [b, c], d] = nums;
console.log(a); // 1
console.log(b); // 2
console.log(c); // 3
console.log(d); // 4

JavaScript Promise Reject

See the following code, what’s the output?

1
2
3
4
5
6
7
8
9
10
11
12
13
14
15
16
17
18
19
20
21
22
23
24
25
26
27
28
29
30
31
function handleResponse(response) {
return new Promise((resolve, reject) => {
if (response.code !== 200) {
console.log('rejected!');
reject(response.code);
}

const {
data: { token },
} = response;
if (token) {
console.log('resolved!');
resolve(token);
}
});
}

const response = {
code: 201,
data: {
token: '123455',
},
};

handleResponse(response)
.then((res) => {
console.log(res);
})
.catch((err) => {
console.log(err);
});

The output is:

1
2
3
rejected!
resolved!
201

Why?

reject or resolve will not terminate the execution of the promise, it will continue to execute subsequent code.

To solve this problem, you can add a return statement after reject(response.code).

1
2
3
4
5
6
7
8
9
10
11
12
13
14
15
16
17
function handleResponse(response) {
return new Promise((resolve, reject) => {
if (response.code !== 200) {
console.log('rejected!');
return reject(response.code); // return reject here.
// return; // or return here.
}

const {
data: { token },
} = response;
if (token) {
console.log('resolved!');
resolve(token);
}
});
}

Or use the else statement to make the exclusive execution.

1
2
3
4
5
6
7
8
9
10
11
12
13
14
15
16
function handleResponse(response) {
return new Promise((resolve, reject) => {
if (response.code !== 200) {
console.log('rejected!');
reject(response.code);
} else {
const {
data: { token },
} = response;
if (token) {
console.log('resolved!');
resolve(token);
}
}
});
}

Then we got the correct output as:

1
2
rejected!
201

conclusion

  • reject or returnwill not terminate the execution of the promise, it will continue to execute subsequent code.

Three ways to solve this problem:

  1. return resolved(xxx) or return reject(xxx), the return value will be ignored, so we can save a line then way 2.
  2. Add a return statement after reject(response.code).
  3. Use the if/else statement to make the exclusive execution.

webstorm-tips

Conflict between prettier and eslint

[ESlint] delete cr (prettier/prettier)

Resolution: put the following config in your .eslintrc.js under project root.

1
2
3
4
5
6
7
8
9
rules: {
...
'prettier/prettier': [
'error',
{
'endOfLine': 'auto' // This line will remove the warning
}
]
},