0%

Dost it make sense to return undefined in else branch?

Today, I noticed a code snippet during code review, it looks like this:

1
2
3
4
5
6
7
const getUserInfo(user: User) {
if (user.isActive) {
return user.info;
} else {
return undefined;
}
}

The code is trying to get the user info, if the user is active, it will return the user info, otherwise, it will return undefined. But does it make sense to return undefined in the else branch? In JavaScript, if a function does not return anything, it implicitly returns undefined. So, the above code can be refactored to:

1
2
3
4
5
const getUserInfo(user: User) {
if (user.isActive) {
return user.info;
}
}

Similarly to the following code.

1
2
3
4
5
6
7
8
9
const fetchData = async () => {
try {
const data = await fetch('https://api.example.com/data');
return data.json();
} catch (error) {
console.error(error);
return undefined;
}
};

Which can be simplified to:

1
2
3
4
5
6
7
8
const fetchData = async () => {
try {
const data = await fetch('https://api.example.com/data');
return data.json();
} catch (error) {
console.error(error);
}
};

What’s the difference of the following two code snippets?
first code snippet.

1
2
3
4
5
6
7
8
9
10
11
12
13
14
15
16
17
const handler = () => {
console.log("handler executed...");
};

const fetchData = async () =>
new Promise((resolve) => {
setTimeout(() => {
resolve("success in fetchData");
}, 100);
});

fetchData()
.then(handler)
.catch((error) => {
console.log(error);
});

second code snippet.

1
2
3
4
5
6
7
8
9
10
11
12
13
14
15
16
const handler = () => {
console.log("handler executed...");
};

const fetchData = async () =>
new Promise((resolve, reject) => {
setTimeout(() => {
reject("error in fetchData");
}, 100);
});

fetchData()
.catch((error) => {
console.log(error);
})
.then(handler);

The first code snippet is xxx.then().catch() while the second code snippet is xxx.catch().then(), since promise.catch also return a promise, so handler in the second code snippet will always be executed. But in the first code snippet, the handler will not be executed.

outputs:

first code snippet.

1
error in fetchData

second code snippet.

1
2
error in fetchData
handler executed...

点击清除(Clear)按钮时,表单竟然提交了!

今天在编写 Angular + Material Design 表单时,遇到一个奇怪的问题:点击清除按钮时,表单竟然被提交了!

表单结构非常简单:

  • 用户名和密码输入框
  • 提交按钮(Submit)
  • 清除按钮(Clear)

但点击清除按钮时,触发了意外的表单提交行为。
button-default-submit

代码如下:

1
2
3
4
5
6
7
8
9
10
11
12
13
14
15
16
17
18
19
20
21
22
23
24
25
26
27
28
29
30
31
<!DOCTYPE html>
<html lang="en">
<head>
<meta charset="UTF-8" />
<title>Title</title>
</head>
<body>
<form onsubmit="onSubmit()">
<label for="username">Username:</label>
<input id="username" name="username" type="text" />
<label for="password">Password:</label>
<input id="password" name="password" type="password" />
<button type="submit">Submit</button> <!-- submit -->
<button onclick="clear()">Clear</button> <!-- clear input -->
</form>

<script>
function onSubmit() {
const username = document.getElementById("username").value;
const password = document.getElementById("password").value;
console.log("username:", username);
console.log("password:", password);
}

function clear() {
document.getElementById("username").value = "";
document.getElementById("password").value = "";
}
</script>
</body>
</html>

原因分析

后来仔细查阅MDN文档发现,form表单中button的默认type是submit,而我的代码中没有为清除按钮指定button的type,所以点击清除按钮时,同时触发了清除和提交两个操作。

form中button的三种类型

  • submit:默认值,点击按钮时提交表单。
  • reset:点击按钮时重置表单中的所有字段。
  • button:点击按钮时不执行任何操作,这种类型的button需要用户自己添加事件处理函数。

解决办法

方法一

为清除按钮指定type为button,这样点击清除按钮时就不会触发表单提交了。

1
<button type="button" onclick="clear()">Clear</button>

方法二

为清除按钮指定type为reset,这样做的好处是:1. 语义更清晰,2. 不需添加额外的事件处理函数。

1
<button type="reset">Clear</button>

参考

关于form中button的更多细节,请参考MDN

Introduction

In this article, we will learn how to dynamically load a component in Angular, In addition to load a component in html template directly, you can also load a component dynamically with NgComponentOutlet or ViewContainerRef

NgComponentOutlet

NgComponentOutlet is a directive that provide a declarative way for dynamic component creation, it requires a component type as input and create an instance of the component in the view.

1
*ngComponentOutlet="componentType"

Here are the code snippets to dynamically load a component with NgComponentOutlet:

1
2
<!-- app.component.html -->
<ng-container *ngComponentOutlet="getComponent()"></ng-container>
1
2
3
4
5
6
7
8
9
10
11
12
13
14
15
16
17
18
19
20
21
// app.component.ts
import { Component } from '@angular/core';
import {NgComponentOutlet} from "@angular/common";
import {ProductComponent} from "./product/product.component";
import {CustomerComponent} from "./customer/customer.component";

@Component({
selector: 'app-root',
standalone: true,
imports: [NgComponentOutlet],
templateUrl: './app.component.html',
styleUrl: './app.component.css'
})
export class AppComponent {
showProduct = true;

// We return the component type by condition.
getComponent() {
return this.showProduct? ProductComponent: CustomerComponent;
}
}

Question:
What’s the difference between *ngComponentOutlet and *ngIf* in this case? *ngIf can also load the component by condition.

ViewContainerRef

ViewContainerRef is a class that represents a container where one or more views can be attached to a component. It provides methods to create components and attach them to the container.

1
2
3
4
5
6
7
8
9
10
11
12
13
14
15
16
17
18
19
20
21
22
23
24
25
import {Component, OnInit, ViewContainerRef} from '@angular/core';
import {ProductComponent} from "./product/product.component";
import {NgComponentOutlet} from "@angular/common";
import {CustomerComponent} from "./customer/customer.component";

@Component({
selector: 'app-root',
standalone: true,
imports: [NgComponentOutlet],
templateUrl: './app.component.html',
styleUrl: './app.component.css'
})
export class AppComponent implements OnInit {
showProduct = true;
constructor(private viewContainerRef: ViewContainerRef) {
}

ngOnInit() {
this.viewContainerRef.createComponent(this.getComponent());
}

getComponent() {
return this.showProduct? ProductComponent: CustomerComponent;
}
}

The above code will create the component instance as the sibling node of the host element(the component where ViewContainerRef was declared).

Lazy load component

You can also lazy load a component with ViewContainerRef.

1
2
3
<!-- app.component.html -->
<p>app works</p>
<button (click)="lazyLoadComponent()">Lazy load component</button>
1
2
3
4
5
6
7
8
9
10
11
12
13
14
15
16
17
18
19
20
21
22
23
24
25
26
27
28
29
30
31
32
// app.component.ts
import {Component, ViewContainerRef} from '@angular/core';
import {NgComponentOutlet} from "@angular/common";

@Component({
selector: 'app-root',
standalone: true,
imports: [NgComponentOutlet],
templateUrl: './app.component.html',
styleUrl: './app.component.css'
})
export class AppComponent {
showProduct = false;
constructor(private viewContainerRef: ViewContainerRef) {
}

async lazyLoadComponent() {
this.viewContainerRef.clear(); // avoid loading multiple components
const component = await this.getComponent();
this.viewContainerRef.createComponent(component);
}

async getComponent() {
if (this.showProduct) {
const {ProductComponent} = await import('./product/product.component');
return ProductComponent;
} else {
const {CustomerComponent} = await import('./customer/customer.component');
return CustomerComponent;
}
}
}

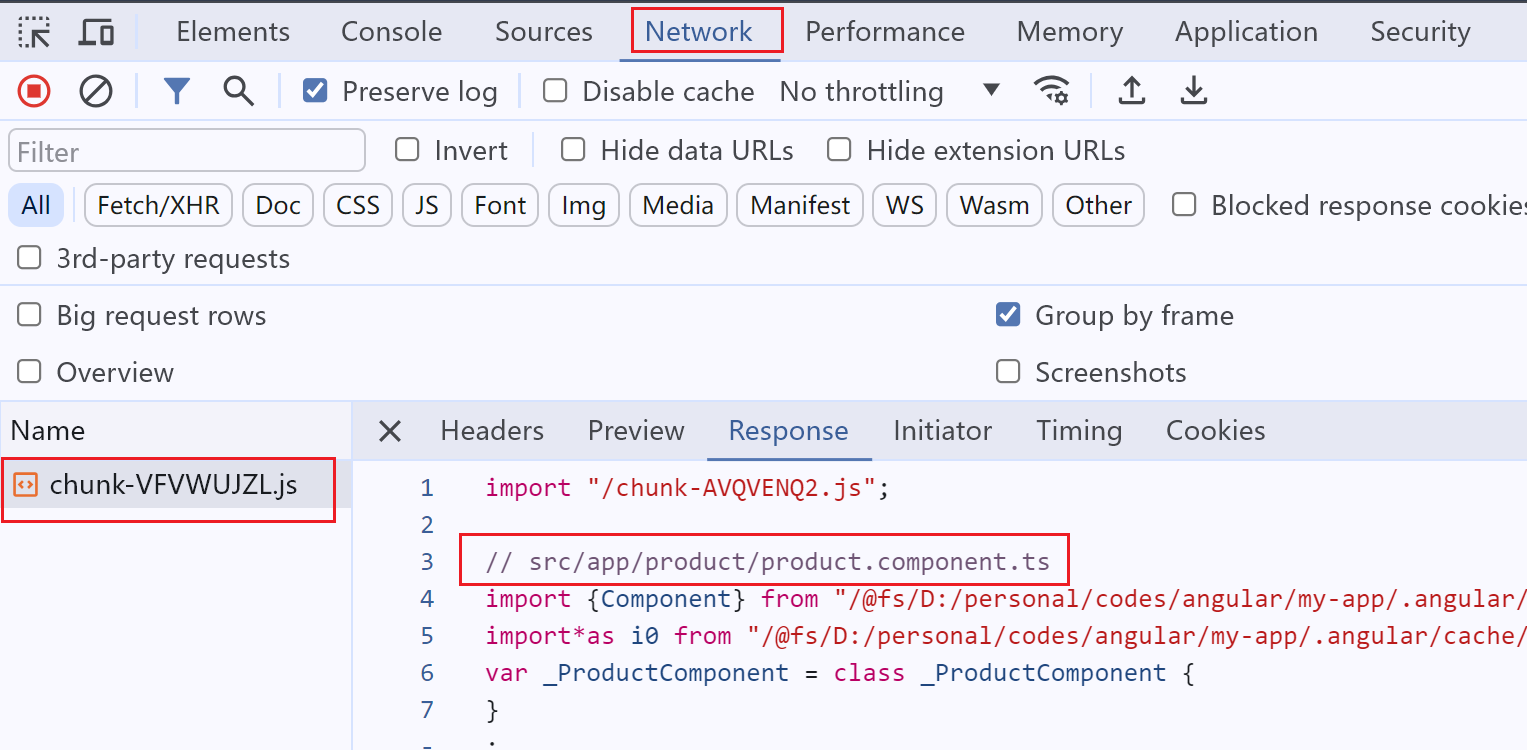
Explanation: The above code decides which component should be loaded when the user clicks the button, based on the showProduct variable. After running the program, press F12 to open the developer tools, and observe the Network tab. You can see that after clicking the Lazy load component button, the app initiates a request to dynamically load the Product component.

angular-lazy-load-component

The component was bundled separately with name chunk-VFVWUJZL.js to support lazy load, if you want to see the real name of the chunk file, you can add namedChunk to your angular.json file.

1
2
3
4
5
6
7
8
9
10
11
"architect": {
"build": {
"builder": "@angular-devkit/build-angular:application",
"options": {
"outputPath": "dist/my-app",
"index": "src/index.html",
// ...
"namedChunks": true // <-- here
},
}
}

In this way the chunk file will got a name like product.component-RGAR2EGQ.js

Finally, the getComponent method can be optimized to avoid duplicate code, but it seems that the readability is not very good after optimization. What do you think?

优化后的代码:

1
2
3
4
5
async getComponent() {
const component = this.showProduct ? 'ProductComponent' : 'CustomerComponent';
const result = await import(`./${component.toLowerCase()}/${component}.component`);
return result[component];
}

References

[1] programmatic-rendering

Introduction

In this post, we’ll discuss how to upgrade Angular to the latest version.

Steps

Suppose the current Angular version is 16.0.0, and the latest version is 17.0.0. Here are the steps to upgrade Angular to the latest version:

Update Node.js

First, make sure you have the latest version of Node.js installed on your machine. You can download the latest version from the official Node.js website.

Update Angular core/cli

Navigate to your Angular project root directory and run the following command to update Angular CLI to the latest version:

1
ng update @angular/core@16 @angular/cli@16

Update Angular Material/CDK

If your project use Angular Material or Angular CDK, you can update them to the latest version by running the following command:

1
ng update @angular/material@16 @angular/cdk@16

Update 3rd-party libraries

If your project uses any 3rd-party libraries, make sure to update them to the latest compatible version with Angular 17.

  • Jest
  • Cypress

References

[1] Angular Update Guide

Introduction

In this article, we will learn how to use ChangeDetectionStrategy.OnPush in Angular to improve the performance of your application. By default, Angular uses ChangeDetectionStrategy.Default, which means that the change detection runs every time an event is triggered in the application. This can be inefficient if your application has a lot of components that don’t need to be updated every time an event is triggered. By using ChangeDetectionStrategy.OnPush, you can tell Angular to only run change detection on a component when its input properties change. with onPush strategy, Angular will only trigger change detection in the following cases:

  • When component’s input property changes
  • When an event is triggered in the component
  • When you manually trigger change detection
  • 注意:这里好像还有一条是async pipe,但是我找不到文档了,以后找到再补充吧。

Example

Take a look at the product component below, it has an input property name, and an event handler which changes the price of the product. We have set the changeDetection property to ChangeDetectionStrategy.OnPush in the component’s metadata.

1
2
3
4
<!-- product.component.html -->
<button (click)="changePrice(10)">Change price</button>
<p>Product Name: {{name}}</p>
<p>Product Price: {{price}}</p>
1
2
3
4
5
6
7
8
9
10
11
12
13
14
15
16
17
18
19
20
21
22
23
24
25
26
27
28
29
30
31
32
33
34
@Component({
selector: 'app-product',
standalone: true,
imports: [],
templateUrl: './product.component.html',
styleUrl: './product.component.css',
changeDetection: ChangeDetectionStrategy.OnPush
})
export class ProductComponent implements OnInit, DoCheck, OnChanges {
@Input() name: string;
price: number;

constructor() {
this.name = '';
this.price = 0;
}

// `ngDoCheck()` will called each time change detection run
ngDoCheck() {
console.log('change detection triggered...')
}

// This will not trigger change detection
ngOnInit() {
setTimeout(() => {
this.price = 20;
}, 1000);
}

// click handler, will trigger change detection.
changePrice(price: number) {
this.price = price;
}
}
  1. When parent component change the input property name, Angular will trigger change detection in the product component. and console will output change detection triggered...
  2. When user click button to change the price, Angular will trigger change detection in the product component. and console will output change detection triggered...
  3. setTimeout function will not trigger change detection in the product component.

Change Detection with OnPush Diagram

See here for details.

Do I need OnPush strategy if component has no @Input bindings?

Yes, OnPush still make sense even if the component has no @Input bindings.

  1. With OnPush, change detection still triggers when an event is triggered in the component.
  2. With OnPush, you prevent the change detection running automatically when the parent component changes.
  3. With OnPush, you can manually trigger change detection when needed with ChangeDetectorRef.detectChanges(), or ChangeDetectorRef.markForCheck().

OnPush + signal is the future of Angular.

References:

  1. https://angular.dev/best-practices/skipping-subtrees
  2. https://v17.angular.io/guide/change-detection-skipping-subtrees

Angular builders负责构建,测试和运行Angular项目。Angular CLI使用builders来执行这些任务。以下是@angular-devkit/build-angular一些常见的builders:

Name Description
application Build an Angular application targeting a browser and server environment using esbuild.
app-shell Build an Angular App shell.
browser Build an Angular application targeting a browser environment using Webpack.
browser-esbuild Build an Angular application targeting a browser environment using esbuild.
dev-server A development server that provides live reloading.
extract-i18n Extract i18n messages from an Angular application.
karma Execute unit tests using Karma test runner.
ng-packagr Build and package an Angular library in Angular Package Format (APF) format using ng-packagr.
prerender Prerender pages of your application. Prerendering is the process where a dynamic page is processed at build time generating static HTML.
server Build an Angular application targeting a Node.js environment.
ssr-dev-server A development server which offers live reload during development, but uses server-side rendering.
protractor Deprecated - Run end-to-end tests using Protractor framework.

Builders的源码位于Angular CLI项目中。

  • application: packages/angular/build/src/builders/application/index.ts
  • browser: packages/angular_devkit/build_angular/src/builders/browser/index.ts
  • browser-esbuild: packages/angular_devkit/build_angular/src/builders/browser-esbuild/index.ts
  • dev-server
    • ESBuild + Vite: packages/angular/build/src/builders/dev-server/index.ts
    • Webpack: packages/angular_devkit/build_angular/src/builders/dev-server/index.ts

Introduction

The angular.json file under the root of an Angular workspace provides workspace-wide and project-specific configuration defaults. It is used by the Angular CLI to build, test, and run Angular projects.

Path values given in the configuration are relative to the root of workspace directory.

Schema

You can find the schema file of angular.json from here: ./node_modules/@angular/cli/lib/config/schema.json

Configuration of angular.json

Turn on chunk named

1
2
3
4
5
6
7
8
9
10
11
12
13
{
"projects": {
"my-project": {
"architect": {
"build": {
"options": {
"namedChunks": true
}
}
}
}
}
}

Named chunk is useful for lazy loading component, you can see which chunk was loaded from the network tab in Chrome.

Turn on source map

1
2
3
4
5
6
7
8
9
10
11
12
13
14
15
{
"projects": {
"my-project": {
"architect": {
"build": {
"configurations": {
"production": {
"sourceMap": true
}
}
}
}
}
}
}

Source map is useful for debugging, it will generate a source map file for each JavaScript file. For example, main.xxx.js will have a main.xxx.js.map file when source map was on.

Turn off optimization

1
2
3
4
5
6
7
8
9
10
11
12
13
14
15
16
17
18
19
{
"projects": {
"my-project": {
"architect": {
"build": {
"configurations": {
"production": {
"optimization": {
"scripts": true,
"styles": false,
"fonts": false
}
}
}
}
}
}
}
}

This option is useful when you want to debug the production build, with above option, it will not minify the scripts, but styles and fonts are still minified.

References

https://angular.dev/reference/configs/workspace-config

这篇文章讨论一下在 Angular/Nx 项目中 tsconfig.json 是如何工作的,本文使用的环境如下:

  • Node: 20.11.0(node -v)
  • NPM: 10.2.4(npm -v)
  • Angular CLI: 17.3.7(ng version)
  • Typescript: 5.4.2(in package.json —by project, or tsc -v —globally)
  • Nx: 15.2.1(nx --version)

1. 什么是 tsconfig.json

tsconfig.json 是 TypeScript 的配置文件,用于配置 TypeScript 编译器的行为。目前很多框架都使用Typescript,自然也就需要配置 tsconfig.json 文件。

2. Angular Single Project

Angular框架原生支持Typescript,所以在Angular项目中,使用Angular CLI创建Angular项目后,项目的文件结构如下:

1
2
3
4
5
6
7
8
9
10
11
12
my-app/
├─ node_modules/
├─ src/
│ ├─ index.html
│ ├─ main.ts
│ ├─ ...
├─ angular.json
├─ package.json
├─ tsconfig.app.json
├─ tsconfig.json
├─ tsconfig.spec.json
├─ ...

与tsconfig相关的文件有如下三个:

  • tsconfig.json
  • tsconfig.app.json
  • tsconfig.spec.json

2.1 tsconfig.json

先看一下 tsconfig.json 文件,这是该项目总的配置文件,用来做一些通用配置,其他tsconfig文件可以继承这个文件。

1
2
3
4
5
6
7
8
9
10
11
12
13
14
15
16
17
18
19
20
21
22
23
24
25
26
27
28
29
30
31
32
/* To learn more about this file see: https://angular.io/config/tsconfig. */
{
"compileOnSave": false,
"compilerOptions": {
"outDir": "./dist/out-tsc",
"strict": true,
"noImplicitOverride": true,
"noPropertyAccessFromIndexSignature": true,
"noImplicitReturns": true,
"noFallthroughCasesInSwitch": true,
"skipLibCheck": true,
"esModuleInterop": true,
"sourceMap": true,
"declaration": false,
"experimentalDecorators": true,
"moduleResolution": "node",
"importHelpers": true,
"target": "ES2022",
"module": "ES2022",
"useDefineForClassFields": false,
"lib": [
"ES2022",
"dom"
]
},
"angularCompilerOptions": {
"enableI18nLegacyMessageIdFormat": false,
"strictInjectionParameters": true,
"strictInputAccessModifiers": true,
"strictTemplates": true
}
}

2.2 tsconfig.app.json

tsconfig.app.json 文件是 Angular app的编译配置文件,由第一行"extends": "./tsconfig.json"可知,它继承了 tsconfig.json 文件的配置,同时也可以覆盖 tsconfig.json 文件的配置。

  • files:
  • include: "src/**/*.d.ts" 表示包含所有位于src目录下的Typescript类型定义文件(*.d.ts)
1
2
3
4
5
6
7
8
9
10
11
12
13
14
/* To learn more about this file see: https://angular.io/config/tsconfig. */
{
"extends": "./tsconfig.json",
"compilerOptions": {
"outDir": "./out-tsc/app",
"types": []
},
"files": [
"src/main.ts"
],
"include": [
"src/**/*.d.ts"
]
}

2.3 tsconfig.spec.json

tsconfig.spec.json 文件是 Angular app的测试配置文件,由第一行"extends": "./tsconfig.json"可知,它也继承了 tsconfig.json 文件。在include选项中,包含了所有的测试文件(.spec.ts)和类型定义文件(.d.ts)。

1
2
3
4
5
6
7
8
9
10
11
12
13
14
/* To learn more about this file see: https://angular.io/config/tsconfig. */
{
"extends": "./tsconfig.json",
"compilerOptions": {
"outDir": "./out-tsc/spec",
"types": [
"jasmine"
]
},
"include": [
"src/**/*.spec.ts",
"src/**/*.d.ts"
]
}

如果你尝试将src/**/*.spec.tsinclude选项中删除,再运行npm run test,将会遇到如下错误。

1
An unhandled exception occurred: error TS18003: No inputs were found in config file '.../my-app/tsconfig.spec.json'. Specified 'include' paths were '["src/**/*.d.ts"]' and 'exclude' paths were '["./out-tsc/spec"]'

由上面的分析可知,Angular项目中的 tsconfig.json 文件是一个全局配置文件,tsconfig.app.json掌管app的编译选项,tsconfig.spec.json负责测试文件的配置,这两者分别继承了 tsconfig.json 文件,同时可以做一些个性化的配置。

那么tsconfig.app.jsontsconfig.spec.json文件是如何被使用的呢?这就需要分析另一个文件:angular.json

2.4 angular.json

可以看到在projects | my-app | architect | build | options中,有一个tsConfig选项,这个选项指定了tsconfig.app.json文件的路径,这就是告诉Angular CLI在编译app时要使用tsconfig.app.json文件。

同时,在projects | my-app | architect | test | options中,有一个tsConfig选项,这个选项指定了tsconfig.spec.json文件的路径,这就是告诉Angular CLI在编译测试文件时要使用tsconfig.spec.json文件。

1
2
3
4
5
6
7
8
9
10
11
12
13
14
15
16
17
18
19
20
21
22
23
24
25
{
"$schema": "./node_modules/@angular/cli/lib/config/schema.json",
"version": 1,
"newProjectRoot": "projects",
"projects": {
"my-app": {
"projectType": "application",
"architect": {
"build": {
"builder": "@angular-devkit/build-angular:application",
"tsConfig": "tsconfig.app.json", // 1 <-- here
//...
}
},
// ...
"test": {
"builder": "@angular-devkit/build-angular:karma",
"options": {
"polyfills": [
"zone.js",
"zone.js/testing"
],
"tsConfig": "tsconfig.spec.json", // 2 <-- here
// ...
}

总结一下:

  • tsconfig.json 是全局配置文件
  • tsconfig.app.json 是app的编译配置文件,继承了tsconfig.json文件。
  • tsconfig.spec.json 是测试文件的配置文件,继承了tsconfig.json文件。
  • angular.json 文件中的tsConfig选项指定了tsconfig.app.jsontsconfig.spec.json文件的路径

上图:
angular-single-project-tsconfig

3. Angular Multi Project

关于如何创建Angular多项目应用,可以参考这篇

多项目应用的文件结构如下,projects目录负责存放所有的子项目,这里有两个子项目:mfe1和shell。
每个子项目分别有自己的tsconfig.app.jsontsconfig.spec.json文件,这两个文件分别继承了全局的tsconfig.json文件。

1
2
3
4
5
6
7
8
9
10
11
12
13
14
15
my-app/
├─ node_modules/
├─ projects/
│ ├─ mfe1/
│ │ ├─ ...
│ │ ├─ tsconfig.app.json
│ │ ├─ tsconfig.spec.json
│ ├─ shell/
│ │ ├─ ...
│ │ ├─ tsconfig.app.json
│ │ ├─ tsconfig.spec.json
├─ ...
├─ angular.json
├─ package.json
├─ tsconfig.json

angular.json文件中的tsConfig选项指定了每个子项目的tsconfig.app.jsontsconfig.spec.json文件的路径。

1
2
3
4
5
6
7
8
9
10
11
12
13
14
15
16
17
18
19
20
21
22
23
24
25
26
27
28
29
30
31
32
33
34
35
36
37
38
39
40
41
42
43
44
45
46
{
"$schema": "./node_modules/@angular/cli/lib/config/schema.json",
"version": 1,
"newProjectRoot": "projects",
"projects": {
"shell": { // project shell <-- here
"projectType": "application",
// ...
"architect": {
"build": {
"builder": "ngx-build-plus:browser",
"options": {
// ...
"tsConfig": "projects/shell/tsconfig.app.json", // 1 <-- here
},
},
// ...
"test": {
// ...
"tsConfig": "projects/shell/tsconfig.spec.json", // 2 <-- here
}
}
},
"mfe1": { // project mfe1 <-- here
"projectType": "application",
// ...
"architect": {
"build": {
"builder": "ngx-build-plus:browser",
"options": {
// ...
"tsConfig": "projects/mfe1/tsconfig.app.json", // 3 <-- here
},
},
// ...
"test": {
"builder": "@angular-devkit/build-angular:karma",
"options": {
// ...
"tsConfig": "projects/mfe1/tsconfig.spec.json", // 4 <-- here
}
}
}
}
}
}

总结一下:
多项目Angular应用的tsconfig文件使用情况

  • tsconfig.json 是全局配置文件,位于workspace根目录下
  • 每个子项目有自己的tsconfig.app.jsontsconfig.spec.json文件,分别继承了全局的tsconfig.json文件
  • angular.json 文件中的tsConfig选项指定了每个子项目的tsconfig.app.jsontsconfig.spec.json文件的路径

上图:
angular-multiple-projects-tsconfig

4. Nx Mono Repo

使用Nx创建的Mono Repo项目,Nx会自动创建一个tsconfig.base.json文件,这个文件是全局的配置文件,所有的子项目都会继承这个文件。并且没有angular.json文件,每个子项目有自己的project.json文件,负责引用子项目中的tsconfig文件。

假设我们的mono repo包含一个app,名为todo, 一个library, 名为data-access,则文件结构如下:

1
2
3
4
5
6
7
8
9
10
11
12
13
14
15
16
17
18
19
Nx mono repo/
├─ apps/
│ ├─ todo/
│ │ ├─ ...
│ │ ├─ project.json
│ │ ├─ tsconfig.app.json
│ │ ├─ tsconfig.json
│ │ ├─ tsconfig.spec.json
├─ libs/
│ ├─ data-access/
│ │ ├─ ...
│ │ ├─ project.json
│ │ ├─ tsconfig.json
│ │ ├─ tsconfig.lib.json
│ │ ├─ tsconfig.spec.json
├─ node_modules/
├─ package.json
├─ tsconfig.base.json
├─ ...

总结一下:

  • tsconfig.base.json 是全局配置文件,位于workspace根目录下
  • app项目有自己的tsconfig.app.jsontsconfig.spec.json文件以及tsconfig.json,继承关系如下:
    • tsconfig.app.json继承tsconfig.json
    • tsconfig.spec.json继承tsconfig.json
    • tsconfig.json继承tsconfig.base.json
  • library项目有自己的tsconfig.lib.jsontsconfig.spec.json文件以及tsconfig.json,继承关系如下:
    • tsconfig.lib.json继承tsconfig.json
    • tsconfig.spec.json继承tsconfig.json
    • tsconfig.json继承tsconfig.base.json
  • 每个子项目的project.json文件负责引用子项目中的tsconfig文件

一图胜千言
nx-mono-repo-tsconfig

介绍

今天在做Angular Code Review的时候看到如下一行代码,之前没有见过这种写法,查了一下资料,发现这是TypeScript中的类型断言。

1
const myCanvas = <HTMLCanvasElement>document.getElementById("main_canvas");

其实类型断言我也之前也用过,不过用的是as关键字,如下:

1
const myCanvas = document.getElementById("main_canvas") as HTMLCanvasElement;

这两者效果一样。TypeScript中的类型断言有两种写法,一种是<Type>,另一种是as Type。这两种写法是等价的,但是在React中,<Type>会和JSX的语法冲突,所以推荐使用as Type的写法。

既然遇到了,那就顺势学习一下。

什么是类型断言

类型断言是TypeScript的一种特性,它允许开发者告诉编译器某个值的类型是什么,而不是让编译器去推断。类型断言并不会改变值的实际类型,它只是告诉编译器如何处理这个值。

注意:类型断言不是类型转换,它不会改变值的类型。

断言的两种语法

尖括号语法:不适合React等JSX语法的环境,因为尖括号会与JSX标签冲突。

1
const myCanvas = <HTMLCanvasElement>document.getElementById("main_canvas");

as语法:通用性更好,推荐使用。

1
const myCanvas = document.getElementById("main_canvas") as HTMLCanvasElement;

类型断言的使用场景

处理DOM元素

document.getElementById为例,它的返回值类型是HTMLElement | null,因此需要使用类型断言来指定具体的类型。

但是HtMLElement这个类型太宽泛了,几乎所有的DOM元素都可以被认为是HTMLElement,当我们的操作需要一个特定的DOM元素类型时,必须进行断言,比如需要对元素调用onFocus方法时,元素的类型必须是HTMLInputElement。这时候就需要断言操作。

1
2
3
4
const inputElement = document.getElementById("myInput") as HTMLInputElement;
inputElement.onfocus = () => {
console.log("Input focused");
};

处理泛型数据

比如开发中常见的JSON数据处理,从JSON字符串解析成对象时,由于JSON字符串表示的对象千变万化,所以使用泛型处理最为合适。

以下代码中T表示最终解析的对象类型,在使用的时候,需要调用者传入具体的类型,比如User类型。

1
2
3
4
5
6
7
8
9
10
function parseJSON<T>(json: string): T {
return JSON.parse(json) as T;
}

interface User {
name: string;
age: number;
}

const user = parseJSON<User>('{"name":"Philip","age":18}');

处理第三方库

在使用第三方库时,可能会遇到一些类型定义不准确的情况,这时候可以使用类型断言来告诉TypeScript如何处理这些类型。
例如,某个第三方库的类型定义文件可能没有包含某个方法或属性,这时候可以使用类型断言来添加这些方法或属性。

1
2
3
4
5
6
7
import { ThirdPartyLib } from 'some-library';

// User类型由库的调用者自行定义,将第三方库返回的用户数据断言为User类型
const users = ThirdPartyLib.getUsers() as User[];

// 使用更安全的类型断言
const safeUsers = ThirdPartyLib.getUsers() as unknown as User[];

const断言

TypeScript 3.4引入了const断言,它可以让我们在声明变量时,告诉编译器这个变量的值是不可变的。使用const断言可以让TypeScript更好地推断类型,尤其是在处理字面量类型时。

1
2
3
4
5
6
7
8
// myString的类型是"Hello, World!",而不是string
const myString = "Hello, World!" as const;

// myArray的类型是readonly [1, 2, 3],而不是number[]
const myArray = [1, 2, 3] as const;

// myObject的类型是{ readonly name: "Alice"; readonly age: 30; },而不是{ name: string; age: number; }
const myObject = { name: "Alice", age: 30 } as const;

const的作用有二:

  1. 将类型字面化,更加精确。
  2. 将对象变为只读,防止意外修改。

比如在项目常用的配置对象,最好的方式是使用const断言,这样可以确保其中的属性不会被意外修改。

1
2
3
4
5
6
7
const config = {
apiUrl: "https://api.example.com",
timeout: 5000,
} as const;

// TS2540: Cannot assign to apiUrl because it is a read-only property.
config.apiUrl = "https://api.newexample.com";

好了,今天就到这里了,明天再见!

今天打弹弓打到晚上10点半,理查德和詹姆斯还在打,我说我先走了,今天的任务还没完成,于是我就回来写公众号了,日更不能停!加油!