javascript-url-fragment
Introduction
URL fragment is the part of the URL that comes after the # symbol.
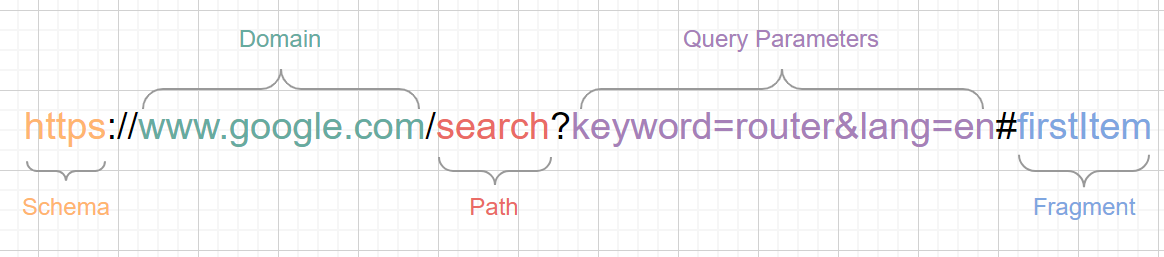
1. A fragment in a url specify the location within the page.
How to go to the specific location in the page?
- Create a empty
<a>tag withidattribute set to the fragment part in url.
1 | <a id="fragment1"> |
input the following url in your browser http://example.com/page.html#fragment1, the browser will scroll to the location of the fragment1 in the page.
If you want to jump to the specific location in the page by clicking a link in the page, you can create a link with its href set to the id part of the section.
1 | <a href="#fragment1">Go to fragment 1</a> |
2. Fragment never send to server in http request.
The fragment part of the URL is never sent to the server. It is only used by the browser. Take the following URL as an example, when you input it in the browser, observe the network tab in the developer tools, you will find that the fragment part is not sent to the server. the server only receives the request for the URL http://example.com/page.html.
1 | https://localhost:3000/page1#fragment |
3. Anything after the first # is a fragment identifier.
The url below want to set the color by the fragment part of the URL, but it won’t work because browser will parse the fragment part as #ffff&shape=circle instead of #ffff.
1 | http://example.com/?color=#ffff&shape=circle |
4. Changing fragment id doesn’t reload a page but create history.
When you change the fragment part of the URL, the page will not reload, but it will create a new entry in the browser history. You can use the forward and back button in the browser to navigate between the history entries.
## 5. Googlebot ignores the fragment part of the URL.

# References:
1. https://blog.httpwatch.com/2011/03/01/6-things-you-should-know-about-fragment-urls/
2. https://developer.mozilla.org/en-US/docs/Web/HTTP/Basics_of_HTTP/Identifying_resources_on_the_Web#Fragment
javascript-export
Export * from …
This syntax is used to re-export all named exports from another module. It does not work for default exports.
1 | // math.mjs |
File index.mj re-exports all named exports from math.mjs, in this case, add and subtract, but not multiply, since it is a default export.
1 | // index.mjs |
Now you can import all named exports from index.mjs using the following syntax:
1 | // main.mjs |
javascript-cache-request
最近项目中出现一个问题,后端监测系统发现,同样一个请求在短时间内一次性发起了四次,这是极大的浪费,于是考虑使用缓存策略来解决。
首先模拟一个获取后端数据的方法,这里使用setTimeout模拟一个异步请求。这个方法在延时一秒钟后返回一个结构化数据。{id: 1, name: 'Data 1'}
1 | function fetchData() { |
接下来我们模拟短时间内的四次请求,可以使用for循环来依次发送四次请求。
1 | for (let i = 0; i < 4; i++) { |
我们使用async/await语法封装一下上面的for循环。
1 | async function fetchDataFourTimes() { |
最后,我们调用一下fetchDataFourTimes方法,查看控制台输出。
1 | fetchDataFourTimes(); |
控制台输出如下:
1 | { id: 1, name: 'Data 1' } |
注意,这里有一个问题,我们很难区分这四次请求是不是真的发送了四次,因为返回的数据都是一样的。为了验证后续的cache策略确实能工作,我们可以在fetchData方法中加入一个console.log来验证。
1 | function fetchData() { |
再次调用fetchDataFourTimes方法,查看控制台输出。
1 | fetchData |
接下来,使用缓存策略来解决这个问题。
我们可以改造一下fetchDataFourTimes,使用一个全局变量来存储请求的数据,然后在下次请求时,先判断是否有缓存数据,如果有则直接返回缓存数据,否则发送请求。
1 | const cacheRequest = {}; |
然后运行fetchDataFourTimesWithCache方法,查看控制台输出。
1 | fetchData |
可以看到,第一次请求了数据,后面三次都是直接从缓存中获取的,这样就避免了多次请求的问题。
这里有一点需要注意,那就是缓存用的cacheRequest必须是位于缓存函数外部,如果直接放在缓存函数内部,那么每次调用缓存函数都会重新初始化cacheRequest并将其设置为{},导致缓存失效。
我们也可以使用闭包的特性,将cacheRequest封装到函数内部,这样的话,cacheRequest就成了fetchDataFourTimesWithCache函数的内部变量,可以避免全局变量的污染。在fetchDataFourTimesWithCache中,我们返回了一个匿名异步函数,而cacheRequest相对于这个匿名函数是一个外部变量,这样就形成了一个闭包。
1 | function fetchDataFourTimesWithCache() { |
angular-bindings
Introduction
In Angular, there are several ways to bind data to the view, including text interpolation, property binding, class/style bindings, and event binding. In this article, we’ll cover the basics of these bindings.
In an Angular template, a binding creates a live connection between a part of the UI created from a template(a DOM element, directive, or component) and the model(the component instance to which the template belongs). This connection can be used to synchronize the view with the model, to notify the model when an event or user action takes place in the view, or both. Angular’s Change Detection algorithm is responsible for keeping the view and the model in sync.
Text interpolation
Text interpolation refers to embedding expressions into marked up text, Angular use {{}} to interpolate expressions into HTML.
Suppose you have a variable name in the component, you can use it in the template like this:
1 | <p>Hello, {{name}}!</p> |
Or if you want to display an image based on its URL, you can do this:
1 | <img src="{{imageUrl}}" alt="image"> |
You can also use conditional expressions in text interpolation, for example:
1 | <div>Performance: {{ score > 90 ? 'Exceeded' : 'Match' }}</div> |
Or even a function call:
1 | <div>Performance: {{ getPerformance() }}</div> |
Note: text interpolation only works on string, for all other types, Angular will first convert it to string then interpolate it.
Property binding
Property binding in Angular helps you set values for properties of HTML elements or directives.
Property binding moves a value in one direction, from a component’s property into a target element property. In the following example, the src property of the img element is bound to the imageUrl property of the component.
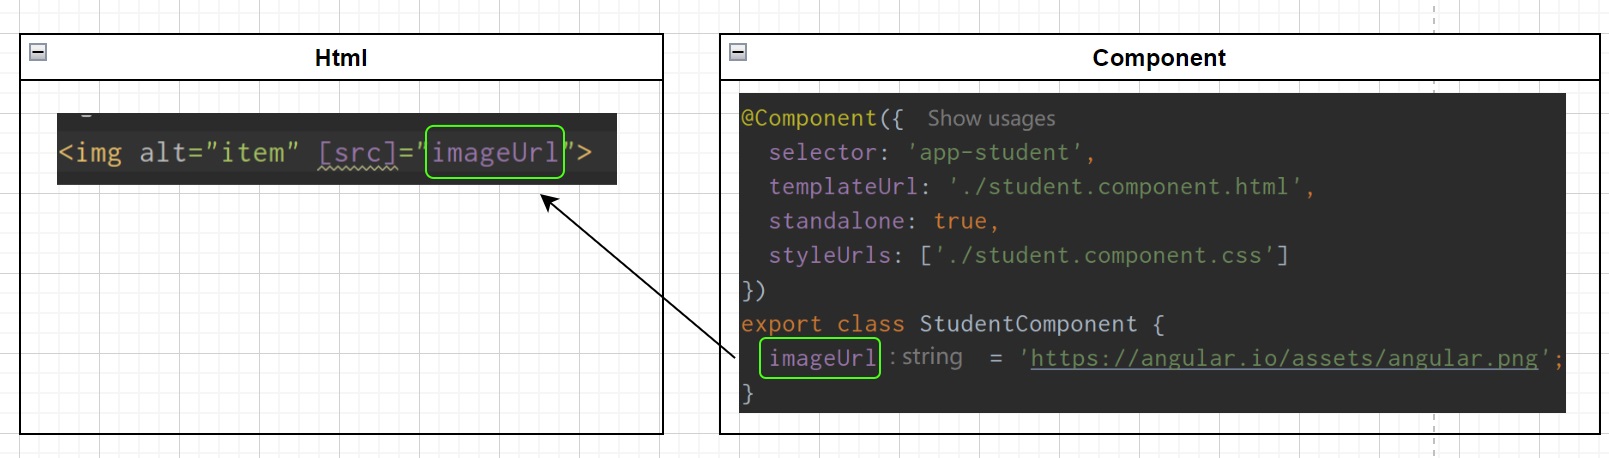
Property binding syntax
You should enclose the HTML element property with [], and put the component’s property in "". In this way angular will parse the content in quotes as a variable. the following code won’t work, since angular will treat imageUrl as a literal string, not a variable in component.
1 | <img src="imageUrl" alt="image"> |
Text interpolation can also be used interchangeably with property binding, the following code has the same effects.
1 | <img src="{{imageUrl}}" alt="image"> |
So, if imageUrl is an variable in component class, then[src]="imageUrl" is equal to src="{{imageUrl}}".
Class/Style bindings
Class bindings
If you only need single class/style binding, you can use the following syntax.
Where grade is a variable in the component, and this works as long as grade is a truthy value.
1 | <div [class.grade]="grade">Student A</div> |
class bindings works the same as ngClass directive, see here for details.
Style bindings
Style bindings works like class bindings, see here, we rarely use style bindings, since we always put styles into a single file, but its good to know.
References
angular-ng-class
Introduction
ngClass is a directive in Angular that allows you to add or remove classes on an HTML element.
Usage
First, create a Student component in your app.
1 | ng generate component student |
1. import NgClass from @angular/common;
1 | import {NgClass} from "@angular/common"; |
2. Add NgClass to the imports array in the component/module;
We’re using standalone component here.
1 | ({ |
3. Use the ngClass directive in the HTML template.
We’ll categorize students based on their grades, different grades will have different colors.
ngClass accepts string, array, object, map, set, function, and binding to a CSS class. we’ll use all of them in the following examples.
1. String syntax
Note, since ngClass is a property binding, we need to wrap the class name in '' to make it a hard-coded string, otherwise the class name will be treated as a variable in your component.
1 | <div [ngClass]="'grade-A'">Student A</div> |
ngClass is commonly used to bind a variable in component, for example, we can define a variable grade in the component, and bind it to the ngClass directive.
1 | grade = 'grade-A'; |
1 | <div [ngClass]="grade">Student A</div> |
If you want to apply a class without a condition, you can simply use the following syntax.
1 | <div class="grade-A">Student A</div> |
2. Array syntax
1 | <div [ngClass]="['grade-A', 'grade-B']">Student B</div> |
3. Object syntax
1 | <div [ngClass]="{'grade-A': true, 'grade-B': false}">Student C</div> |
4. Map syntax
1 | <div [ngClass]="gradeMap">Student D</div> |
1 | gradeMap = new Map<string, boolean>([ |
5. Set syntax
1 | <div [ngClass]="gradeSet">Student E</div> |
1 | gradeSet = new Set<string>(['grade-A', 'grade-B']); |
With any object-like bindings such as Array, Object, Map, and Set syntax, the identity of the object must change for Angular to apply the new class. Updating the property without changing the identify has no effect, for example:
This one doesn’t work, because gradeObject is the same object.
1 | this.gradeObject["grade-b"] = false; |
This one works, because gradeObject is a new object.
1 | this.gradeObject = {...this.gradeObject, "grade-b": false}; |
Note that, Map and Set syntax are rarely used, object and array syntax are the most common.
6. Expression syntax
grade is a component variable, we can use it in the expression.
1 | <div [ngClass]="grade === 'isGradeA' ? 'grade-A' : ''">Student F</div> |
7. Function syntax
1 | <div [ngClass]="getGrade()">Student F</div> |
1 | getGrade() { |
Difference between [ngClass] and [class]
[ngClass] is a directive that allows you to add or remove classes based on conditions, while [class] is a property binding that allows you to add a class without a condition.
Most of the above case can be achieved by [class] as well, except the following case.
This one works
1 | <div [ngClass]="{'grade-a grade-b': true}">Student</div> |
But this one doesn't work
1 | <div [class]="{'grade-a grade-b': true}">Student</div> |
References
great-blogs
javascript-the-most-powerful-line-of-code
From Quora: https://www.quora.com/What-is-the-most-elegant-piece-of-JavaScript-code-you-can-write
I actually have two candidates for the title of “most powerful line of code ever written in JavaScript”. The first is this line:
1 | element.innerHTML = "..."; |
The innerHTML property was introduced by Microsoft in the Internet Explorer 4.0 browser (IE4), which was released in October 1997. Prior to this, the only way to modify the HTML content of a page from JavaScript was using the document.write method. Unfortunately, calling document.write on a loaded document automatically calls document.open, which clears the entire document. In other words, it was only with the introduction of innerHTML that JavaScript gained the ability to modify a specific portion of a page, by inserting a bit of arbitrary HTML inside an existing element. And thus, modern Web applications were born.
My other candidate is this line:
1 | var xhr = new XMLHttpRequest(); |
Prior to this, content could only be downloaded into the browser by requesting a whole new page. Developers resorted to all sorts of tricks, primarily using hidden frames, to circumvent this limitation, but such code was very unwieldy, and had problematic side-effects. It was Microsoft again that changed the game by introducing the XMLHttpRequest object in Internet Explorer 5.0 (IE5) in March 1999. And just like that, AJAX was created, and along with it Single-Page Applications, and the modern Web we know today.
javascript-logical-or-operator
How logical or || operator works in JavaScript
Consider the following expression, what’s the evaluated result?
1 | `expr1 || expr2` |
If expr1 can be converted to true, return expr1. Otherwise, return expr2.
So we have the following truth:
1 | true || true; // t || t returns true |
|| in javascript not always return boolean(true or false)
Note that || in javascript is quit difference from || in other languages. For example, in Java, || returns Boolean(true or false), but in JavaScript, it returns the value of one of the operands.
1 | "" || 1; // returns 1 |
If you want to convert the value to boolean, you can use double !! or Boolean()
- !!expr - convert to boolean
- Boolean(expr) - convert to boolean
Short circuit
|| is a short-circuit operator, which means if the first operand is true, it will not evaluate the second operand.
1 | true || console.log("Hello"); // nothing output |
|| vs ??
|| and ?? are both used to provide a default value, but they have different behaviors, if you only care about null or undefined, and treat other Falsy value as valid(for example 0 or empty string "") use ??, otherwise, use ||.
1 | const x = 0; |
References
javascript-nullish-coalescing-operator
In JavaScript, the nullish operator ?? is used to return the right-hand side value if the left-hand side value is null or undefined. Otherwise, it returns the left-hand side value.
1 | x ?? y // return x if x is not null or undefined, otherwise return y |
Difference between || and ??
||returns the first truthy value among its operands, if all operands are falsy, it returns the last operand.??returns the first non-null and non-undefined value among its operands, if all operands are null or undefined, it returns the last operand.
Short-circuiting evaluation.
Same as ||, ?? also supports short-circuiting evaluation. If the left-hand side value is not null or undefined, the right-hand side value will not be evaluated.