0%

Replace Temp with Query

以查询取代临时变量的方法只适用于处理某些类型的临时变量,即那些只被赋值一次,而且之后再也没有被修改的临时变量。
看下面的代码:我们可以将 price()中的临时变量 basePricediscountFactor 替换为查询函数。

1
2
3
4
5
6
7
8
9
10
11
12
13
14
15
class Order {
constructor(quantity, item) {
this.quantity = quantity;
this.item = item;
}

get price() {
const basePrice = this.quantity * this.item.price;
let discountFactor = 0.98;
if (basePrice > 1000) {
discountFactor -= 0.03;
}
return basePrice * discountFactor;
}
}

修改后如下:可以看到,修改后,price()内的代码明显更加简洁,更加容易理解。

1
2
3
4
5
6
7
8
9
10
11
12
13
14
15
16
17
18
19
20
21
22
constructor(quantity, item) {
this.quantity = quantity;
this.item = item;
}

get price() {
return this.basePrice * this.discountFactor;
}

// Use this method to replace the temp variable basePrice
get basePrice() {
return this.quantity * this.item.price;
}

// Use this method to replace the temp variable discountFactor
get discountFactor() {
let discountFactor = 0.98;
if (this.basePrice > 1000) {
discountFactor -= 0.03;
}
return discountFactor;
}

最后,discountFactor()函数还可以进一步简化:

1
2
3
get discountFactor() {
return this.basePrice > 1000 ? 0.95 : 0.98;
}

如果是在不支持gettersetter的语言中,我们可以使用extract function的方法来实现。

1
2
3
4
5
6
7
8
9
10
11
12
13
14
15
16
17
18
constructor(quantity, item) {
this.quantity = quantity;
this.item = item;
}

getPrice() {
return this.getBasePrice() * this.getDiscountFactor();
}

// Use this method to replace the temp variable basePrice
getBasePrice() {
return this.quantity * this.item.price;
}

// Use this method to replace the temp variable discountFactor
getDiscountFactor() {
return this.getBasePrice() > 1000 ? 0.95 : 0.98;
}

Angular Standalone Component

standalone component是Angular 14的一个新特性,它可以让我们在不创建module的情况下创建一个component。注意:DirectivePipe也可以是standalone的。

创建一个standalone component

组件代码如下:

1
2
3
4
5
6
7
8
9
10
11
import { Component, OnInit } from '@angular/core';
@Component({
standalone: true, // 添加这一句,表示这是一个standalone component。
imports: [CommonModule],
selector: 'lifecycle-order',
templateUrl: './order.component.html',
styleUrls: ['./order.component.less'],
})
export class OrderComponent{
constructor() {}
}

standalone component和module的交互使用有如下两种情况。

standalone component引入其他module

如果standalone component需要引入其他module,那么需要在imports属性中引入其他module,比如上面代码中引入的CommonModule

注意:只有standalone component才能引入其他module,普通的component(non-standalone component)不能引入其他module。所以只有standalone component才能使用imports属性。

如果你遇到如下报错,那么说明你在非standalone组件中使用了imports属性,这是不允许的。

1
error NG2010: 'imports' is only valid on a component that is standalone.

这种情况经常发生在,ComponentA(非独立组件)想在template中使用ComponentB(独立组件),那么应该在ComponentA所在的module中的imports属性中引入ComponentB。

module引入standalone component

如果一个module要使用一个standalone component,那么不再需要在declarations属性中声明这个standalone component,只需要在imports属性中引入这个standalone component所在的module即可。

1
2
3
4
5
6
7
8
9
10
11
12
13
@NgModule({
declarations: [
AppComponent,
// OrderComponent, // no need to declare standalone component here
],
imports: [
BrowserModule,
OrderComponent, // imports standalone component here
],
providers: [],
bootstrap: [AppComponent],
})
export class AppModule {}

lazy load module

在NgModel时代,我们可以使用loadChildren来实现懒加载,比如下面的product module

1
2
3
4
5
6
export const routes: Routes = [
{path: 'home', component: HomeComponent},
{path: 'product', loadChildren: () => import('./product/product.module').then(m => m.ProductModule)},
{path: 'about', component: AboutComponent},
{path: '**', component: NotFoundComponent},
];

Lazy load standalone component

在Angular 14中,我们可以使用loadComponent来实现懒加载standalone component,比如下面的order component

1
2
3
4
5
6
export const routes: Routes = [
{path: 'home', component: HomeComponent},
{path: 'order', loadComponent: () => import('./order/order.component').then(m => m.OrderComponent)},
{path: 'about', component: AboutComponent},
{path: '**', component: NotFoundComponent},
];

summary

  • lazy load module: loadChildren
  • lazy load standalone component: loadComponent

Bootstrap standalone component

See here

References:

Angular standalone component

Angular Module

Angular是模块化的,模块是Angular应用的基本构建块,每个Angular应用都至少有一个模块,即根模块,Angular模块是一个带有@NgModule装饰器的类。

模块是一个逻辑单元,是一个自我完备的功能集合,它可以包含组件、服务、指令、管道等,模块可以导入其他模块,也可以导出组件、指令、管道等供其他模块使用,模块还可以提供Service。

以一个电商网站App为例,可以包含如下模块:登录模块(包含登录,注册,找回密码等功能),购物模块,订单模块,支付模块等等。

Generate Angular module with Angular CLI

使用Angular CLI生成一个新的模块,运行如下命令:

1
ng generate module moduleName // or ng g m moduleName

NgModule的组成

以下是一个典型的入口模块的代码:

1
2
3
4
5
6
7
8
9
10
11
12
13
14
@NgModule({
declarations: [
AppComponent,
],
imports: [
BrowserModule,
AppRoutingModule,
FormsModule,
HttpClientModule,
],
providers: [],
bootstrap: [AppComponent],
})
export class AppModule {}

declarations

declarations属性用来声明属于该模块的组件、指令、管道等,这些组件、指令、管道等只能在该模块中使用,其他模块不能使用。

  • declarations只能包含component, directive,pipe.
  • component, directive,pipe - 统称为declarable, 每个declarable只能隶属于一个NgModule,如果在多个NgModule中导入同一个declarable,那么会出现如下错误:
1
xxx is declared in multiple Angular modules: AppModule and AppContentModule

imports

imports属性用来导入其他模块,一经导入,那么被导入的模块中包含的组件、指令、管道等可以在当前模块中使用。比如当前模块依赖另一个模块A,那么要把模块A导入到当前模块中,这样当前模块才可以使用模块A中的组件、指令、管道等。

  • imports只能包含module, 或者standalone component.

providers

providers属性用来声明该模块中的服务,这些服务可以在该模块中使用,也可以在该模块导入的其他模块中使用。(我在现实中看见有人把Component放到providers中也能work,这不是好的编程习惯。)

exports

exports属性用来声明该模块中导出的组件、指令、管道等,这些导出的组件、指令、管道等可以在该模块导入的其他模块中使用。注意导出的组件、指令、管道等必须同时在declarations属性中声明。
也就是说exportsdeclarations的子集。

Angular应用的主模块app.module.ts中的exports属性是空的,因为根模块中的组件、指令、管道等都是可以在其他模块中使用的,所以不需要导出。

bootstrap

bootstrap属性用来声明该模块的根组件,根组件是Angular应用的入口组件,一个Angular应用只能有一个根组件,根组件只能在根模块中声明。bootstrap中声明的组件会插入到index.html中的<app-root></app-root>标签中。

注意:bootstrap中可以指定多个组件,这些组件会被插入到index.html中,index.html中根据组件的选择器加在不同的组件。

1
2
3
4
5
6
7
8
9
10
11
12
13
<!--index.html-->
<!doctype html>
<html lang="en">
<head>
<meta charset="utf-8" />
<title>LearningAngular</title>
</head>
<body>
<app-header></app-header>
<app-content></app-content>
<app-footer></app-footer>
</body>
</html>
1
2
3
4
5
6
7
8
9
10
11
12
13
14
15
16
17
18
19
20
21
22
23
// app.module.ts
import { NgModule } from '@angular/core';
import { BrowserModule } from '@angular/platform-browser';
import { HttpClientModule } from '@angular/common/http';

import { AppHeaderComponent } from './app-header/app-header.component';
import { AppContentComponent } from './app-content/app-content.component';
import { AppFooterComponent } from './app-footer/app-footer.component';

@NgModule({
declarations: [
AppHeaderComponent,
AppContentComponent,
AppFooterComponent,
],
imports: [
BrowserModule,
HttpClientModule,
],
providers: [],
bootstrap: [AppHeaderComponent, AppContentComponent, AppFooterComponent],
})
export class AppModule {}

注意: 只有根模块才需要声明根组件,其他模块不需要声明根组件。所以除了app.module.ts之外,其他的module都不需要声明bootstrap属性。

component and module

在Angular standalone component出现以前,任何一个component都必须隶属于一个module。但是在Angular standalone component出现以后,component就可以不用隶属于一个module了,这种component称为standalone component,也就是独立的component。

详情请看Angular Standalone Component

How Angular module identifies components?

Angular module是如何识别Component的呢?对于非standalone component,Angular module是通过declaration来标记的。对于standalone component,Angular module是通过imports来标记的。

非独立组件还分为两种情况,有对应的angular module或者没有对应的angular module

  • angular module - 当前module需要导入对应的angular module,才能使用导入module中的component。(待使用的component需在其module中exports数组中导出)
  • 没有angular module - 则需要将component声明在当前module的declarations中。

Example

假设我们需要定义如下两个组件, 这两个组件都有对应的module

  • ProductHomeModule包含ProductHomeComponent - 产品首页, 该组件内部又调用了ProductDetailComponent
  • ProductDetailModule包含ProductDetailComponent - 产品详情页

首先,需要在ProductDetailModule中声明ProductDetailComponent,并导出ProductDetailComponent

1
2
3
4
5
6
7
8
9
10
11
// product-detail.module.ts
import { NgModule } from '@angular/core';
import { CommonModule } from '@angular/common';
import { ProductDetailComponent } from './product-detail.component';

@NgModule({
declarations: [ProductDetailComponent], // <-- declare ProductDetailComponent
imports: [CommonModule],
exports: [ProductDetailComponent], // <-- export ProductDetailComponent
})
export class ProductDetailModule {}

然后,需要在ProductHomeModule中导入ProductDetailModule,这样ProductHomeComponent就可以使用ProductDetailComponent了。

1
2
3
4
5
6
7
8
9
10
11
12
// product-home.module.ts
import { NgModule } from '@angular/core';
import { CommonModule } from '@angular/common';
import { ProductHomeComponent } from './product-home.component';
import { ProductDetailModule } from '../product-detail/product-detail.module';

@NgModule({
declarations: [ProductHomeComponent],
imports: [CommonModule, ProductDetailModule], // <-- import ProductDetailModule
exports: [ProductHomeComponent],
})
export class ProductHomeModule {}

最后,在ProductHomeComponent模板中使用ProductDetailComponent

1
2
<!-- product-home.component.html --> 
<app-product-detail /> <!-- use ProductDetailComponent -->

References:

Angular杂项

什么操作会触发Angular执行change detection?

这个问题一直没有搞明白,有待进一步研究。
https://angular.io/guide/change-detection
https://www.youtube.com/watch?v=-tB-QDrPmuI

这个问题,现在大概了解了一些,Angular内部使用Zone.js来实现change detection,Zone.js对所有异步操作都进行了monkey patch,当有异步操作发生时,Angular会自动进行更新检测。所以这些动作会出发Angular执行change detection:

  1. setTimeout/setInterval
  2. XMLHttpRequest/fetch
  3. EventListener: click, mouseover, keydown, …
  4. Promise.then
  5. Async/Await

Change detection相关参考资料

  1. https://blog.angular-university.io/how-does-angular-2-change-detection-really-work/ - 尚未阅读。
  2. https://hackernoon.com/everything-you-need-to-know-about-change-detection-in-angular-8006c51d206f - 这个比较老了,用的还是Angular4.0的源码讲解的。
  3. https://stackoverflow.com/questions/42643389/why-do-we-need-ngdocheck/42807309#42807309 - ngDoCheck的作用。

Content

在AOT编译器下,Private变量无法绑定到模板中。

如果在组件中定义了一个私有变量,是不能使用双括弧绑定到模板中的,比如下面的代码:

1
2
3
4
5
6
7
8
@Component({
selector: 'app-order',
templateUrl: './order.component.html',
styleUrls: ['./order.component.less'],
})
export class OrderComponent {
private count = 0;
}
1
<p>{{count}}</p>

这样写是不行的,因为在AOT编译器下,私有变量会被删除,所以无法绑定到模板中,如果想要绑定到模板中,需要将变量定义为公共变量,或者使用get方法,如下:

1
2
3
4
5
6
7
8
9
10
11
12
@Component({
selector: 'app-order',
templateUrl: './order.component.html',
styleUrls: ['./order.component.less'],
})
export class OrderComponent {
private _count = 0;

get count(): number {
return this._count;
}
}
1
<p>{{count}}</p>

或者使用getCount()方法,如下:

1
2
3
4
5
6
7
8
9
10
11
12
@Component({
selector: 'app-order',
templateUrl: './order.component.html',
styleUrls: ['./order.component.less'],
})
export class OrderComponent {
private count = 0;

private getCount(): number {
return this.count;
}
}
1
<p>{{getCount()}}</p>

AOT vs JIT

Monkey Patching

In computer programming, monkey patching is a technique used to dynamically update the behavior of a piece of code at run-time. It is used to extend or modify the runtime code of dynamic languages such as Smalltalk, JavaScript, Objective-C, Ruby, Perl, Python, Groovy, and Lisp without altering the original source code. - Wikipedia

Angular找不到selector对应的组件时,不会报错。

如果你在Angular template中使用了一个选择器,但是这个选择器没有对应任何组件,那么Angular不会报错,只会将选择器当作一个普通的HTML标签处理。这个问题在开发过程中很容易出现,因为Angular不会报错,所以很难发现。

ng-repeat vs ngFor

  • ng-repeat是AngularJS中的指令,用于循环遍历数组或对象。
  • ngFor是Angular中的指令,用于循环遍历数组或对象。

Angular中的viewProviders和providers

竟然还有viewProvider?真是孤陋寡闻了。

基于配置的换肤方案

因为Angular的模板和样式是在Component元数据中指定的,所以我们可以定义一个变量用来控制模板和样式的变化,从而实现换肤功能。

首先:我们在config目录下新建一个theme.ts文件,用来存放主题相关的配置。这里我们定义一个USE_LIGHT_THEME变量,用来控制是否使用浅色主题。

1
2
// config/theme.ts
export const USE_LIGHT_THEME = true;

然后:我们在app.component.ts中引入USE_LIGHT_THEME变量,根据这个变量的值来选择不同的模板和样式。

1
2
3
4
5
6
7
8
// app.component.ts
import { Component } from '@angular/core';
import { USE_LIGHT_THEME } from './config/theme';

@Component({
selector: 'app-root',
templateUrl: USE_LIGHT_THEME ? './app.component-light.html' : './app.component-dark.html',
styleUrls: USE_LIGHT_THEME ? ['./app.component-light.css'] : ['./app.component-dark.css'],

以上就是一个简单的实现方式,通过更改USE_LIGHT_THEME的值,就可以实现换肤功能。使用这种方法时,我们可以为已有的项目添加换肤功能,而不需要修改原有的代码,只需为每个组件添加一个额外的模板和样式文件即可。(有的甚至只需要添加一个样式文件就行了)。

如何让Angular每五分钟进行一次更新检测?

为什么会有如此奇怪的需求呢,现实中还真有。比如我们使用websocket来实时更新数据,但是websocket的数据更新不会触发Angular的change detection,所以我们需要定时调用ChangeDetectorRef.detectChanges()方法来手动触发更新检测。

这里的做法是首先使用ChangeDetectorRef.detach()方法来暂时关闭自动更新检测,然后使用setInterval()方法每隔5秒调用一次ChangeDetectorRef.detectChanges()方法来手动触发更新检测。

1
2
3
4
5
6
constructor(private ref: ChangeDetectorRef) {
ref.detach();
setInterval(() => {
this.ref.detectChanges();
}, 5000);
}

HostBinding主要用来做什么?

HostBinding装饰器用来绑定宿主元素的属性,比如下面的例子,我们使用HostBinding装饰器将class属性绑定到app-root元素上。

1
2
3
4
5
6
7
8
@Component({
selector: 'app-root',
templateUrl: './app.component.html',
styleUrls: ['./app.component.css']
})
export class AppComponent {
@HostBinding('class') class = 'app-root';
}

这样就相当于在app-root元素上添加了一个class="app-root"属性。

MDC

MDC = Material Design Components.

Angular challenges

https://angular-challenges.vercel.app/guides/getting-started/

Angular interview.

https://creators.spotify.com/pod/show/daniel-glejzner/episodes/Angular-Job-Interview---with-GDE-Chau-Tran--Brecht-Billiet-e22mf51/a-a9mqru9

Angular zone.js

  1. https://angular.love/from-zone-js-to-zoneless-angular-and-back-how-it-all-works
  2. https://dev.to/vivekdogra02/angular-zonejs-change-detection-understanding-the-core-concepts-16ek
  3. https://medium.com/@krzysztof.grzybek89/how-runoutsideangular-might-reduce-change-detection-calls-in-your-app-6b4dab6e374d
  4. https://medium.com/@sehban.alam/what-is-zone-js-in-angular-e0029c21c32f
  5. https://www.youtube.com/watch?v=pGBh5oNB2wE

UI framework

  1. PrimeNg - https://primeng.org/
  2. Angular Material - https://material.angular.io/
  3. DevUI - https://devui.design/home

Angular Form

  1. Template-driven form
  2. Reactive form

[(ngModel)] 使用双向绑定必须先导入FormsModule模块。

1
2
3
4
5
6
7
import { FormsModule } from '@angular/forms';

@NgModule({
imports: [
FormsModule
]
})

如何查看Angular编译后的结果?

可以使用ngc命令,详情看这里:https://zdd.github.io/2024/05/21/angular-ngc/

各种Ref

  1. ChangeDetectorRef - 构造函数注入,用于手动触发更新检测。
  2. ElementRef - 构造函数注入,用于获取当前元素的引用, 常用于自定义指令。
  3. ComponentRef - 用于获取组件实例。
  4. ViewContainerRef - 构造函数注入,用于动态创建组件。
  5. TemplateRef - 构造函数注入,用于动态创建组件。
  6. EmbeddedViewRef -
  7. ViewRef

发现一个Angular宝藏

  1. https://angular.love/ - 有空整个通读一下吧,质量非常之高!
  2. https://angular-university.io/ - 这个质量就一般了。

Angular Lifecycle

今天我们来深入学习一下Angular的Lifecycle方法,Lifecycle方法是Angular中非常重要的一个概念,我们在开发中经常会用到这些方法,比如在ngOnInit中初始化数据,或者在ngOnDestroy中取消订阅等等。

首先在项目中生成一个组件,命名为lifecycle,命令如下:

1
ng g component lifecycle

lifecycle.component.html中的内容清空.然后在lifecycle.component.ts中添加如下代码。组件中的count变量用来标记每个Lifecycle方法调用的序号,这样我们就可以清楚的看到每个方法的调用顺序了。

1
2
3
4
5
6
7
8
9
10
11
12
13
14
15
16
17
18
19
20
21
22
23
24
25
26
27
28
29
30
31
32
33
34
35
36
37
38
39
40
41
42
43
44
45
46
47
48
49
50
51
52
53
54
55
56
57
58
59
60
61
62
63
64
65
66
67
import {
AfterContentChecked,
AfterContentInit,
AfterViewChecked,
AfterViewInit,
Component,
DoCheck,
OnChanges,
OnDestroy,
OnInit,
} from '@angular/core';

@Component({
selector: 'app-order',
templateUrl: './order.component.html',
styleUrls: ['./order.component.less'],
})
export class OrderComponent
implements
OnInit,
AfterViewInit,
OnChanges,
AfterContentInit,
AfterContentChecked,
AfterViewChecked,
OnDestroy,
DoCheck
{
private static count = 0;

constructor() {
console.log(`${++OrderComponent.count} constructor`);
}

ngOnInit(): void {
console.log(`${++OrderComponent.count} ngOnInit`);
}

ngDoCheck() {
console.log(`${++OrderComponent.count} ngDoCheck`);
}

ngAfterContentInit() {
console.log(`${++OrderComponent.count} ngAfterContentInit`);
}

ngAfterContentChecked() {
console.log(`${++OrderComponent.count} ngAfterContentChecked`);
}

ngAfterViewInit() {
console.log(`${++OrderComponent.count} ngAfterViewInit`);
}

ngAfterViewChecked() {
console.log(`${++OrderComponent.count} ngAfterViewChecked`);
}

ngOnChanges() {
console.log(`${++OrderComponent.count} ngOnChanges`);
}

ngOnDestroy() {
console.log(`${++OrderComponent.count} ngOnDestroy`);
}
}

运行程序,会得到如下输出:

1
2
3
4
5
6
7
1 constructor
2 ngOnInit
3 ngDoCheck
4 ngAfterContentInit
5 ngAfterContentChecked
6 ngAfterViewInit
7 ngAfterViewChecked

constructor是构造函数,并不能算是Angular生命周期函数,但是为了图个全乎,我们一并介绍。

Constructor

constructor是构造函数,它是在组件被创建时调用的,它的调用顺序是最早的,也就是说它是第一个被调用的方法,它的调用顺序是固定的,不会因为其他因素而改变。

构造函数中应该做哪些事情

一般在构造函数中会做一些初始化的工作,比如

  1. 初始化变量
  2. 订阅事件

构造函数中不应该做哪些事情?

  1. 与View相关的操作,比如操作DOM元素(应该在ngAfterViewInit中进行)
  2. 获取后台数据(应该在ngOnInit中获取)

ngOnChanges

ngOnChanges是当组件的@Input属性发生变化时调用的,它接受一个SimpleChanges类型的参数,这个参数中包含了变化的属性的信息,比如变化前的值和变化后的值等等。

调用时机:

  1. 当且仅当组件中有@Input属性时才会被调用。
  2. 先在ngOnInit之前调用一次。(为什么?)
  3. 后续每当@Input属性发生变化时调用一次。

由于我们这个组件中没有@Input属性,所以这个方法没有被调用。

ngOnInit

Initialize the directive or component after Angular first displays the data-bound properties and sets the directive or component’s input properties

调用时机

  1. ngOnChanges之后调用一次。
  2. 不管ngOnChanges是否被调用,ngOnInit都会被调用一次。
  3. 整个生命周期中只调用一次。

所以上面例子中构造函数调用之后,立即调用了ngOnInit方法。

ngDoCheck

Detect and act upon changes that Angular can’t or won’t detect on its own

该方法主要用来做自定义的更新检测。

调用时机
2. 在ngOnInit调用之后调用一次。

  1. 每次ngOnChanges调用之后,都会调用该方法。

在上例中,虽然没有调用ngOnChanges,但是ngOnInit调用了,所以该方法也调用了一次。

注意:这里的第一点Angular官网的解释并不准确,确切的说,是每次Angular进行更新检测之后,都会调用该方法,即使更新检测后,绑定的值没有任何变化,也会调用该方法。为了验证,我们可以在ngInit中添加如下代码:

1
2
3
4
5
6
7
8
9
10
11
12
13
14
constructor(
private changeDetector: ChangeDetectorRef, // 注入ChangeDetectorRef
) {
console.log(`${++OrderComponent.count} constructor`);
}

ngOnInit(): void {
console.log(`${++OrderComponent.count} ngOnInit`);

// 每隔一秒手动触发一次更新检测。
setInterval(() => {
this.changeDetector.detectChanges();
}, 1000);
}

此时观察控制台,输出如下,可见,每当change detection发生时,ngDoCheck都会被调用。ngAfterContentCheckedngAfterViewChecked也会跟着被调用。

1
2
3
4
5
6
7
8
9
10
11
12
13
14
15
16
17
1 constructor
2 ngOnInit
3 ngDoCheck
4 ngAfterContentInit
5 ngAfterContentChecked
6 ngAfterViewInit
7 ngAfterViewChecked

8 ngDoCheck
9 ngAfterContentChecked
10 ngAfterViewChecked

11 ngDoCheck
12 ngAfterContentChecked
13 ngAfterViewChecked

...

ngAfterContentInit

Respond after Angular projects external content into the component’s view。该方法与<ng-content>标签相关。但是需要注意的是,无论组件中是否包含<ng-content>标签,该方法都会被调用。

调用时机

  1. ngDoCheck第一次调用之后,调用一次。
  2. 整个生命周期中只调用一次。

ngAfterContentChecked

当Angular检测完组件内容变化之后调用。

调用时机

  1. ngAfterContentInit之后调用一次。
  2. 在每次ngDoCheck之后调用一次。

ngAfterViewInit

当Angular初始化完组件视图及其子视图之后调用。如果是directive中的ngAfterViewInit,则在初始化完包含该directive的视图之后调用。

调用时机

  1. ngAfterContentChecked第一次调用之后调用一次。
  2. 整个生命周期中只调用一次。

ngAfterViewChecked

当Angular检测完组件视图及其子视图之后调用。如果是directive中的ngAfterViewChecked,则在检测完包含该directive的视图之后调用。

调用时机

  1. ngAfterViewInit之后调用一次。
  2. 在每次ngAfterContentChecked之后调用一次。

ngOnDestroy

当Angular销毁组件之前调用。

调用时机

  1. 在组件被销毁之前调用。
  2. 整个生命周期中只调用一次。

要想看到该方法被调用,必须切换到切他页面,也就是离开该组件所在的页面才行。

下面我们改变页面内容,看看这些生命周期是否有变化,首先给模板文件添加内容,在lifecycle.component.html中添加如下内容:

1
<p>Lifecycle component works</p>

保存并刷新页面,可以看到输出并未变化。

接下来我们给组件添加一个@Input属性,修改lifecycle.component.ts文件,添加如下内容:

1
@Input() nameList: string[] = [];

修改模板文件,添加如下内容,用来显示输入的名字列表。

1
2
3
<ng-container *ngFor="let name of nameList">
<p>name: {{name}}</p>
</ng-container>

然后我们创建一个父组件,用来调用LifecycleComponent组件,并传入nameList属性。
lifecycle-parent.component.html

1
2
<lifecycle-order [nameList]="nameList">
</lifecycle-order>

然后运行程序,切换到life-cycle页面,可以看到控制台输出如下内容,从第二行可以看出,ngOnChanges方法被调用了,而且是在ngOnInit之前调用的。

1
2
3
4
5
6
7
8
1 - OrderComponent: constructor
2 - OrderComponent: ngOnChanges
3 - OrderComponent: ngOnInit
4 - OrderComponent: ngDoCheck
5 - OrderComponent: ngAfterContentInit
6 - OrderComponent: ngAfterContentChecked
7 - OrderComponent: ngAfterViewInit
8 - OrderComponent: ngAfterViewChecked

由于我们并没有在父组件中修改nameList属性,所以ngOnChanges方法只被调用了一次。
我们可以打印一下changes参数,看看里面有什么内容。

1
2
3
4
ngOnChanges(simpleChanges: SimpleChanges) {
console.log(`${++OrderComponent.count} - ${this.className}: ngOnChanges`);
console.log(simpleChanges); // print changes
}

控制台输出如下内容:
Alt text
因为是第一次赋值,所以previousValueundefinedcurrentValue['John, 'Mary', 'Joe']。并且firstChange为true

接下来我们在父组件中添加一个按钮,用来修改nameList属性,修改lifecycle-parent.component.html文件,添加如下内容:

1
<button (click)="changeNameList()">Change Name List</button>

修改lifecycle-parent.component.ts文件,添加如下内容:

1
2
3
changeNameList() {
this.nameList = ['John', 'Mary', 'Joe', 'Tom'];
}

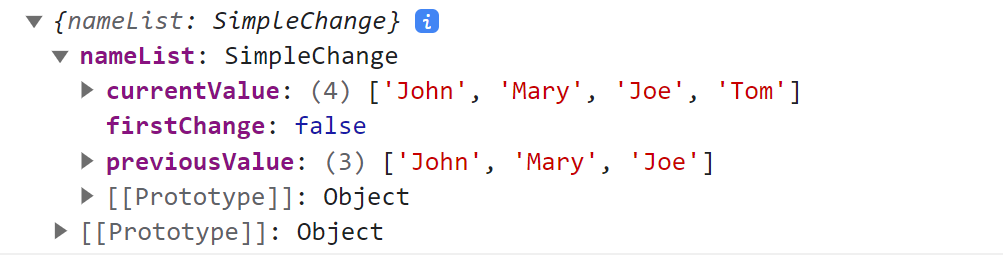
运行程序,切换到life-cycle页面,点击按钮,可以看到控制台输出如下内容:可以看到,由于这次我们修改了nameList属性,所以ngOnChanges方法又被调了一次。

1
2
3
4
9 - OrderComponent: ngOnChanges
10 - OrderComponent: ngDoCheck
11 - OrderComponent: ngAfterContentChecked
12 - OrderComponent: ngAfterViewChecked

这次changes参数的内容如下图所示:
Alt text

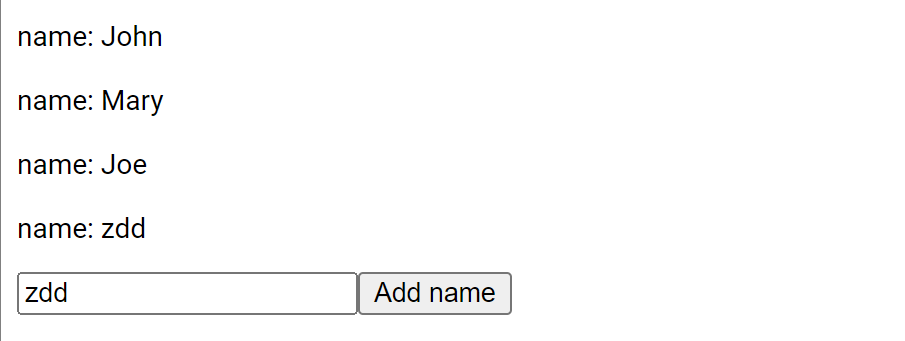
接下来,我们修改一下代码,添加一个input框,让用户输入名字,然后将该名字显示到页面上,修改lifecycle-parent.component.html文件,添加如下内容:

1
2
<input type="text" [(ngModel)]="name">
<button (click)="addName()">Add Name</button>

修改lifecycle-parent.component.ts文件,添加如下内容:

1
2
3
4
5
6
name: string;
addName() {
if (this.name.trim()) {
this.nameList.push(this.name);
}
}

运行程序,输入zdd到input框,点击Add Name按钮,可以看到新添加的name显示到了页面上,但是onChanges方法并没有被调用,这是为什么呢?

Alt text

这是因为,Angular默认的change detection比较的是Input值的引用,而不是值本身。所以,当我们重新给nameList赋值时,ngOnChanges方法被调用了,因为此时nameList的引用改变了,但是当我们使用Array.prototype.pushnameList中添加元素时,ngOnChanges方法并没有被调用,因为nameList的引用并没有变化。

要想让ngOnChanges方法被调用,我们可以这样给nameList属性赋值:

1
this.nameList = [...this.nameList, this.name];

这样,nameList的引用就变化了,ngOnChanges方法就会被调用。

不知道大家是否注意到这样一个情况,我们在input框每输入一个字符,控制台都会打印一下内容,甚至在我们删除输入框内容的时候,也会打印。

1
2
3
96 - OrderComponent: ngDoCheck
97 - OrderComponent: ngAfterContentChecked
98 - OrderComponent: ngAfterViewChecked

看来,每当我们输入值的时候,都触发了Angular change detection,这并不是我们想要的,我们只想在点击Add Name按钮的时候,触发change detection,这样才能保证性能。

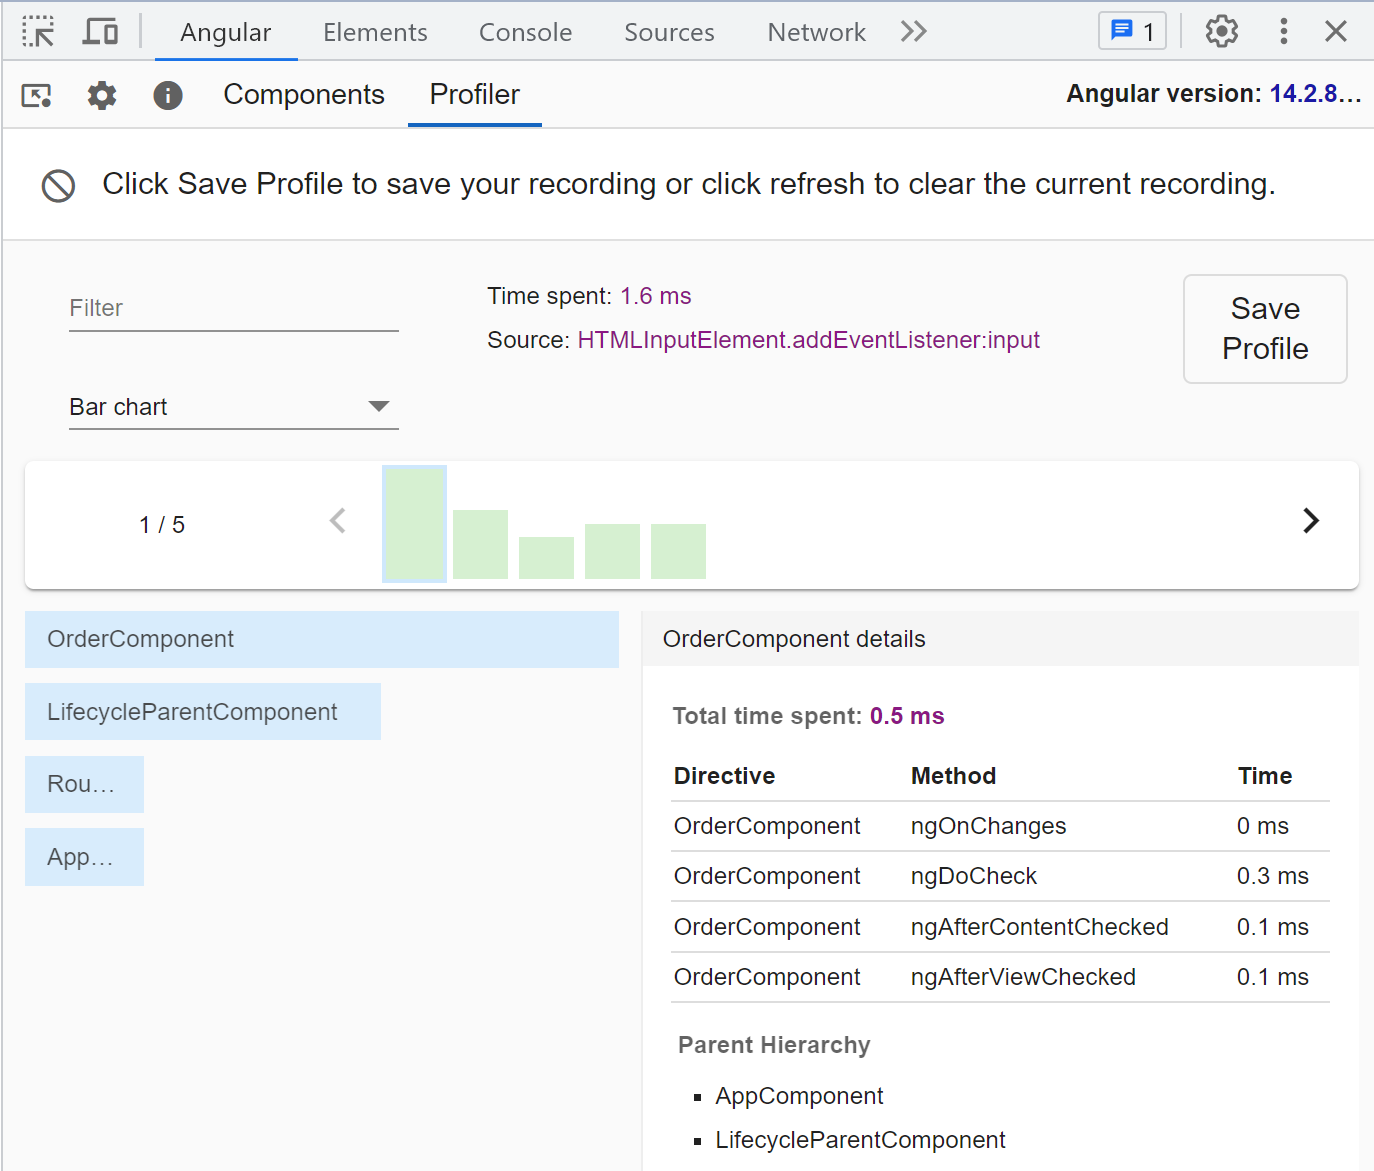
用Angular Dev tool分析一下程序的性能。

首先打开Chrome的插件商店,搜索Angular DevTools,然后安装该插件。

然后运行程序,打开该插件,切换到Profiler页面。点击Start recording,然后在input框中输入几个字符,并停止录制。

Alt text

可以看到,输入框的input事件触发了OrderComponent的change detection,这不是我们想要的。我们可以使用ChangeDetectorRef来禁用change detection.

修改lifecycle.component.ts文件,添加如下内容:

1
2
3
4
5
6
7
8
9
10
11
12
13
14
15
16
constructor(private changeDetector: ChangeDetectorRef) {}

ngAfterViewInit() {
// 注意,不能在ngOnInit方法中调用以下方法,否则初始数据无法显示到页面上。
this.changeDetector.detach(); // 禁用change detection.
}

onInput(event: any) {
console.log(event.data);
}
addName() {
if (this.name.trim()) {
this.nameList = [...this.nameList, this.name];
this.changeDetector.detectChanges(); // 更新数据时,要手动触发change detection.
}
}

再次运行程序,在input框中输入字符,观察控制台,你会发现,input事件不再触发change detection了。

1
2
3
4
1
12
123
1234

使用ChangeDetectionStrategy.OnPush可以提高性能,但是要注意,如果我们使用了ChangeDetectionStrategy.OnPush,那么我们就必须使用@Input属性,否则,ngOnChanges方法不会被调用。而且使用这种策略时,只有当@Input属性的引用发生变化时,才会触发change detection,如果@Input属性的发生变化,是不会触发change detection的。

比如,这样可以触发ngOnChanges方法:

1
2
3
4
5
addName() {
if (this.name.trim()) {
this.nameList = [...this.nameList, this.name];
}
}

但是这样不会触发ngOnChanges方法:

1
2
3
4
5
addName() {
if (this.name.trim()) {
this.nameList.push(this.name);
}
}

Nested Components

In Angular, components can be nested, for example, a Parent component can contain a Child component. Here is the lifecycle method order for nested components.

1
2
3
4
5
6
7
8
9
10
11
12
13
14
15
16
17
18
ParentComponent.constructor
ChildComponent.constructor
ParentComponent.ngOnChanges
ParentComponent.ngOnInit
ParentComponent.ngDoCheck
ParentComponent.ngAfterContentInit
ParentComponent.ngAfterContentChecked
ChildComponent.ngOnChanges
ChildComponent.ngOnInit
ChildComponent.ngDoCheck
ChildComponent.ngAfterContentInit
ChildComponent.ngAfterContentChecked
ChildComponent.ngAfterViewInit
ChildComponent.ngAfterViewChecked
ParentComponent.ngAfterViewInit
ParentComponent.ngAfterViewChecked
ChildComponent.ngOnDestroy
ParentComponent.ngOnDestroy

Deep nested components

What if the Child component also has a child component Descendant? Here is the lifecycle method order for deep nested components.

1
2
3
4
5
6
7
8
9
10
11
12
13
14
15
16
17
18
19
20
21
22
23
24
25
26
27
ParentComponent.constructor
ChildComponent.constructor
DescendantComponent.constructor
ParentComponent.ngOnChanges
ParentComponent.ngOnInit
ParentComponent.ngDoCheck
ParentComponent.ngAfterContentInit
ParentComponent.ngAfterContentChecked
ChildComponent.ngOnChanges
ChildComponent.ngOnInit
ChildComponent.ngDoCheck
ChildComponent.ngAfterContentInit
ChildComponent.ngAfterContentChecked
DescendantComponent.ngOnChanges
DescendantComponent.ngOnInit
DescendantComponent.ngDoCheck
DescendantComponent.ngAfterContentInit
DescendantComponent.ngAfterContentChecked
DescendantComponent.ngAfterViewInit
DescendantComponent.ngAfterViewChecked
ChildComponent.ngAfterViewInit
ChildComponent.ngAfterViewChecked
ParentComponent.ngAfterViewInit
ParentComponent.ngAfterViewChecked
DescendantComponent.ngOnDestroy
ChildComponent.ngOnDestroy
ParentComponent.ngOnDestroy
生命周期钩子 调用时机 调用次数 作用
ngOnChanges 输入属性(@Input)变化时触发 多次 响应输入属性的变化,获取新旧值并执行逻辑
ngOnInit 组件初始化后触发(在首次 ngOnChanges 之后) 一次 初始化数据(如从服务获取数据),适合执行一次性操作
ngDoCheck 每次变更检测周期中触发 多次 手动检测变更(如复杂对象变更),用于扩展默认变更检测
ngAfterContentInit 组件内容投影(如 <ng-content>)初始化完成后触发 一次 操作投影内容(如访问 @ContentChild 引用的子组件)
ngAfterContentChecked 每次内容投影变更检测完成后触发 多次 响应投影内容的变更(如动态插入子组件)
ngAfterViewInit 组件视图及子视图初始化完成后触发 一次 操作视图元素(如访问 @ViewChild 引用的 DOM 或子组件)
ngAfterViewChecked 每次视图及子视图变更检测完成后触发 多次 响应视图变更(如动态修改子组件属性),需避免在此修改状态以防止无限循环
ngOnDestroy 组件销毁前触发 一次 清理资源(如取消订阅、移除事件监听器)

Reference

  1. https://angular.dev/guide/components/lifecycle#summary

JavaScript事件模型

在JavaScript中,有两种事件的传递方向,一种是由内层元素向外层元素传递,也叫自底向上的方式,称作事件冒泡,好比水中的气泡由水底向水面上升的过程。另一种叫做事件捕获,方向刚好相反,从外层元素向内层元素传递,也叫自顶向下。

目前主流的浏览器都支持这两种事件传递方式,但是在IE8及以下版本的浏览器中,只支持事件冒泡,不支持事件捕获。

所以DOM中的事件处理分为以下三个阶段

  • capture(捕获阶段),事件由外层向内层传递
  • target(命中阶段),事件到达目标元素
  • bubbling(冒泡阶段),事件由内层向外层传递

那么如何指定事件的传递方式呢?我们可以通过addEventListener的第三个参数来指定,比如下面的代码:
当useCapture为true时,事件传递方式为事件捕获,当useCapture为false时,事件传递方式为事件冒泡。默认值为false,使用事件冒泡模式。

1
addEventListener(type, listener, useCapture)

Event.stopPropagation

  1. 当事件传递方式为捕获模式时,event.stopPropagation()会阻止事件继续向下(内层元素)传递。
  2. 当事件传递方式为冒泡模式时,event.stopPropagation()会阻止事件继续向上(外层元素)传递。

代码示例:

1
2
3
4
5
6
7
8
9
<div id="div1">
div1
<div id="div2">
div2
<div id="div3">
div3
</div>
</div>
</div>
1
2
3
4
5
6
7
8
9
10
11
12
13
14
15
16
17
18
19
20
21
22
23
24
25
const div1 = document.querySelector("#div1");
bindEventListener(div1, "click", clickHandler1, false);
const div2 = document.querySelector("#div2");
bindEventListener(div2, "click", clickHandler2, false);
const div3 = document.querySelector("#div3");
bindEventListener(div3, "click", clickHandler3, false);

function bindEventListener(element, event, listener, useCapture) {
element.addEventListener(event, listener, useCapture);
}

function clickHandler1(event) {
const text = event.currentTarget.id + " clicked";
console.log(text);
}

function clickHandler2(event) {
const text = event.currentTarget.id + " clicked";
console.log(text);
}

function clickHandler3(event) {
const text = event.currentTarget.id + " clicked";
console.log(text);
}

点击div3,输出如下,因为采用的是冒泡模式,所以事件会从内层元素向外层元素传递。即div3最先捕获事件,然后是冒泡给div2,最后是div1.

1
2
3
div3 clicked
div2 clicked
div1 clicked

如果我们在clickHandler3中加入event.stopPropagation(),再次点击div3,输出如下:

1
div3 clicked

可见,event.stopPropagation()阻止了事件继续向上(外层元素)传递。

将事件处理函数改为捕获模式

1
2
3
bindEventListener(div1, "click", clickHandler1, true);
bindEventListener(div2, "click", clickHandler2, true);
bindEventListener(div3, "click", clickHandler3, true);

再次点击div3,输出如下,因为采用的是捕获模式,所以事件会从外层元素向内层元素传递。即div1最先捕获事件,然后是div2,最后是div3.

1
2
3
div1 clicked
div2 clicked
div3 clicked

如果我们在clickHandler1中加入event.stopPropagation(),再次点击div3,输出如下:

1
div1 clicked

可见,event.stopPropagation()阻止了事件继续向下(内层元素)传递。

Event.stopImmediatePropagation

如果将上述代码中的event.stopPropagation()改为event.stopImmediatePropagation(),你会发现,输出的结果是一样的,这说明event.stopImmediatePropagation()event.stopPropagation()的作用是一样的,都是阻止事件继续传递。既然作用是一样的,那么为什么还要有event.stopImmediatePropagation()呢?这是因为event.stopImmediatePropagation()还有一个额外的功能,就是阻止事件处理函数队列中的其他函数执行,比如下面的代码:

1
2
3
bindEventListener(div1, "click", clickHandler1, false);
bindEventListener(div1, "click", clickHandler2, false);
bindEventListener(div1, "click", clickHandler3, false);

当我们点击div1时,输出如下:

1
2
3
div1 clicked
div1 clicked
div1 clicked

当多个事件处理函数绑定到同一个元素的同一个事件时,事件处理函数的执行顺序是按照绑定的顺序执行的,比如上面的代码,clickHandler1会先于clickHandler2执行,clickHandler2会先于clickHandler3执行。如果我们在clickHandler1中加入event.stopImmediatePropagation(),再次点击div1,输出如下:

1
div1 clicked

可见,event.stopImmediatePropagation()阻止了事件处理函数队列中的其他函数执行。clickHandler2和clickHandler3都被阻止了执行。

阻止默认行为

event.stopPropagation()虽然能阻止事件传播,却不能阻止事件的默认行为,比如将上例中的button换成<a>的话,即使阻止了事件传播,点击链接后a标签依然会跳转。这时,我们可以使用 event.preventDefault()来实现这个功能。

1
2
3
4
5
6
7
8
9
10
11
12
13
14
15
16
17
18
19
20
21
22
23
24
25
26
27
28
<html lang="zh-Hans-CN">
<head>
<meta charset="UTF-8" />
<meta content="width=device-width,initial-scale=1" name="viewport" />
<title>event-handler</title>
<style>
div#my-div {
text-align: center;
margin: 32px auto;
padding-top: 32px;
width: 400px;
height: 300px;
border: 1px solid gray;
}

a {
display: block;
margin: 16px auto;
}
</style>
</head>
<body>
<div id="my-div">
div
<a href="https://www.baidu.com" id="my-button">link</a>
</div>
</body>
</html>
1
2
3
4
5
6
7
8
9
10
11
12
13
14
15
16
document
.getElementById('my-div')
.addEventListener('click', divClickHandler, true);
document
.getElementById('my-button')
.addEventListener('click', buttonClickHandler, true);

function divClickHandler(event) {
event.stopPropagation();
event.preventDefault(); // 阻止链接打开的默认行为
console.log('div clicked');
}

function buttonClickHandler(event) {
console.log('button clicked');
}

有以下几点需要注意:

  1. event.preventDefault()只会阻止事件默认行为,并不会阻止事件继续传播
  2. event.preventDefault()只对cancelable=true的事件起作用。

event.preventDefault()的应用场景有:

  1. 阻止<a>标签点击后跳转

  2. 阻止<checkbox>被选中

  3. 验证用户输入,比如只允许输入小写字母,当输入非小写字母时,不显示输入的字符。

    1
    2
    3
    4
    5
    6
    7
    8
    9
    10
    11
    12
    function checkName(evt) {
    var charCode = evt.charCode;
    if (charCode != 0) {
    if (charCode < 97 || charCode > 122) {
    evt.preventDefault();
    displayWarning(
    "Please use lowercase letters only."
    + "\n" + "charCode: " + charCode + "\n"
    );
    }
    }
    }

References

什么是Event.target和Event.currentTarget

这个两个target在JavaScript事件处理中十分重要,来看一下他们之间的区别。

  • event.target:触发事件的元素
  • event.currentTarget:绑定事件的元素

二者之间的区别只有在元素嵌套的时候,才会有所体现。比如下面的代码:
外层div1绑定了click事件,内层div2没有绑定任何事件。当我们点击div2的时候,会输出什么呢?

1
2
3
<div id="div1">div 1
<div id="div2">div2</div>
</div>
1
2
3
4
5
const div1 = document.getElementById("div1");
div1.addEventListener("click", (event) => {
console.log(event.target);
console.log(event.currentTarget);
});

event-target-vs-event-currentTarget

  • 当我们点击div2的时候,event.targetdiv2event.currentTargetdiv1
  • 当我们点击div1的时候,event.targetdiv1event.currentTarget也是div1

由此可见,event.target永远是触发事件的元素,而event.currentTarget永远是绑定事件的元素。

如何禁止子元素触发事件

那么问题来了,有些时候我们不像让内部元素(子元素)触发事件,而是想让外部元素(父元素)触发事件,这个时候我们应该怎么做呢?考虑如下场景,假设现在我们要实现一个Card,这个Card内部有很多子元素,现在用户有一个需求,让Card实现拖拽功能,那么我们需要监听Card的dragenter事件,但是我们不想让Card内部的子元素触发dragenter事件,这个时候我们应该怎么做呢?我们可以通过判断event.currentTarget来实现这个功能,因为event.currentTarget会指向card本身,而不是其内部的子元素。

其实还有一个更加彻底的办法就是使用CSS的pointer-events属性,这个属性可以控制元素是否可以触发鼠标事件,比如上面的例子,我们可以这样禁止div2触发click事件:

1
2
3
<div id="div1">div 1
<div id="div2" style="pointer-events: none;">div2</div>
</div>

这下我们再次点击div2时,输出就变成了下面这样:可见div2没有触发click事件,而是由它的父元素div1触发了。

1
2
target: div 1
currentTarget: div 1

需要注意:pointer-events属性是CSS3中的属性,IE11及以下版本不支持。并且它具有传递性,比如我们在div2上设置了pointer-events: none;,那么div2及其子元素都不会触发鼠标事件。

Event.relatedTarget

Event中除了这两个target之外,其实还有一个relatedTarget属性,这个属性在不同的事件中有不同的含义,比如在mouseover事件中,relatedTarget表示鼠标移入的元素,而在mouseout事件中,relatedTarget表示鼠标移出的元素。两外html5中的drag and drop api也会用到这个属性,比如在dragenter事件中,relatedTarget表示被拖拽元素正在进入的元素,而在dragleave事件中,relatedTarget表示被拖拽元素正在离开的元素。

References

element.style vs window.getComputedStyle

这两种方式都可以获取元素的样式,但是它们之间有什么区别呢?首先让我们看看在前端开发中,有哪几种方式可以设置样式。

inline style(内联样式)

内联样式是指直接在元素上设置样式,比如下面的代码中,<div>元素上设置了style属性,这就是内联样式。

1
<div style="color: red;">Hello World!</div>

inner style(内部样式)

内部样式是指在<head>标签中添加<style>标签,然后在<style>标签中添加样式,比如下面的代码中div {color: red;}就是内部样式。

1
2
3
4
5
6
7
<head>
<style>
div {
color: red;
}
</style>
</head>

external stylesheet(外部样式表)

外部样式表是指将样式单独放在一个文件中,然后在<head>标签中使用<link>标签引入,比如下面的代码中,<link>标签引入了style.css这个文件,这就是外部样式表。

1
2
3
4
<!-- index.html -->
<head>
<link rel="stylesheet" href="style.css" />
</head>
1
2
3
4
/* style.css */
div {
color: red;
}

element.style 和 window.getComputedStyle的区别

再来看element.stylewindow.getComputedStyle的区别:

  1. element.style只能获取内联样式,
  2. window.getComputedStyle可以获取内联样式、内部样式和外部样式表。

所以大多数情况下,我们都是使用window.getComputedStyle来获取元素的样式。

示例代码

下面的代码中,style.css文件中设置了外部样式表。

1
2
3
4
5
6
<head>
<link rel="stylesheet" href="style.css" />
</head>
<body>
<div id="my-div">Hello World!</div>
</body>
1
2
3
4
/* style.css */
div {
color: blue;
}
1
2
3
const div = document.getElementById("my-div");
console.log(div.style.color); // "" - empty string. 因为div元素上没有设置内联样式。
console.log(window.getComputedStyle(div).color); // rgb(0, 0, 255)

可以看到,element.style只能获取内联样式,而window.getComputedStyle可以获取内联样式、内部样式和外部样式表。

应用场景

不同的场景可以使用不同的方式来获取元素的样式:

  • 如果你只需要获取内联样式,可以使用element.style
  • 如果想直接修改样式,可以使用element.style
  • 如果你需要获取内联样式、内部样式和外部样式表,可以使用window.getComputedStyle

总结

  1. 修改样式的时候,最好用element.style,因为它的优先级最高。
  2. 获取样式的时候,最好用window.getComputedStyle,因为它可以获取所有的样式。

需要注意的是:如果使用window.getComputedStyle获取样式,可能会引发浏览器重绘。因为它获取的总是最终计算过的样式,如果获取样式时,浏览器尚未完成渲染,那么必然会引发重绘。

References

Angular template reference variables

Template reference variables - 模板引用变量,是指在模板中声明的变量,它可以在模板中的任何地方使用,比如在模板中的表单元素中,可以使用模板引用变量来获取表单元素的值。模板引用变量的名字以#开头,比如#name#age等。模板引用变量的作用域是模板,不能在组件中使用。

模板引用变量可以引用如下内容

  • A DOM element in a template
  • a directive or component
  • a TemplateRef from an ng-template
  • a web component

Syntax

模板引用变量以#开头,比如下面的代码中,#phone就是一个模板引用变量, 它引用了<input>元素。就是说,我们可以通过#phone这个模板引用变量来获取<input>元素的值。

1
<input #phone placeholder="phone number" />

引用DOM元素

下面的代码使用#phone变量引用了input元素,在点击button的时候,获取input元素的值,并调用相应的方法。

1
2
<input #phone placeholder="phone number" />
<button (click)="callPhone(phone.value)">Call</button>

如果想在页面上显示input中输入的值,可以使用双向绑定,如下所示:注意这里添加了ngModel,没有这个的话,phone.value是获取不到值的,因为初始的时候输入框并并没有值,而且input值改变的时候,phone.value也无法感知更新。

1
2
<input ngModel #phone placeholder="phone number"/>
<p>{{phone.value}}</p>

引用DOM元素应该是模板变量最常用的场景了,有了它,我们就可以不用再使用document.getElementById()这样的方法来获取DOM元素了。

使用模板变量创建ViewChild

模板引用变量可以用来创建ViewChild,比如下面的代码中,#phone就是一个模板引用变量,它引用了<input>元素,然后我们就可以在组件中使用@ViewChild装饰器来获取<input>元素。

template.html代码

1
<input #phone placeholder="phone number" />

component.ts代码

1
@ViewChild('phone') phone: ElementRef;

这样我们就可以在组件中调用input元素的方法,比如点击某个按钮时,让input元素获取焦点。

1
2
3
focusPhone() {
this.phone.nativeElement.focus();
}

引用Component

模板引用变量可以引用组件,比如下面的代码中,#child就是一个模板引用变量,它引用了<child-component>组件,然后我们就可以在模板中使用#child这个模板引用变量来调用<child-component>组件中的方法和属性。

1
2
<child-component #child></child-component>
<button (click)="child.childMethod()">Call child method</button>

引用Directive

Directive中有一个属性:exportAs, 这个属性对应的值,就是模板引用变量中可以使用的名字。
下面是一个自定Directive,用来给某一段文字添加背景色。

1
2
3
4
5
6
7
8
9
10
11
12
13
14
15
16
17
18
19
import {Directive, ElementRef} from '@angular/core';

@Directive({
selector: '[appHighlight]',
exportAs: 'highlightDirective',
})

export class HighlightDirective {
constructor(private element: ElementRef) {
}

ngOnInit() {
this.element.nativeElement.setAttribute('style', 'background-color: yellow;');
}

setBackgroundColor(color: string) {
this.element.nativeElement.setAttribute('style', `background-color: ${color};`);
}
}

下面是使用这个自定义指令的component对应的模板代码:页面加载后,文字的背景色为黄色,点击按钮后,文字的背景色变为红色。注意#highlight="highlightDirective"这句话,highlight是模板引用变量,highlightDirectiveDirectiveexportAs属性对应的值。这样就把模板变量和其引用的指令关联起来了。

1
2
<p appHighlight #highlight="highlightDirective">test-component works!</p>
<button (click)="highlight.setBackgroundColor('red')">Reset color</button>

引用TemplateRef

模板引用变量可以引用<ng-template>元素,这种情形经常出现在条件渲染中,就是根据不同的条件渲染不同的内容,比如下面的代码中,当conditiontrue时,渲染thenBlock,当conditionfalse时,渲染elseBlock。这里面的thenBlockelseBlock引用的都是<ng-template>元素。

1
2
3
<div *ngIf="condition; then thenBlock else elseBlock"></div>
<ng-template #thenBlock>Content to render when condition is true.</ng-template>
<ng-template #elseBlock>Content to render when condition is false.</ng-template>

引用Web Component

模板引用变量可以引用Web Component,比如下面的代码中,#wc就是一个模板引用变量,它引用了<my-custom-element>元素,然后我们就可以在模板中使用#wc这个模板引用变量来调用<my-custom-element>元素中的方法和属性。

1
2
<my-custom-element #wc></my-custom-element>
<button (click)="wc.webComponentMethod()">Call web component method</button>

什么是事件代理(也叫事件委托)

事件代理是利用事件冒泡,只指定一个事件处理程序,就可以管理某一类型的所有事件。比如,我们有一个ul元素,里面有很多li元素,我们想要给每个li元素添加点击事件。有两种方法可以完成这件事:

  1. 给每个li元素都添加一个点击事件,弊端是如果li元素很多的话,就会导致代码很冗余,如果后面还有新的li元素添加进来,还需要给新的li元素添加点击事件,导致代码很难维护。
  2. ul元素添加一个点击事件,然后在事件处理程序中判断点击的是哪个li元素,然后执行对应的操作即可,简洁高效。这种方法就是事件代理

事件代理的原理

事件代理的原理是利用事件冒泡,将本应由被点击元素处理了的事件委托给其父元素来处理,这样就可以在事件处理程序中判断点击的是哪个元素,然后执行对应的操作。
不支持事冒泡的事件无法使用事件代理,比如blurfocusloadunload等事件。

示例代码

下面代码为ul元素添加了一个点击事件,然后在事件处理程序中判断点击的是哪个li元素,然后执行对应的操作。

1
2
3
4
5
6
7
<ul id="list">
<li>item 1</li>
<li>item 2</li>
<li>item 3</li>
<li>item 4</li>
<li>item 5</li>
</ul>
1
2
3
4
5
6
const list = document.getElementById('list');
list.addEventListener('click', (e) => {
if (e.target && e.target.nodeName === 'LI') {
console.log(e.target.innerHTML);
}
});

而下面的代码为table元素添加了点击事件,然后在事件处理程序中判断点击的是哪个td元素,然后执行对应的操作。

1
2
3
4
5
6
7
8
9
10
<table id="my-table">
<tr>
<td>1</td>
<td>2</td>
</tr>
<tr>
<td>3</td>
<td>4</td>
</tr>
</table>
1
2
3
4
5
6
7
8
9
const table = document.getElementById("my-table");
table.addEventListener("click", (e) => {
// Only handle click on td element.
if (e.target.tagName.toLowerCase() === "td") {
console.log(
`You clicked on td element with value ${e.target.innerHTML}`
);
}
});

为啥突然想到这个呢?

因为最近在做一个drag and drop的app,需要在拖拽的时候显示preview(被拖拽元素跟着鼠标走),需要一个操作就是克隆被拖拽的元素,而cloneNode这个方法是无法克隆事件的(只能克隆inline事件,无法克隆通过属性或者event listener添加的事件),而如果使用的是事件代理模式,则不存在这个问题。