0%

Test async task with Angular + Jest

在前端开发中,Unit Test是很重要的一个环节,而异步任务测试又是Unit Test不可避免的一个环节。本文将介绍如何使用Angular + Jest来测试异步任务。

待测试函数返回一个Promise

这是最简单的情况了,直接使用async/await即可。

待测函数

1
2
3
getPromise() {
return Promise.resolve(1);
}

测试代码

1
2
3
4
it('test getPromise', async () => {
const result = await service.getPromise();
expect(result).toBe(1);
});

在实际项目中不会有这么简单的情况,大部分都是一个async函数,里面await了其他异步操作,比如下面代码中的handleData,我们该如何测试它呢?

待测函数

1
2
3
4
5
6
7
8
9
10
11
12
13
14
15
getData() {
return new Promise((resolve) => {
setTimeout(() => {
resolve(10);
}, 100);
});
}

async handleData() {
const data = await this.getData();
return {
data,
timestamp: new Date().getTime(),
};
}

首先来分析一下,handleData是一个async方法,而async方法一定返回一个Promise(如果函数实际返回值不是Promise,那么async方法会用Promise包裹该返回值),所以我们还是可以直接使用async/await来测试。

测试代码

1
2
3
4
it('test handle data', async () => {
const data = await component.handleData();
expect(data.data).toBe(10);
});

最新版的Angular推荐使用waitForAsync来测试异步任务,所以我们也可以使用waitForAsync来测试。(注意waitForAsync中不能使用await。)

测试代码

1
2
3
4
5
it('test handle data', waitForAsync(() => {
component.handleData().then((data) => {
expect(data.data).toBe(10);
});
}));

当然也可以使用fakeAsync来测试,这个情景使用fakeAsync来测试有点大材小用,仅作示例。

1
2
3
4
5
6
it('test handle data', fakeAsync(() => {
service.handleData().then((data) => {
expect(data.data).toBe(10);
});
flush();
}));

注意不要忘记flush()操作,否则会产生如下错误:Error: 1 timer(s) still in the queue.

待测试函数包含异步操作,但是没有返回Promise。

以上情况还是有些简单,实际应用中,经常是一个函数中间夹杂着某些异步操作用来获取数据,然后对数据进行处理,最后可能也不返回Promise,对于这种情况,我们应该使用fakeAsync来测试。
fakeAsync内部有三个方法可以控制异步操作

  • tick: 让时间快进
  • flush: 让所有异步操作立即执行
  • flushMicrotasks: 让所有微任务立即执行
name 作用 使用场景
tick 用于控制时间流逝 想要精细控制每个timer的执行时机,tick在执行前会清空micro task队列,如果代码中有promise,tick之后,promise都会执行完毕。
flush 执行所有异步操作,不论是macro task还是micro task 这个最常用,无脑操作,将所有异步操作执行完,比如setTimeout和promise等,flush之后就可以expect了
flushMicrotasks 这个只执行micro task,对于前端来说,就是promise了,不会影响timer 如果代码中没有用到timer,可以使用这个。

下面看几个列子,分别讲解一下如何使用这三个方法来进行测试。

待测试函数只包含Macro Task

待测函数

1
2
3
4
5
6
7
8
9
10
11
updateValue() {
this.num = 10;

setTimeout(() => {
this.num = 11;
}, 100);

setTimeout(() => {
this.num = 12;
}, 200);
}

测试代码

1
2
3
4
5
6
7
8
it('test updateValue', fakeAsync(() => {
component.updateValue();
expect(component.num).toBe(10);
tick(100); // tick the timer by 100ms
expect(component.num).toBe(11);
tick(100); // tick the timer by 100ms again.
expect(component.num).toBe(12);
}));

来分析一下以上测试代码,首先我们调用了updateValue方法,然后期望num的值为10,因为updateValue中有两个timer,所以我们需要调用两次tick,第一次调用tick,让时间快进100ms,这时候第一个timer会执行,num的值变为11,然后再调用一次tick,让时间再快进100ms,这时候第二个timer会执行,num的值变为12。

当然了,如果你不想测试中间过程,而只想测试最终的结果,也可以使用Jest提供的useFakeTimer方法。

测试代码

1
2
3
4
5
6
it('test updateValue', () => {
jest.useFakeTimers();
component.updateValue();
jest.runAllTimers();
expect(component.num).toBe(12);
});

useFakeTimers会将所有的timer替换成一个fake的timer,然后调用runAllTimers,会让所有的timer立即执行,这样就可以直接测试最终结果了。

待测试函数只包含Micro Task

待测函数

1
2
3
4
5
6
7
8
fetchData() {
return Promise.resolve(10);
}
updateValue() {
this.fetchData().then((value) => {
this.num = value;
});
}

测试代码

1
2
3
4
5
6
it('test updateValue', fakeAsync(() => {
component.updateValue();
expect(component.num).toBe(0);
flushMicrotasks(); // 这里用tick()或者flush()也可以。但是flushMicrotasks更加精确。
expect(component.num).toBe(10);
}));

上述代码中,首先调用了updateValue方法,然后期望num的值为0,因为updateValue中有一个promise,所以我们需要调用flushMicrotasks,让所有的micro task立即执行,这时候num的值变为10。

当然上例中的flushMicrotasks也可以替换成flush,因为flush会让所有的异步操作立即执行,包括macro task和micro task。也可以使用tick,因为tick在执行之前也会先把微任务队列清空(把队列中的微任务都执行完)。

待测试函数同时包含Macro Task和Micro Task

待测函数

1
2
3
4
5
6
7
8
9
10
11
12
fetchData() {
return new Promise<number>((resolve) => {
setTimeout(() => {
resolve(10);
}, 100);
});
}
updateValue() {
this.fetchData().then((value) => {
this.num = value;
});
}

测试代码

1
2
3
4
5
6
it('test updateValue', fakeAsync(() => {
component.updateValue();
expect(component.num).toBe(0);
tick(100); //或者flush()
expect(component.num).toBe(10);
}));

上述代码中,fetchData()中同时包含Macro task和Micro task,所以我们可以使用tick或者flush来测试。但是使用flushMicrotasks就不行了,因为flushMicrotasks只会让micro task立即执行,而setTimeout是macro task,不会被执行。

Limitation: The fakeAsync() function won’t work if the test body makes an XMLHttpRequest (XHR) call. XHR calls within a test are rare, but if you need to call XHR, see the waitForAsync() section.

需要更新UI的异步测试

上面的测试用例都不涉及UI更新,如果需要测试UI更新,那么需要使用fixture.detectChanges()来触发Angular的变更检测。

fixture.WhenStable()

这个方法也是用来处理异步任务的,可以稍后总结一下。fixture.WhenStable()通常和waitForAsync一起配合使用。

1
2
3
4
5
6
7
8
9
10
11
it('should show quote after getQuote (waitForAsync)', waitForAsync(() => {
fixture.detectChanges(); // ngOnInit()
expect(quoteEl.textContent).withContext('should show placeholder').toBe('...');

fixture.whenStable().then(() => {
// wait for async getQuote
fixture.detectChanges(); // update view with quote
expect(quoteEl.textContent).toBe(testQuote);
expect(errorMessage()).withContext('should not show error').toBeNull();
});
}));

总结

  • 如果函数返回一个Promise,那么直接使用async/await测试即可。新版的Angular推荐使用waitForAsync来测试。
  • 如果函数中间夹杂着异步操作,但是没有返回Promise,那么分为以下三种情况
    • 待测试函数只包含微任务 - 使用fakeAsync配合flushMicrotasks来控制异步操作。
    • 待测试函数只包含宏任务 - 使用fakeAsync配合tick或者flush来控制异步操作。
    • 待测试函数同时包含微任务与宏任务 - 使用fakeAsync配合tick或者flush来控制异步操作。
  • 能用async/await或者waitForAsync测试的一定能用fakeAsync测试,反之不成立。

最终结论: 在Angular + Jest为基础的项目中,使用fakeAsync + tick/flush能搞定所有的异步测试。

A simple singleton with global variable

1
2
3
4
5
6
7
8
9
10
11
12
13
14
15
16
17
const Singleton = function (name) {
this.name = name;
};

let instance = null;

Singleton.getInstance = function (name) {
if (!instance) {
instance = new Singleton(name);
}

return instance;
};

const a = Singleton.getInstance('zdd');
const b = Singleton.getInstance('ddz');
console.log(a === b); // true

这是一个最简单的单例模式,但是这种方式有一个问题,就是instance是一个全局变量,会污染全局空间。稍微改进一下,将instance挂载到Singleton上。

1
2
3
4
5
6
7
8
9
10
11
12
13
14
15
const Singleton = function (name) {
this.name = name;
};

Singleton.getInstance = function (name) {
if (!this.instance) {
this.instance = new Singleton(name);
}

return this.instance;
};

const a = Singleton.getInstance('zdd');
const b = Singleton.getInstance('ddz');
console.log(a === b);

这样就不会污染全局空间了,但是这种方式还有一个问题,无法阻止使用者通过new Singleton()来创建实例。这无形中增加了使用者的心智负担,使用者必须提前知道Singleton是一个单例,也必须调用getInstance方法来获取实例。假设使用者用new Singleton()来创建实例,那么就会创建出多个实例。

1
2
3
const c = new Singleton('zdd');
const d = new Singleton('ddz');
console.log(c === d); // false, not a singleton !!!

为了避免用户通过new来创建实例,可以使用闭包来实现,将Singleton变成一个IIFE(Immediately Invoked Function Expression)。

Use IIFE

1
2
3
4
5
6
7
8
9
10
11
12
13
14
15
16
17
18
19
20
21
22
23
24
const Singleton = (() => {
let instance = null;

// 这里的init函数返回的是一个对象,而不是一个类的实例。
// 这里init是箭头函数,最好不要使用this, 因为this指向global对象。
const init = (name) => ({
name,
});

return {
getInstance: (name) => {
if (!instance) {
instance = init(name);
}

return instance;
},
};
})();

const a = Singleton.getInstance('zdd');
const b = Singleton.getInstance('ddz');
console.log(a === b); // true

此时,使用者就无法通过new来创建实例了,只能通过getInstance来获取实例。

1
2
3
const c = new Singleton(); // error, Singleton is not a constructor
const d = new Singleton();
console.log(c === d);

这里使用IIFE的好处是:

  1. 不会污染全局空间,所有变量及方法都是私有的。
  2. 用户无法使用new来创建实例,只能通过getInstance来获取实例。

为了区分私有方法和变量,以及公有方法和变量,可以使用下面的代码,更好的区分私有和公有。

1
2
3
4
5
6
7
8
9
10
11
12
13
14
15
16
17
18
19
20
21
22
23
24
25
26
27
28
29
30
31
32
33
34
35
36
37
38
39
const Singleton = (() => {
let instance = null;

const init = () => {
// Private methods and variables
const privateVariable = 'I am private variable';
const privateMethod = () => {
console.log('Private method');
};

// This object is the return value of init will be assigned to instance.
return {
// Public methods and variables
publicVariable: 'I am public variable',
publicMethod: () => {
console.log('Public method');
},
};
};

// Public method to get the singleton instance
const getInstance = () => {
if (!instance) {
instance = init();
}
return instance;
};

// Expose the public method
return {
getInstance,
};
})();

// Usage
const singletonInstance1 = Singleton.getInstance();
const singletonInstance2 = Singleton.getInstance();

console.log(singletonInstance1 === singletonInstance2); // true

前面说过,使用.getInstance()来获取实例,增加了用户的心智负担,如果想要用户通过new来创建实例,可以使用下面的代码。

1
2
3
4
5
6
7
8
9
10
11
12
13
14
15
16
17
18
19
20
const Singleton = (() => {
let instance = null;

function createInstance(name) {
if (!instance) {
// Init code goes here, If you want to exact init to a function, you must use createInstance.prototype.init = function(name){this.name = name}. This will make init public to every instance, it's bad idea!
this.name = name;
instance = this;
}

return instance;
}

return createInstance;
})();

const a = new Singleton('zdd');
const b = new Singleton('ddz');
console.log(a === b); // true

下面是使用ES6的class来实现单例模式。代码更加简洁优雅。

Use class

1
2
3
4
5
6
7
8
9
10
11
12
13
14
15
class Singleton {
constructor() {
if (!Singleton.instance) {
Singleton.instance = this;
// Your initialization code here
}
return Singleton.instance;
}

// Additional properties and methods can be added here
}

const instance1 = new Singleton();
const instance2 = new Singleton();
console.log(instance1 === instance2); // true

虽然这种方式代码简洁,但是这种方式有一个问题,就是用户可以通过new Singleton()来创建实例,虽然创建的实例都是同一个,但是还是很别扭,我们可以换一个思路,指导出一个实例,而不是导出整个类。

Use Proxy

1
2
3
4
5
6
7
8
9
10
11
12
13
14
class Singleton {
constructor() {
if (!Singleton.instance) {
Singleton.instance = this;
// Your initialization code here
}
return Singleton.instance;
}

// Additional properties and methods can be added here
}

const singletonInstance = new Singleton();
export default Object.freeze(singletonInstance);

这样用户只需使用我们导出的实例就行了,不用自己去创建实例。但是这种方式还是有一个问题,就是用户可以通过singletonInstance.instance来获取到实例,这样就破坏了单例模式的封装性。我们可以使用ES2022中新增的private field来解决这个问题。

Use private field

1
2
3
4
5
6
7
8
9
10
11
12
13
14
15
16
17
18
19
class Singleton {
static #instance = null;

constructor() {
if (!Singleton.#instance) {
Singleton.#instance = this;
// Your initialization code here
}
return Singleton.#instance;
}

// Additional properties and methods can be added here
logInstance() {
console.log(Singleton.#instance);
}
}

const singleton = new Singleton();
export default Object.freeze(singleton);

TypeScript

1
2
3
4
5
6
7
8
9
10
11
12
13
14
15
16
class Singleton {
private static instance: Singleton;

private constructor() {}

public static getInstance(): Singleton {
if (!Singleton.instance) {
Singleton.instance = new Singleton();
}
return Singleton.instance;
}
}

const s1 = Singleton.getInstance();
const s2 = Singleton.getInstance();
console.log(s1 === s2); // true

Use Proxy

待补充。

Introduction

观察者模式是设计模式中非常重要的一个模式,它属于行为模式的一种。下面是wikipedia中对观察者模式的定义。

In software design and engineering, the observer pattern is a software design pattern in which an object, named the subject, maintains a list of its dependents, called observers, and notifies them automatically of any state changes, usually by calling one of their methods.

是不是看得一头雾水?我们先以一个现实中的例子来解释观察者模式。假设你现在正在看一场球赛,那么这时候你是观察者(Observer),而比赛是被观察者(Observable),或者叫主题(Subject)。比赛中如果你支持的球队进球了,你会欢呼跳跃,而如果对方进球,你会沮丧失望。你的状态会根据比赛的状态而改变,这就是观察者模式的一个例子。

观察者模式有以下特征:

  1. Subject和观察者之间是一对多的关系。
  2. 每个观察者有一个update方法。
  3. Subject(被观察者)维护一个观察者列表。
  4. 当Subject状态发生变化时,对于列表中每个观察者,都会调用它们的update方法通知他们。

Define Observer

下面的代码为每个观察者指定一个名字,当Subject发生变化时,Observerupdate方法会被调用,打印出观察者的名字。update方法就是被观察者和观察者联系的纽带。

1
2
3
4
5
6
7
8
9
10
11
export default class Observer {
private readonly name;

constructor(name: string) {
this.name = name;
}

update() {
console.log(`${this.name} updated`);
}
}

Define Subject

Subject中文翻译为主题,它是一个对象,拥有注册观察者、删除观察者、通知观察者的方法。当某个特定事件发生时,Subject会通知所有观察者,让它们做出相应的反应。所以Subject实际上就是被观察者。

下面的代码为Subject添加了一个观察者数组,当Subject发生变化时,会遍历观察者数组,调用每个观察者的update方法。subscribe方法实际上就是addObserver方法,unsubscribe方法实际上就是removeObserver方法。这两个方法用来将观察者加入或者移除观察者数组。被移除数组的观察者无法再收到Subject的通知。

1
2
3
4
5
6
7
8
9
10
11
12
13
14
15
16
17
import Observer from './Observer';

export default class Subject {
private observers: Observer[] = [];

subscribe(observer: Observer) {
this.observers.push(observer);
}

unsubscribe(observer: Observer) {
this.observers = this.observers.filter((o) => o !== observer);
}

notify() {
this.observers.forEach((o) => o.update());
}
}

Use Observer

1
2
3
4
5
6
7
8
9
10
11
12
13
14
15
import Observer from './Observer';
import Subject from './Subject';

const subject = new Subject();
const observer1 = new Observer('Observer 1');
const observer2 = new Observer('Observer 2');
const observer3 = new Observer('Observer 3');

subject.subscribe(observer1);
subject.subscribe(observer2);
subject.subscribe(observer3);
subject.notify(); // 1

subject.unsubscribe(observer1);
subject.notify(); // 2

在 // 1 处,输入如下内容。

1
2
3
Observer 1 updated
Observer 2 updated
Observer 3 updated

在 // 2 处,输入如下内容,因为Observer 1被移除了,所以只有Observer 2和Observer 3收到了通知。

1
2
Observer 2 updated
Observer 3 updated

Summary

  1. Subject(被观察者,也叫Observable):拥有注册观察者、删除观察者、通知观察者的方法。
  2. Observer(观察者):拥有update方法,当Subject发生变化时,Observer的update方法会被调用。
  3. 观察者和被观察者之间是松耦合的,被观察者只知道观察者的接口,而不知道观察者的具体实现。

网上常见的EventBus就是基于观察者模式实现的,当一个组件发生变化时,EventBus会通知所有订阅了这个事件的组件。下面是一个简单的EventBus实现。之所以将EventBus挂在到Window对象上,是因为这样可以在全局范围内使用EventBus。比如在不同的模块中,可以通过EventBus来通信。Module Federation中Remote模块和Host模块之间的通信也可以通过EventBus实现。

1
2
3
4
5
6
7
8
9
10
11
12
13
14
15
16
17
18
19
20
21
22
// eventBus.js
class EventBus {
constructor() {
this.listeners = {};
}

on(eventName, callback) {
if (!this.listeners[eventName]) {
this.listeners[eventName] = [];
}
this.listeners[eventName].push(callback);
}

emit(eventName, data) {
if (this.listeners[eventName]) {
this.listeners[eventName].forEach(callback => callback(data));
}
}
}

const eventBus = new EventBus();
window.eventBus = eventBus;
1
2
// Emit an event from Remote module.
window.eventBus.emit('someEvent', { message: 'Hello from Remote' });
1
2
3
4
// Listen for an event from Host module.
window.eventBus.on('someEvent', (data) => {
console.log(data.message); // 输出: Hello from Remote
});

注意上面这个写法并不支持粘性事件,如果要支持粘性事件,该如何改进呢?

How node.js handle environment variables

The following content was generated by “文心一言”, Have fun!

在 Node.js 中处理环境变量通常使用 process.env 对象。当你想要从不同的配置文件中加载环境变量时,需要一些额外的步骤。通常,我们不直接通过 Node.js 加载 .local.env或其他配置文件,而是通过一些库(如 dotenv)来完成这个任务。

使用 dotenv 处理环境变量

安装 dotenv:

1
npm install dotenv

在代码中使用 dotenv:
你可以在代码的顶部require dotenv,并使用它加载环境变量。(默认情况下, dotenv会自动寻找项目根目录下的.env文件,如果想指定其他配置文件,可以通过path参数来控制)

1
require('dotenv').config();

创建配置文件:
通常,你可以创建一个 .env 文件在你的项目的根目录。这个文件可以包含环境变量,如:

.env 文件

1
2
PORT=3000  
DATABASE_URL=mysql://user:password@localhost/dbname

.local.env文件通常是用于本地开发的环境变量,这些变量不应该被提交到版本控制系统中(如 git)。你可以在你的.gitignore文件中添加.local.env 来确保它不会被提交。

访问环境变量:
你可以使用 process.env 对象来访问你加载的环境变量。例如:

1
2
const port = process.env.PORT;  
const databaseUrl = process.env.DATABASE_URL;

配置文件的优先级

当你有多个配置文件时,你需要确定哪个文件的优先级更高。例如,你可能有一个通用的 .env 文件,还有一个针对本地开发的 .local.env 文件。

通常,你可以在加载配置文件时确定优先级。例如,你可以首先加载 .local.env,然后再加载 .env。这样,.local.env 中的设置将覆盖 .env 文件中的设置。使用 dotenv 时,你可以这样做:

1
2
require('dotenv').config({ path: '.local.env' });  
require('dotenv').config();

示例:处理端口环境变量

假设你在 .env 文件中有以下设置:

1
PORT=3000

在 .local.env 文件中有以下设置:

1
PORT=8080

你可以这样加载和使用它们:

1
2
3
4
5
6
7
8
9
10
require('dotenv').config({ path: '.local.env' }); // 加载 .local.env  
require('dotenv').config(); // 加载 .env

const express = require('express');
const app = express();
const port = process.env.PORT; // port = 8080,因为 .local.env 中的设置将覆盖 .env 中的设置。

app.listen(port, () => {
console.log(`Server is running on port ${port}`);
});

在这个例子中,服务器将运行在 8080 端口上,因为 .local.env 中的 PORT 设置覆盖了 .env 文件中的设置。

How to interact Jira/Confluence REST API with Python

1
2
3
4
5
6
7
8
9
10
11
12
13
14
15
16
17
18
19
20
21
22
23
24
25
26
27
28
29
30
31
32
33
34
35
36
37
38
39
40
41
42
43
44
45
46
47
48
49
50
51
52
53
54
55
56
57
58
59
60
61
62
import requests
import json

# Jira API endpoint and authentication
jira_url = "https://your-jira-instance/rest/api/2/search"
jira_token = "your-jira-personal-access-token"

# Confluence API endpoint and authentication
confluence_url = "https://your-confluence-instance/rest/api/content"
confluence_token = "your-confluence-personal-access-token"

# Step 1: Get stories from Jira
jira_headers = {
"Authorization": f"Bearer {jira_token}",
"Content-Type": "application/json"
}

jira_params = {
"jql": "labels = release",
"maxResults": 100
}

response = requests.get(jira_url, headers=jira_headers, params=jira_params)
jira_stories = response.json()["issues"]

# Step 2: Create a new Confluence page
confluence_headers = {
"Authorization": f"Bearer {confluence_token}",
"Content-Type": "application/json"
}

confluence_payload = {
"type": "page",
"title": "Release Stories",
"space": {
"key": "your-space-key"
},
"body": {
"storage": {
"value": "<h2>Release Stories</h2>",
"representation": "storage"
}
}
}

response = requests.post(confluence_url, headers=confluence_headers, json=confluence_payload)
confluence_page_id = response.json()["id"]

# Step 3: Add the stories to the Confluence page
for story in jira_stories:
story_title = story["fields"]["summary"]
story_description = story["fields"]["description"]

confluence_payload["body"]["storage"]["value"] += f"<h3>{story_title}</h3><p>{story_description}</p>"

response = requests.put(f"{confluence_url}/{confluence_page_id}", headers=confluence_headers, json=confluence_payload)

# Step 4: Verify the response
if response.status_code == 200:
print("Page created successfully!")
else:
print("Failed to create the page.")

Here is another example with Excel export support

1
2
3
4
5
6
7
8
9
10
11
12
13
14
15
16
17
18
19
20
21
22
23
24
25
26
27
28
29
30
31
32
33
34
35
36
37
38
39
40
41
42
43
44
45
46
47
48
49
50
51
52
53
54
55
56
57
58
59
60
61
62
63
64
65
66
67
68
69
70
71
72
73
74
75
76
77
78
79
80
81
82
83
84
85
86
87
88
89
90
91
92
93
94
95
import requests
from openpyxl import Workbook
from openpyxl.styles import Color, PatternFill, Font
import datetime
from datetime import timedelta

start_date = '2021-05-29'

def get_issue_list():
headers = {
'Authorization': 'Basic YOUR_TOKEN'}
project = 'YOUR_PROJECT'
issue_type = 'Story'
sprint = 'YOUR_SPRINT_ID'
order_by = 'key'
order_by_type = 'ASC'
jql = f'project = {project} AND issuetype = {issue_type} AND Sprint = {sprint} AND created >= {start_date} ORDER BY {order_by} {order_by_type}'
params = {
'jql': jql,
'fields': ['summary', 'created', 'status', 'priority']
}
url = f'https://jira.xxx.com/rest/agile/1.0/sprint/{sprint}/issue'
r = requests.get(url, headers=headers, params=params)
return r.json()


def parse_response(response):
issue_list = []
i = 1
for issue in response['issues']:
created = str(issue['fields']['created']).split('T')[0]
due_date = datetime.date.fromisoformat(created) + timedelta(2)
issue_item = {'id': i, 'issue key': issue['key'],
'summary': issue['fields']['summary'],
'status': issue['fields']['status']['name'],
'priority': issue['fields']['priority']['name'],
'created': created,
'due date': due_date}
issue_list.append(issue_item)
i += 1
return issue_list


def issue_mapping(issue_list):
new_issue_list = []

priority_mapping = {
'Low': 'Minor',
'Medium': 'Minor',
'High': 'Major',
}

status_mapping = {
'To Do': 'Open',
}

for issue in issue_list:
if issue['priority'] in priority_mapping:
issue['priority'] = priority_mapping[issue['priority']]
if issue['status'] in status_mapping:
issue['status'] = status_mapping[issue['status']]
new_issue_list.append(issue)
return new_issue_list


def write_to_excel(issue_list):
issue_list = issue_mapping(issue_list)
workbook = Workbook()
sheet = workbook.active
sheet.title = 'jira issue'
sheet.append(['id', 'issue key', 'summary', 'status', 'priority', 'created', 'due date'])

# set color for header
for rows in sheet.iter_rows(min_row=1, max_row=1):
for cell in rows:
cell.fill = PatternFill(fgColor="002060", fill_type="solid")
cell.font = Font(color="FFFFFF")

for issue in issue_list:
sheet.append(list(issue.values()))
# fill in color
my_red = Color(rgb='00B050')
my_fill = PatternFill(patternType='solid', fgColor=my_red)
for row_cells in sheet.iter_rows(min_row=1, max_row=sheet.max_row):
if row_cells[3].value == 'Done':
row_cells[3].fill = my_fill

file_name = 'report_issue_list_' + start_date + '.xlsx'
workbook.save(file_name)


response = get_issue_list()
issue_list = parse_response(response)
write_to_excel(issue_list)
print("Done")

Reference:

https://developer.atlassian.com/cloud/jira/platform/rest/v3/intro/

The Jira Software Cloud REST API

JIRA 7.12.0

Generate app

Take Angular as an example, first, install angular plugin for Nx.

1
nx add @nx/angular

Then, generate an app.

1
nx g @nx/angular:app appName

Generate library

1
nx g @nx/angular:lib libName

Generate Angular component

The following command generate a angular component for project my-app.

1
nx generate @nx/angular:component my-component --project=my-app

Note that --project is deprecated and will be removed in Nx v20, use --directory instead.

1
nx generate @nx/angular:component my-component --directory=apps/my-app/src/app

The value of --directory is relative to the root of the project.

Note –directory is only used for component, to generate service in Angular, you can still use --project.

If above commands not work, use the following command. where header is the name of the component, the first one is folder name.

1
nx generate @nx/angular:component apps/yanzhenqingshufa/src/app/layout/header/header

Show affected apps

nx v15

1
nx affected:apps

nx v16

1
nx print-affected --type=app --select=projects

nx v17+

1
2
3
nx show projects --affected
nx affected --graph -t build
nx graph --affected

If there is no affected apps, nx print-affected will show the following output. look at the projects property, its empty, which means there is no affected apps.

1
2
3
4
5
6
7
8
9
10
11
12
13
14
{
"tasks": [],
"projects": [],
"projectGraph": {
"nodes": [
"content-templates",
"todos-e2e",
"todos",
"data",
"api",
"ui"
],
}
}

If your apps/libs was created manually, you have to make sure that there is a file project.json under the root of your app/lib, and have the following content at least.

1
2
3
4
{
"name": "content-templates",
"projectType": "application"
}

Show graph

1
nx dep-graph

Android Studio Tips -1

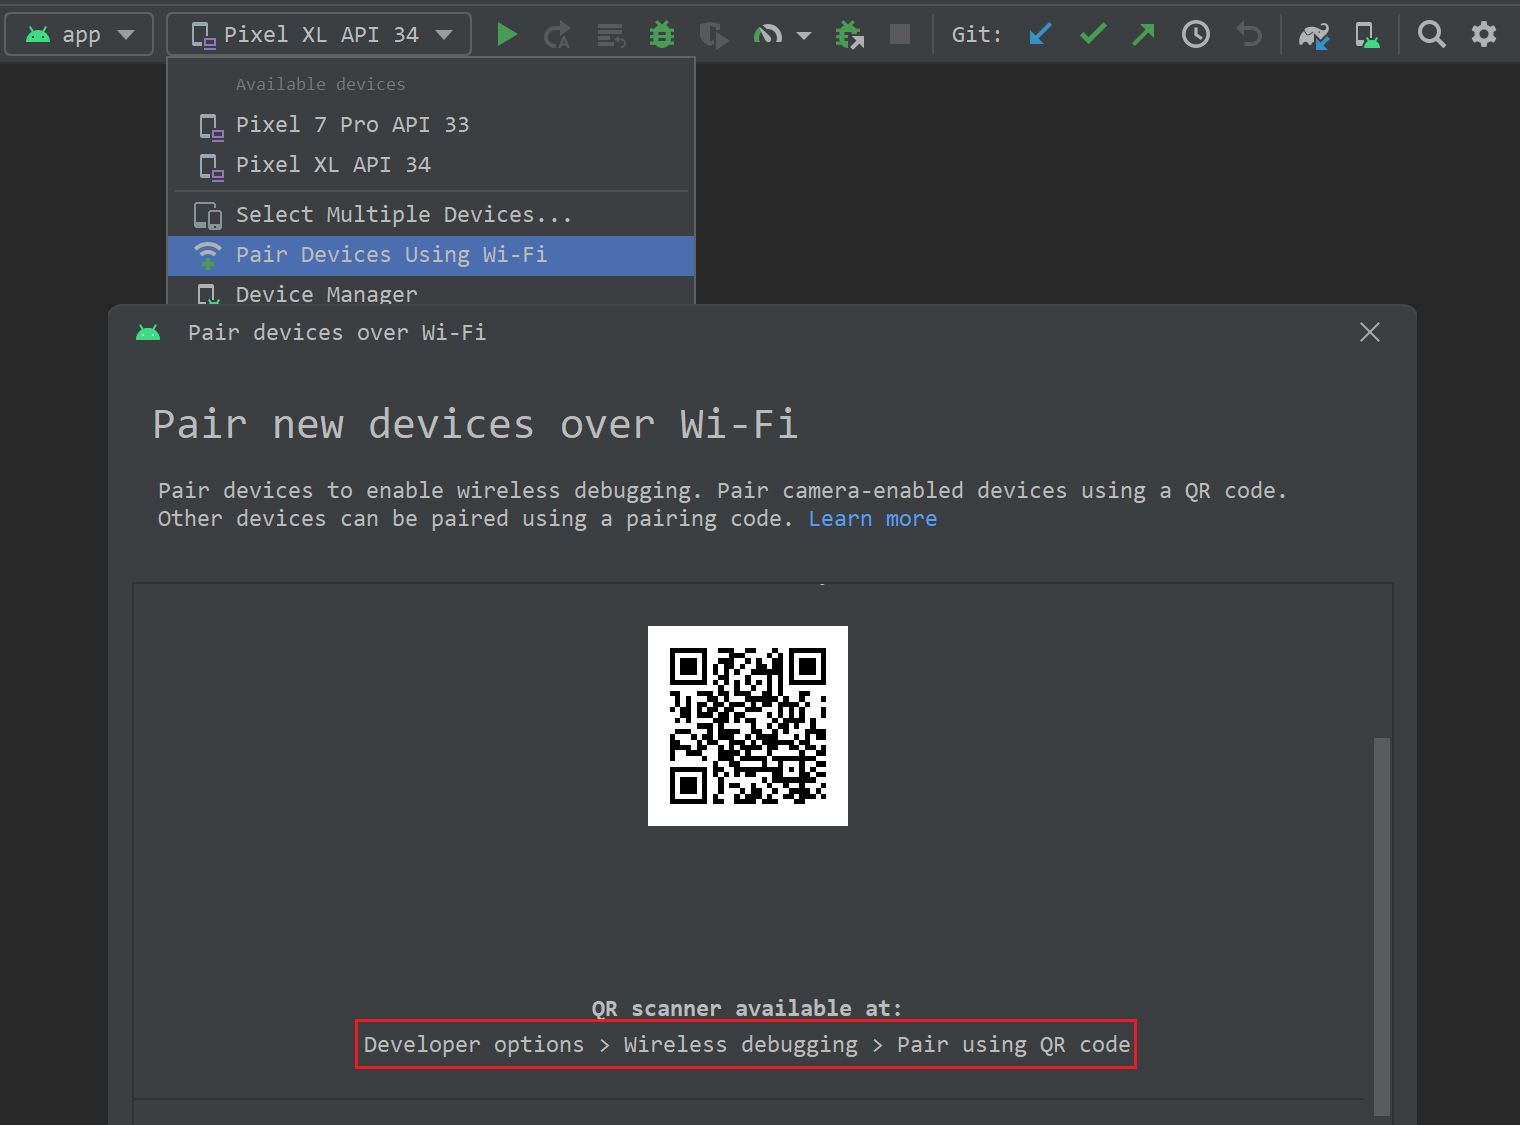
1. Wireless debugging with Android device

  1. Select Pair Devices using Wi-Fi under emulator dropdown list.
  2. Enable debug mode on your android device(see here for more details).
  3. On your android device, select Settings | Developer options | Wireless debugging | Pair using QR code to enable wireless debugging.
    Alt text

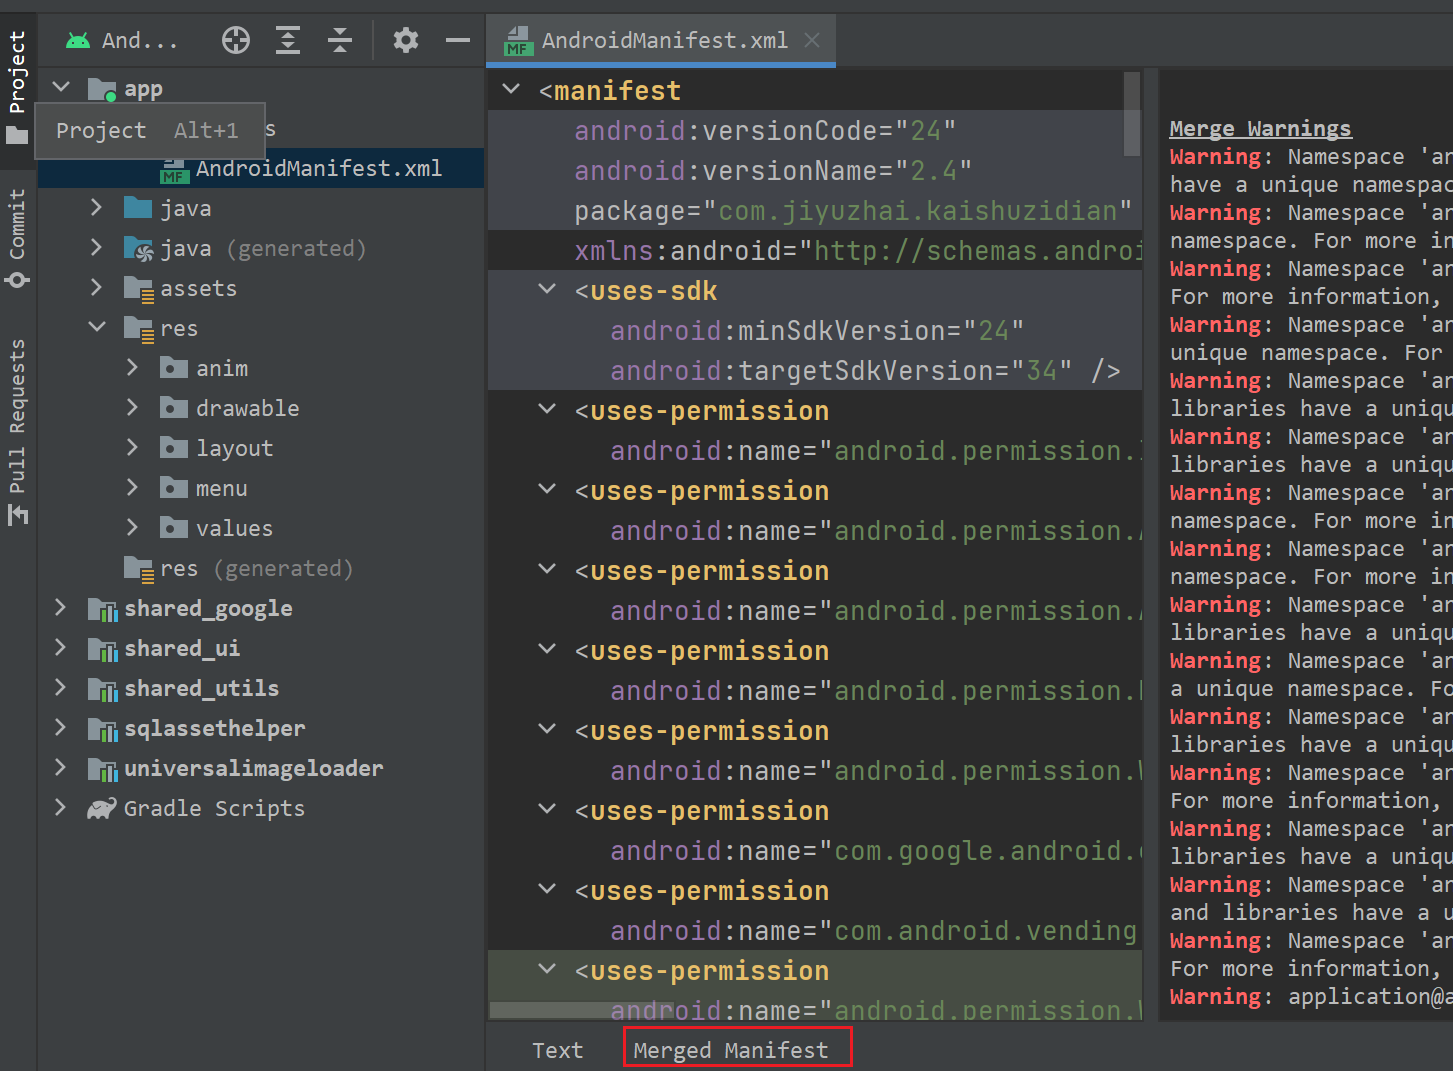
2. Fix Manifest merged errors

  1. Open AndroidManifest.xml file.
  2. Click Merged Manifest tab at the bottom of the editor.
  3. Scroll down to the bottom to see the errors.
    Alt text

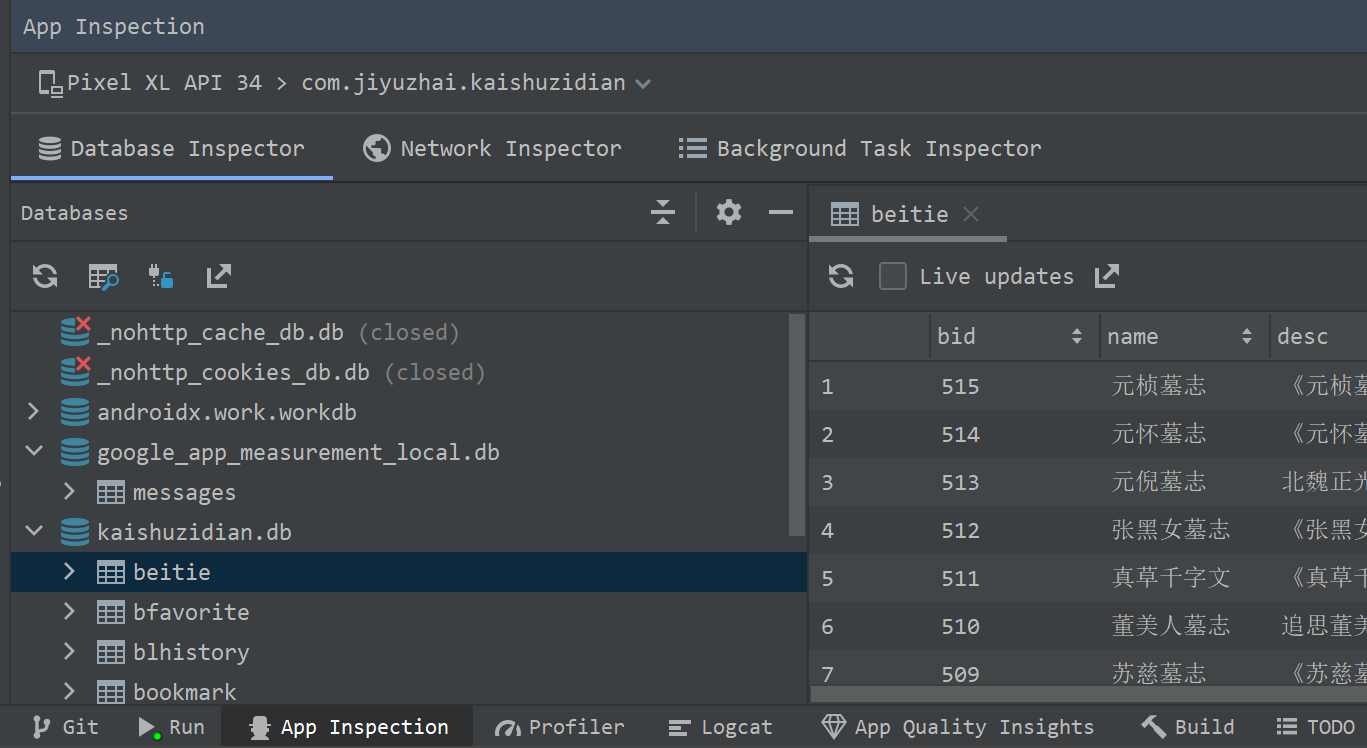
3. View database file in Android Studio

  1. Select View | Tools Window | App Inspection from the main menu.
  2. Launch your app on a device/Emulator running API level 26 or higher.
    Alt text
  3. If you see a red close icon on your database file which means your database was not opened, you can operate on your app to open the database(such as click a button, open a fragment or whatever action which can open the database).
  4. If you database was opened, you can click the table under this database to view the data.

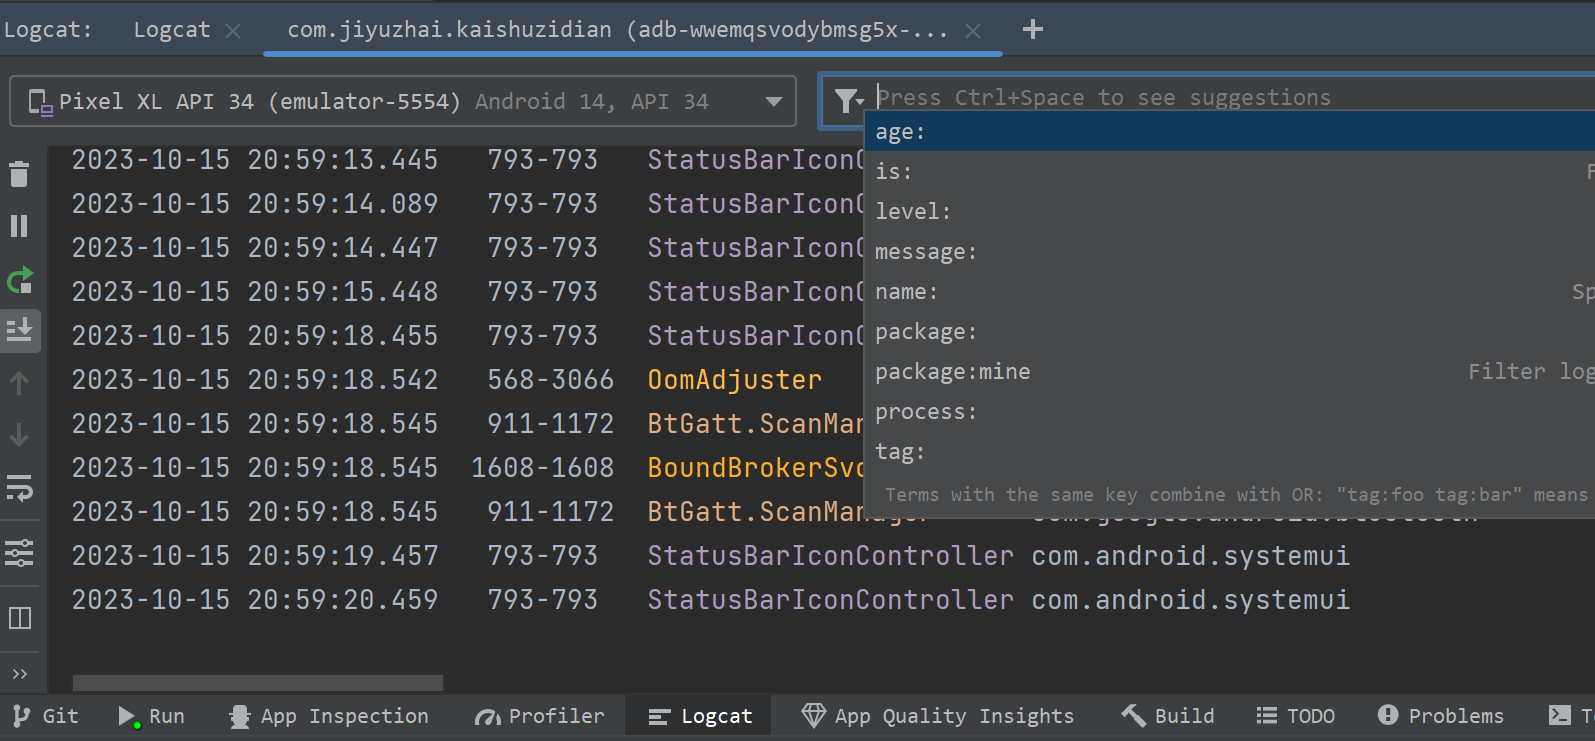
4. Filter logs in Logcat

  1. Select Logcat at the bottom of Android Studio.
  2. Select the emulator/device where your app runs on.
  3. Focus the filter input box, and press Ctrl + Space to open the filter dialog. then select the filter options you want.
    Alt text
  4. For example, if you want to see only error logs for package com.jiyuzhai.kaishuzidian, you can input package: com.jiyuzhai.kaishuzidian level: error as a filter.

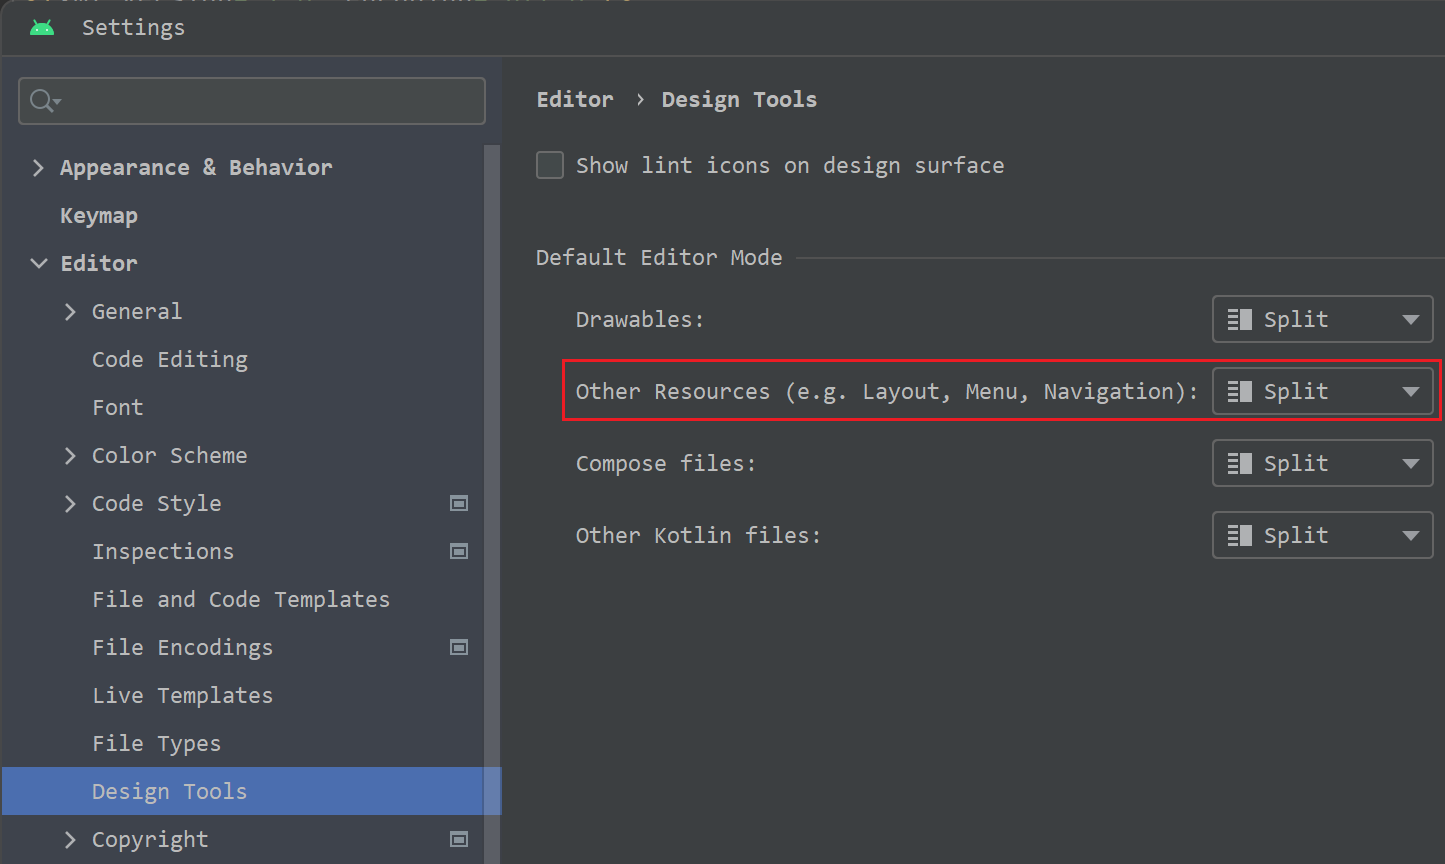
5. Open xml layout file in split mode

Do you ever encounter this situation? whenever you open an xml layout file, it opens in design mode by default. You can do the following to open it in split mode by default.

  1. Open Settings | Editor | Design Tools from the main menu.
  2. Check Prefer XML editor option.
  3. Click OK button.
    Alt text

File xxx already exists, it cannot be overwritten by SerializableChange(file=xxx, fileStatus=NEW, normalizedPath=xxx.class).

  1. In Android menu, select Build | Clean Project, then rebuild, that’s it!

Android emulator stop working.

Delete the lock file under avd folder, here is the lock file path under android sdk folder.

1
$android_sdk_dir\.android\avd\Pixel_XL_API_34.avd\xxx.lock

xxx is already defined in a single-type import

在Android Java中,同一个java文件不能导入两个同名的包,比如两个来自不同module的R文件,解决方法是使用全路径名,比如:

1
2
com.jiyuzhai.kaishuzidian.R.string.app_name
com.jiyuzhai.kaishuzidian2.R.string.app_name

java.lang.OutOfMemoryError: Java heap space

Gradle内存过小导致的错误,可以增加gradle的内存。

  1. 打开gradle.properties文件,如果没有则新建一个。
  2. 添加org.gradle.jvmargs=-Xmx4096m,其中4096m是内存大小,可以根据需要调整。
    我的电脑是32G内存,所以给出如下配置,最高8g, 最低4g内存。
1
2
org.gradle.jvmargs=-Xmx8g -XX:MaxPermSize=4g -XX:+HeapDumpOnOutOfMemoryError -Dfile\
.encoding=UTF-8

Android live reload

  1. Run your app in Emulator or device.
  2. Change your code.
  3. Click Apply Changes button in the toolbar.
    android-apply-changes

Connect to Google App Vitals

  1. Sign in to your developer account in Android Studio using the profile icon at the end of the toolbar.
  2. Open App Quality Insights by clicking the tool window in Android Studio or clicking View > Tool Windows > App Quality Insights.
  3. Click the Android vitals tab within App Quality Insights.

Can not resolve symbol ‘BuildConfig’

2023年中秋节,国庆节

短暂的假期结束了,今天是大多数人上班的日子,而我还在休息,因为在外企工作,所以不会串休,我请了十月五号,六号两天的假期,所以一共能休息九天(含两个周末)。

有人在朋友圈戏称,“八天假期很短吧?马上你就知道七天上班有多长了!”

今年的假期安排是回媳妇的老家—山西运城,前三天在家扒苞米,10月四日去了趟壶口瀑布,然后就是一直在家待着看抖音直播,我戏称,这回真是实现了看直播自由。

运城雨水丰沛,十一期间几乎每天下雨,不过都是小雨,不像大连这边的雨,下起来很大,而且一阵就结束了。

扒苞米这活讲真,我真的是十多年没有干了,小时候在家每年都干这活。一家人围在玉米堆旁边,一边扒,一边聊天,其乐融融。

壶口瀑布非常壮观,这是我第一次看见黄河,有趣的是,壶口瀑布位于山西和陕西两省的交界处,为两省共有,我们在河这边看,陕西的游客在河对面看,不过山西这边的视角更好些。(听网友说的)

本来想去李家大院的,无奈去壶口瀑布开车太累了,最后七公里的路程,堵了两个小时,所以就放弃了。

十月五号返回大连,勇男老弟开车来接,又去他家小坐,拿了很多好吃的,回到旅顺已经快十二点了。

Android monorepo in action(Android monorepo实践)

What is monorepo(什么是monorepo)

In version control systems, a monorepo (“mono” meaning ‘single’ and “repo” being short for ‘repository’) is a software development strategy where code for many projects is stored in the same repository.

Steps

  1. Create a folder named monorepo, this is the root folder of the monorepo.
  2. Create folder mono-libraries under monorepo, this is the folder for shared libraries.
  3. Create foldermono-build-logic under monorepo, this is the folder for gradle files.

注意事项

该monorepo要求每个side project都要打开一个Android Studio实例,如果同时打开多个,那么只能有一个设置为主项目。

Reference(参考)

https://blog.blundellapps.co.uk/make-a-monorepo-for-your-android-projects/