JavaScript Event Loop
Event loop是JavaScript中一个非常重要的知识点,也是面试中常考的内容,今天我们来详细了解一下。其实Event loop的过程非常简单,它是一个无限循环,Javascript引擎等待任务,执行任务,sleep,等待下一个任务,继续执行任务,如此循环往复。虽说简单,但是也有如下特点:
- 浏览器渲染只有在JS执行完才进行,这二者是互斥的。
- 所以如果一个任务执行时间过长,会导致页面卡顿,也会导致用户交互不流畅,比如点击按钮没反应。
比如下面这段代码:运行时你会发现,浏览器一直在执行count函数,而这函数需要运行很久,在它执行完之前,浏览器不会渲染页面,用户也无法进行交互。也就是你看不到progress进度,也看不到按钮,更别说点击这个按钮了。这就印证了上面第一点,执行JS和渲染页面是互斥的。
1 | <body> |
那么问题来了,如何修复上面这个问题呢?答案是将1e7这么多的数字分批处理,比如每次处理1000个数字,然后让浏览器渲染一次,这样就可以看到进度条了,也可以点击按钮了。
那么如何分批呢?其实分批不是目的,目的是给浏览器一个渲染的机会,这时我们就可以使用setTimeout来实现,因为setTimeout中的回调函数是异步执行的,在执行完同步代码后,浏览器会渲染一次,然后再执行setTimeout中的回调函数。如此往复。
1 | <body> |
上面代码的执行顺序是这样的:
- 执行同步代码,先处理1000个数字。
- i < 1e7, 表示还有数字需要处理,所以调用setTimeout,将count函数放到宏任务队列中。
- 同步代码执行完毕,浏览器渲染一次,用户可以看到进度条。
- 从宏任务队列中取出count函数,继续处理1000个数字。
- 重复2-4步骤,直到i >= 1e7。
如此这般,既不影响浏览器更新dom,也不影响渲染,也不耽误用户交互。岂不美哉?
浏览器如何执行一段JavaScript代码?
当浏览器加载一个页面时,它会创建一个主线程来执行JavaScript代码。主线程是单线程的,意味着它一次只能执行一个任务。当主线程执行JavaScript代码时,它会遵循以下步骤:
- 先执行同步代码。
- 遇到异步代码时,做如下处理
- 如果是宏任务代码,将其回调函数放到宏任务队列中。
- 如果是微任务代码,将其回调函数放到微任务队列中。
- 同步代码执行完毕后,开始依次执行微任务队列中的微任务(即回调函数)。
浏览器渲染- 微任务队列清空后,从宏任务队列取出一个任务(即回调函数)执行,然后回到步骤1
注意:步骤3,5的执行也遵循第1, 2两点规则。这么做是为了处理微任务和宏任务的嵌套关系。微任务队列执行每次都会清空微任务队列,而宏任务队列每次只执行一个任务。
什么异步代码?
异步代码是指不会立即执行的代码,而是在将来某个时间点执行的代码。常见的异步代码有:
setTimeout和setInterval。Promise,async/await。MutationObserver等等。
除了异步代码,剩下的就是同步代码。
宏任务
setTimeoutsetInterval
微任务
Promise,async/awaitqueueMicrotaskMutationObserverprocess.nextTick(Node.js)
对于Promise需要特别注意:Promise本身是同步代码,但是其.then, .catch, .finally对应的回调函数是异步代码。对于queueMicrotask,它是一个新的API,用于将一个微任务添加到微任务队列中。(If we’d like to execute a function asynchronously (after the current code), but before changes are rendered or new events handled, we can schedule it with queueMicrotask.)
面试题
1. 以下代码输出什么?
1 | console.log('Start'); |
输出结果是:
1 | Start |
这个题考察的点就是Promise的构造函数体是同步代码,所以输出Start后紧接着会先输出resolve,然后是End。而.then方法中的回调函数是异步代码,所以会在同步代码执行完毕后执行,所以最后输出1.
1. 以下代码输出什么?
1 | document.body.style = 'background:blue'; |
答:用户会直接看到一个黑色的页面,蓝色页面根本不会出现,连闪现的过程也没有。根据Event Loop模型,代码执行过程如下:
- 执行同步代码,
document.body.style = 'background:blue';,将页面背景色设置为蓝色。 - 遇到微任务
Promise.resolve().then(),将其回调函数放到微任务队列中。 - 同步代码执行完毕,开始执行微任务队列中的微任务,即将页面背景色设置为黑色。
- 浏览器开始渲染页面,用户看到的是黑色的页面。
也就是说,在页面渲染之前,document.body.style早已经在 Promise 的回调函数中被赋值为black 了。
注意,浏览器会在每次微任务队列清空时渲染一次,如下图所示。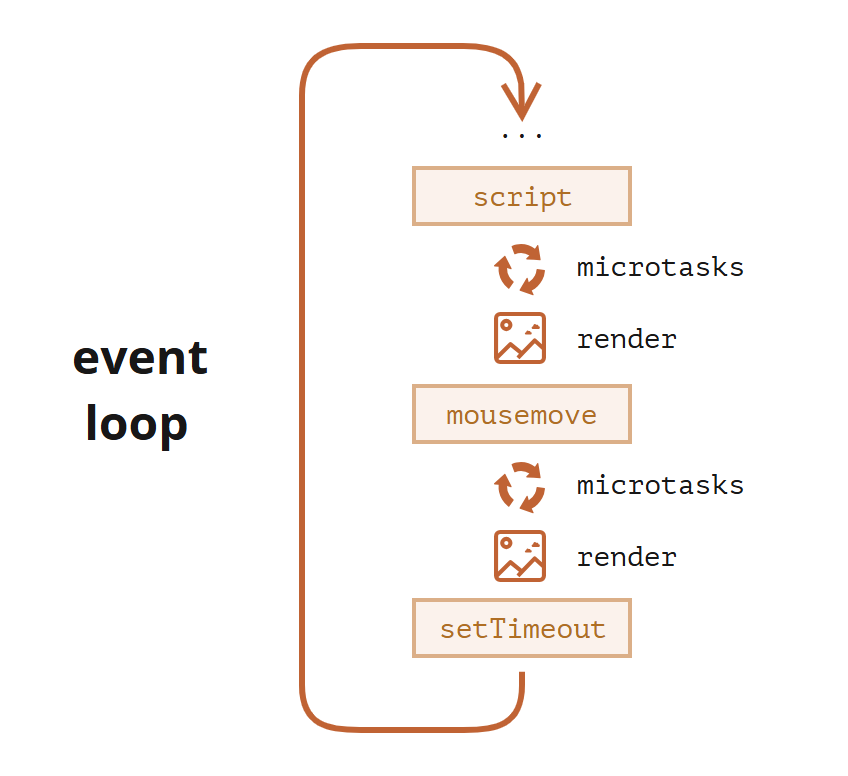
以下代码输出什么?
1 | console.log(1); |
答案:1 7 3 5 2 6 4.
首先执行同步代码,输出如下:
- 控制台:1 7
- 微任务队列:
[() => console.log(3), () => setTimeout(() => console.log(4)), () => console.log(5)] - 宏任务队列:
[()=>console.log(2),()=>console.log(6)]
然后执行微任务队列中的微任务,输出如下:
- 控制台:1 7 3 5
- 微任务队列:[] // 微任务队列清空
- 宏任务队列:
[()=>console.log(2), ()=>console.log(6), () => console.log(4)]
最后执行宏任务队列中的宏任务,输出如下:
- 控制台:1 7 3 5 2 6 4
- 微任务队列:[] // 微任务队列清空
- 宏任务队列:[] // 宏任务队列清空
2. 以下代码输出什么?
注意以下代码需要在Node.js环境下运行。因为process.nextTick是Node.js的API。
1 | console.log('Start'); |
答案:
1 | Start |
还是按照以下执行顺序来分析:
先执行同步代码,输出
Start和End。在执行微任务队列代码,输出
Promise then和Async/Await和Next tick。最后执行宏任务队列代码,输出
Timeout。注意每次只执行一个宏任务,然后再执行微任务队列中的微任务,如此往复。微任务队列每次执行都清空。
宏任务队列每次只取一个任务执行。
Reference:
- https://javascript.info/event-loop
- MDN: Event Loop
- https://youtu.be/8aGhZQkoFbQ
- https://www.youtube.com/watch?v=SrNQS8J67zc
- https://www.youtube.com/watch?v=u1kqx6AenYw
- https://javascript.info/event-loop#:~:text=Rendering%20never%20happens%20while%20the,such%20as%20processing%20user%20events.
- https://html.spec.whatwg.org/multipage/webappapis.html#event-loop-processing-model