0%

JavaScript Object.prototype.groupBy

给定如下对象数组,如何按照type进行分组?

1
2
3
4
5
6
7
const inventory = [
{ name: "asparagus", type: "vegetables", quantity: 5 },
{ name: "bananas", type: "fruit", quantity: 0 },
{ name: "goat", type: "meat", quantity: 23 },
{ name: "cherries", type: "fruit", quantity: 5 },
{ name: "fish", type: "meat", quantity: 22 },
];

最直观的做法如下,遍历数组,然后取出每个对象的type字段,按照哈希表归类的方式进行分组,代码如下:

1
2
3
4
5
6
7
8
9
10
11
12
13
function groupBy(arr, key) {
const result = [];
for (const item of inventory) {
const { type } = item;
if (result[type]) {
result[type].push(item);
} else {
result[type] = [item];
}
}

return result;
}

当然,也可以是用reduce函数,注意下面代码中acc的初始值是{},因为我们显示传递了{}给reduce函数。

1
2
3
4
5
6
7
8
9
10
const groupBy = (arr, key) => {
return arr.reduce((acc, item) => {
const group = item[key];
if (!acc[group]) {
acc[group] = [];
}
acc[group].push(item);
return acc;
}, {});
};

最后,你还可以使用groupBy, 只是这个方法比较新( Chrome 117 or later and Node.js 21.0.0 or later),要注意兼容性。

1
2
const result = Object.groupBy(inventory, ({ type }) => type);
console.log(result);

output:

1
2
3
4
5
6
7
8
9
10
11
12
{
vegetables: [ { name: 'asparagus', type: 'vegetables', quantity: 5 } ],
fruit: [
{ name: 'bananas', type: 'fruit', quantity: 0 },
{ name: 'cherries', type: 'fruit', quantity: 5 }
],
meat: [
{ name: 'goat', type: 'meat', quantity: 23 },
{ name: 'fish', type: 'meat', quantity: 22 }
]
}

References:

  1. https://developer.mozilla.org/en-US/docs/Web/JavaScript/Reference/Global_Objects/Object/groupBy

JavaScript Console

console对象是JavaScript的一个全局对象,它提供了控制台的操作方法和属性。控制台是浏览器提供的一个调试工具,它可以用来输出信息、查看变量的值、查看调用栈等。

colored log

In JavaScript, you can output colored logs to the console using the %c directive in console.log(). Here’s an example:

1
console.log("%cThis is a green text", "color:green; font-size: 18px");

output:
console-green-text
In this example, %c is used as a placeholder for the styles that are specified in the second argument. The text “This is a green text” will be displayed in green color in the console.

You can also specify multiple styles:

1
console.log("%cThis is a blue text on yellow background", "color:blue; background-color:yellow");

output:
alt text

In this example, the text will be blue and the background color will be yellow.

console.dir()

To print a deeply nested object in a more readable way, you can use console.dir().

1
2
3
4
5
6
7
8
9
10
11
12
13
14
15
const obj = {
name: 'Philip',
gender: 'male',
address: {
company: {
name: 'google',
location: {
city: 'shanghai',
country: 'china',
},
},
},
};

console.log(obj);

output: Notice that the location object is printed as [Object] which is unreadable(unreadable in Node.js, it’s OK to run in Browser console).

1
2
3
4
5
{
name: 'Philip',
gender: 'male',
address: { company: { name: 'google', location: [Object] } }
}

Usually, we resolve this by using JSON.stringify() to convert the object to a string.

1
console.log(JSON.stringify(obj));

but this method has a limitation: it only works for objects that are serializable to JSON. If the object contains circular references, it will throw an error.

1
console.dir(obj);

output:

1
2
3
4
5
6
7
8
9
10
{
name: 'Philip',
gender: 'male',
address: {
company: {
name: 'google',
location: { city: 'shanghai', country: 'china' }
}
}
}

JavaScript flatMap

flatMap is the combination of map and flat, It first maps each element using a mapping function, then flattens(only one level) the result into a new array. It’s the same as map followed by flat.

1
arr.flatMap(f); // is equal to arr.map(f).flat();

Note that flatMap only flattening one level

所以,flatMap最多只对二维数组有效,对于多维数组,可以使用arr.map(f).flat(Infinity)

以下代码的作用是,给定一个数组,将数组中每个元素和它的2倍放到一个新数组中,并将所有结果放到一个新数组中。

1
2
3
const arr = [1, 2, 3, 4, 5];
const result = arr.flatMap(x => [x, x * 2]);
console.log(result); // [1, 2, 2, 4, 3, 6, 4, 8, 5, 10]

is equal to

1
2
3
const arr = [1, 2, 3, 4, 5];
const result = arr.map(x => [x, x * 2]).flat();
console.log(result); // [1, 2, 2, 4, 3, 6, 4, 8, 5, 10]

看下面的例子,给定一个字符串数组,其中每个元素是一句话,我们需要将每个句子拆分成单词,并将所有单词放到一个新数组中。

1
2
3
4
5
6
7
8
const arr = [
'It is sunny today',
'I am happy',
'I am learning JavaScript'
];

const result = arr.flatMap(x => x.split(' '));
console.log(result); // ["It", "is", "sunny", "today", "I", "am", "happy", "I", "am", "learning", "JavaScript"]

is equal to

1
2
3
4
5
6
7
8
const arr = [
'It is sunny today',
'I am happy',
'I am learning JavaScript'
];

const result = arr.map(x => x.split(' ')).flat();
console.log(result); // ["It", "is", "sunny", "today", "I", "am", "happy", "I", "am", "learning", "JavaScript"]

Conclusion

So, When to use flatMap? When using Array.prototype.map the callback function usually return an element, but sometimes it returns an array, and you want to flatten the result. Then you can use flatMap to make the code more concise and readable.

当使用Array.prototype.map的回调函数返回数组时,你通常都要使用flatMap.

Authentication vs Authorization

Authentication and authorization are two closely related concepts, but they are not the same. They are both used to protect resources, but they do so in different ways.

In simple terms, authentication is the process of verifying who a user is, while authorization is the process of verifying what they have access to.

Comparing these processes to a real-world example, when you go through security in an airport, you show your ID to authenticate your identity. Then, when you arrive at the gate, you present your boarding pass to the flight attendant, so they can authorize you to board your flight and allow access to the plane.

  • Authentication

    • Authentication is the process of verifying the identity of a user. This is typically done by asking for a username and password, but it can also be done using other methods, such as biometric data or security tokens.
    • The goal of authentication is to ensure that the person accessing a resource is who they claim to be.
  • Authorization

    • Authorization is the process of verifying what a user has access to. This is typically done by checking the user’s permissions and comparing them to the resource they are trying to access.

Conclusion

  • Authentication: 认证
  • Authorization: 授权

以现实中住酒店为例,假设你定好了酒店并来到前台,接待员会要求你出示身份证,以确认你的身份,这就是认证。确认你的身份合法后,他们会给你一张房卡,用这张卡你就可以进入你的房间,这就是授权。

最后的最后

我已经彻底明白认证和授权的区别了,但是,这两个单词实在是太像了,我怎么区分他们呢?

  • 从操作步骤上来说,认证在授权之前。
  • 从单词上来说,如果按照字母顺序排序,authentication 在 authorization 之前。

这样就能记住了,你学会了吗?

javascript-avoid-comments-with-refactoring

下面这段代码是今天在Youtube上看到的一个视频中的代码, 代码的功能是从一个字符串数组中找出所有最长的字符串:比如给定字符串数组:[“aba”, “aa”, “ad”, “vcd”, “aba”],则要求返回[“aba”, “vcd”, “aba”]。

可以看到这段代码中有很多注释,我们的目的是优化这段代码,让代码可以self explanation

1
2
3
4
5
6
7
8
9
10
11
12
13
14
15
16
// gets all longest strings
function longestString(inputArray) {
// initialize the longest string to first value
let { length } = inputArray[0];
for (let i = 1; i < inputArray.length; i++) {
// checks if current string is longer than current longest
if (length < inputArray[i].length) {
length = inputArray[i].length;
}
}
// filters out any values not equal to the longest string
const strs = inputArray.filter((word) => word.length === length);

// return the longest strings
return strs;
}

命名优化

可以从以下几个方面入手:

  1. 函数名字不够清晰,longestString是单数形式,且没有动词,一般函数名字都应该加动词,可以改为getLongestStrings - 这样我们就知道,这个函数返回的是多个字符串。而且是从输入参数中get而来的。
  2. 函数的参数名字不够清晰,inputArray是一个数组,但是我们不知道这个数组的内容是什么,而且input这个单词有点多余,参数当然是input的,没必要再加上input这个单词。可以改为stringArray

此时,我们的代码变成了这样:

1
2
3
function getLongestStrings(stringArray) {

}
  1. 原来的代码中有一个length变量,这个变量的名字不够清晰,并没有说明是什么长度,也无法表明是最大长度,可以改为longestStringLength
  2. 原代码中使用的是经典的for循环,在Modern JavaScript中,我们更推荐函数式编程,所以可以改为for...of循环或者使用Array.prototype.forEach,这样代码更加简洁。

此时代码变成下面的样子。

1
2
3
4
5
6
7
8
9
10
11
12
13
14
15
function getLongestStrings(stringArray) {
let longestStringLength = 0;

stringArray.forEach((str) => {
if (longestStringLength < str.length) {
longestStringLength = str.length;
}
});

const longestStrings = stringArray.filter(
(word) => word.length === longestStringLength
);

return longestStrings;
}

性能优化

此时代码中有一个forEach,有一个filter,这两个函数都是遍历数组的,所以实际上我们遍历了两次数组,不够高效,将其改为一次遍历。此时代码变成下面的样子。

1
2
3
4
5
6
7
8
9
10
11
12
13
14
15
function getLongestStrings(stringArray) {
let longestStringLength = 0;
let longestStrings = [];

stringArray.forEach((str) => {
if (str.length > longestStringLength) {
longestStringLength = str.length;
longestStrings = [str];
} else if (str.length === longestStringLength) {
longestStrings.push(str);
}
});

return longestStrings;
}

使用reduce优化

多数数组的遍历方法都可以使用reduce来实现,所以我们可以将上面的代码改为使用reduce来实现。

1
2
3
4
5
6
7
8
9
10
function getLongestStrings(stringArray) {
return stringArray.reduce((acc, str) => {
if (str.length > acc.maxLength) {
return { maxLength: str.length, longestStrings: [str] };
} else if (str.length === acc.maxLength) {
acc.longestStrings.push(str);
}
return acc;
}, { maxLength: 0, longestStrings: [] }).longestStrings;
}

坦率的说,使用reduce这一版的可读性不如上一版,大家酌情使用。

reduce通常用来处理比较简单的逻辑,比如累加一个数组中所有的数字。在这种情况下,reduce通常只接受一个参数,就是待处理的数组。

1
2
const sum = [1, 2, 3, 4].reduce((acc, cur) => acc + cur, 0);
console.log(sum); // 10

如果逻辑比较复杂,那么reduce就要使用多个参数,比如上面的例子,我们实际上传入了如下两个参数,只不过我们把这两个参数封装到了一个对象中。

  • longesStringLength - 用来记录当前最长的字符串的长度
  • longestStrings - 用来记录当前最长的字符串

处理的时候数组longestStrings是不断变化的,如果当前字符串的长度等于longestStringLength,那么就把当前字符串加入到longestStrings中。(此过程数组元素不断增多,原有的元素还在),如果当前字符串的长度大于longestStringLength,那么就把longestStrings清空,然后把当前字符串加入到longestStrings中。(此过程原有数组元素被清空,只有当前元素)。

此外,我们还注意到,第一个if分支有return,而第二个没有,有点奇怪,其实原本可以这样写。

1
2
3
4
5
6
7
if (str.length > acc.maxLength) {
acc.maxLength = str.length;
acc.longestStrings = [str];
} else if (str.length === acc.maxLength) {
acc.longestStrings.push(str);
}
return acc;

但是,当str.length > acc.maxLength时,直接返回一个新对象也可以,这个对象会作为reduce的下一次迭代的第一个参数。

其实再进一步,我们可以在if-else中也返回一个新对象。

1
2
3
4
5
6
7
8
9
10
11
12
13
if (str.length > acc.maxLength) {
return { maxLength: str.length, longestStrings: [str] };
}

if (str.length === acc.maxLength) {
return {
maxLength: acc.maxLength,
longestStrings: [...acc.longestStrings, str],
};
}

/// str.length < acc.maxLength
return acc;

1. 什么是cookie

In Node.js, you can use the response.setHeader method to set cookies from the server side. Here’s an example using the Express.js framework:

1
2
3
4
5
6
7
8
9
10
11
const express = require('express');
const app = express();

app.get('/', (req, res) => {
res.cookie('username', 'John Doe', { maxAge: 900000, httpOnly: true });
res.end('Cookie has been set');
});

app.listen(3000, () => {
console.log('Server is running on port 3000');
});

In this example, res.cookie('username', 'John Doe', { maxAge: 900000, httpOnly: true }); sets a cookie named “username” with the value “John Doe”. The maxAge option sets the expiry time for the cookie in milliseconds. The httpOnly option is a security enhancement that restricts the cookie from being accessed by client-side scripts.

In Node.js, you can use the request.headers.cookie property to get cookies from the client side. Here’s an example using the Express.js framework:

1
2
3
4
5
6
7
8
const express = require('express');
const app = express();

app.get('/', (req, res) => {
const cookie = req.headers.cookie;
console.log(cookie);
res.end('Cookie has been set');
});

In this example, const cookie = req.headers.cookie; gets the cookie from the client side and logs it to the console.

You can also use cookie-parser middleware to parse the cookie from the request header. Here’s an example using the cookie-parser middleware:

1
2
3
4
5
6
7
8
9
10
const express = require('express');
const cookieParser = require('cookie-parser');

const app = express();
app.use(cookieParser());

app.get('/', (req, res) => {
const { cookies } = req;
console.log(cookies);
});

使用JavaScript操作cookie

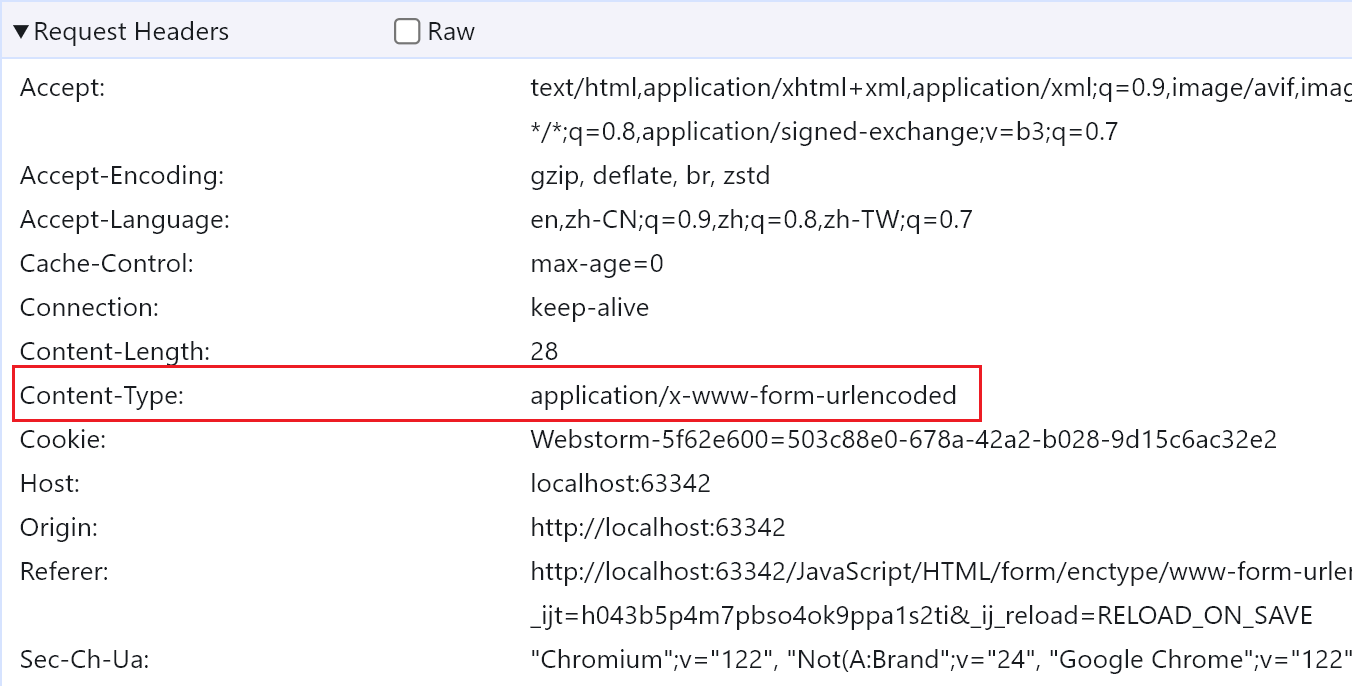
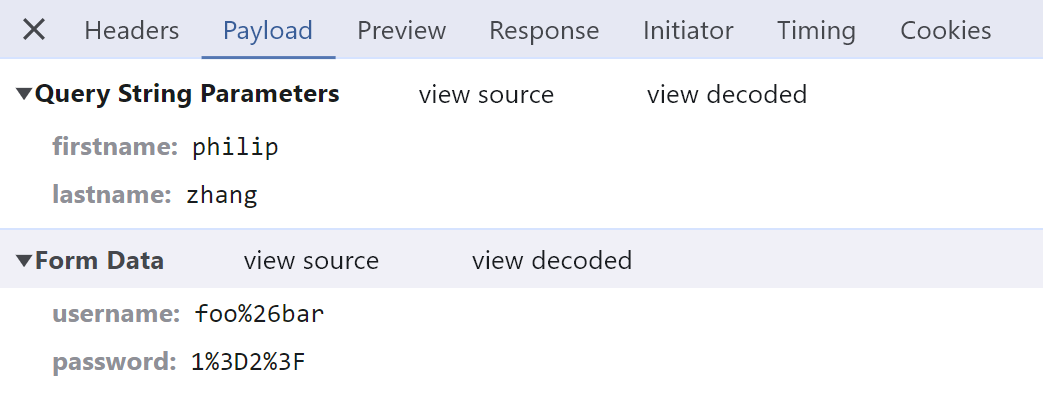
Note that the cookie value cannot contain semicolons, commas, or whitespace. For a solution, use the encodeURIComponent() function to encode the value.

1
document.cookie = "username=John Doe; expires=Thu, 18 Dec 2023 12:00:00 UTC; path=/";

document.cookie will return all cookies in one string, each cookie is separated by a semicolon and a space.

1
let allCookies = document.cookie;

To delete a cookie, just set the expires parameter to a passed date.

document.cookie = "username=; expires=Thu, 01 Jan 1970 00:00:00 UTC; path=/;";

# References
- [MDN web docs](https://developer.mozilla.org/en-US/docs/Web/HTTP/Cookies)

Working Efficiently

Useful VSCode Plugins

  1. Code Runner - Run code snippet or code file for multiple languages.
  2. Mithril Emmet - Quickly write Html/CSS/JSX tags.

HTTP Content-Type

x-www-form-urlencoded

先看一个例子:

1
2
3
4
5
6
7
8
9
<form
action="/urlencoded?firstname=philip&lastname=zhang"
enctype="application/x-www-form-urlencoded"
method="POST"
>
<input name="username" type="text" value="user1" />
<input name="password" type="text" value="pwd1" />
<input type="submit" value="Submit" />
</form>

这里的 enctype 属性指定了表单数据的编码类型,application/x-www-form-urlencoded 是默认的编码类型,也是最常用的编码类型。当表单数据被编码为 application/x-www-form-urlencoded 时:

  • 表单数据会被编码为键值对,键值对之间用 & 连接。
  • 键和值之间用 = 连接。

上面的例子中,表单数据被编码为 username=user1&password=pwd1。(实际上和url中的参数格式一样,所以才叫urlencoded

用浏览器打开这个页面,然后点击 Submit 按钮,按F12打开开发者工具,切换到 Network 选项卡,在HeadersTab可以看到请求的 Content-Typeapplication/x-www-form-urlencoded
alt text

PayloadTab可以看到请求的详细信息:

  • Query Stringfirstname=philip&lastname=zhang - 对应form action中的url参数
  • Form Datausername=user1&password=pwd1- 对应form体中的两个input

alt text

但是,上面这个例子并没有展示出url-encoded的精髓,这里的encoded到底encoded了什么呢?我们来看一个更加直观的例子:

1
2
3
4
5
6
7
8
9
<form
action="/urlencoded?firstname=philip&lastname=zhang"
enctype="application/x-www-form-urlencoded"
method="POST"
>
<input name="username" type="text" value="foo&bar" />
<input name="password" type="text" value="1=2?" />
<input type="submit" value="Submit" />
</form>

这里的 usernamepassword 的值中包含了 &=,这些字符在url中有特殊含义,如果直接放在url中,会导致url解析错误。但是,当表单数据被编码为 application/x-www-form-urlencoded 时,这些特殊字符会被转义,所以编码后的表单数据如下图所示。

  • username: foo%26bar, 其中 %26& 的转义
  • password: 1%3D2%3F, 其中 %3D= 的转义,%3F? 的转义
    如果不转义的话那么最终的结果就是username=foo&bar&password=1=2?,此时浏览器就懵逼了。导致数据解析出错。
    alt text

那么到底哪些字符需要编码呢?参考这里:http://www.blooberry.com/indexdot/html/topics/urlencoding.htm

multipart/form-data

application/json

text/plain

references

Web API

  • REST - Representational State Transfer
  • SOAP - Simple Object Access Protocol
  • GraphQL - A query language for your API

difference between REST and SOAP

Feature REST SOAP
Protocol Can use any protocol but typically uses HTTP/HTTPS Uses HTTP, SMTP, TCP, and more
Standards No official standard, uses HTTP methods (GET, POST, PUT, DELETE) Official standard by W3C
Performance Lightweight, less data overhead Heavyweight, more data overhead due to XML usage
Message format Can use multiple formats (JSON, XML, etc.) Uses XML
Security Uses web security standards Uses WS-Security which is more robust
Transaction support No official support Official support
State management Stateless Stateful

说明:

  1. SOAP by itself is a protocol, but it can use any protocol to transport its messages, REST is not a protocol, it typically uses HTTP/HTTPS.
  2. REST is stateless which means each request from client to server must contain all of the information necessary to understand the request, and cannot take advantage of any stored context on the server. Session state is therefore kept entirely on the client.

JavaScript File Collecting

今天收到老婆的一个需求,她有一个文件夹,里面包含若干文件和子文件夹,子文件夹又包含文件及子文件夹,她需要将这些文件全部收集到一个文件夹中。收集后的文件要从1开始命名,依次递增。我想到了 Node.js,可以使用 Node.js 来实现这个需求。

代码实现 - 百度文心一言版

这个版本一开始错误百出,经过我修改后才能使用。

1
2
3
4
5
6
7
8
9
10
11
12
13
14
15
16
17
18
19
20
21
22
23
24
25
26
27
28
29
30
31
32
33
34
35
36
37
38
39
40
41
42
43
44
45
46
47
48
49
50
51
52
53
const fs = require('fs').promises;
const path = require('path');

let fileIndex = 3001;

async function copyAndRenameFiles(srcDir, destDir) {
try {
// 确保目标目录存在
await fs.access(destDir);
} catch {
// 如果不存在,则创建目标目录
await fs.mkdir(destDir, { recursive: true });
}

// 读取srcDir中的所有文件和文件夹
const entries = await fs.readdir(srcDir, { withFileTypes: true });

for (const entry of entries) {
const srcPath = path.join(srcDir, entry.name);
console.log(srcPath);

if (entry.isDirectory()) {
// 如果是文件夹,则递归调用
await copyAndRenameFiles(srcPath, destDir);
} else if (entry.isFile()) {
const destBaseName = `${fileIndex}`; // 新文件的基本名称
const destExtname = path.extname(entry.name); // 获取原文件的扩展名
const destPath = path.join(destDir, `${destBaseName}${destExtname}`); // 目标文件完整路径
// 如果是文件,则复制到目标文件夹并重命名
await fs.copyFile(srcPath, destPath);
fileIndex++; // 更新文件索引
}
}

return fileIndex; // 返回下一个可用的文件索引
}

// 使用示例
const sourceFolder = 'xxx'; // 顶层文件夹路径
const destinationFolder = 'xxx'; // 目标文件夹路径

// 从1开始编号
copyAndRenameFiles(sourceFolder, destinationFolder)
.then((finalFileIndex) => {
console.log(
`所有文件已成功复制到目标文件夹,并从1开始重新编号到${
finalFileIndex - 1
}。`
);
})
.catch((error) => {
console.error('在复制过程中发生错误:', error);
});

代码实现-ChatGPT4

这个版本一次通过,一行未改。

1
2
3
4
5
6
7
8
9
10
11
12
13
14
15
16
17
18
19
20
21
22
23
24
25
26
27
28
29
30
31
32
33
34
35
36
37
38
39
40
41
42
43
44
45
46
47
48
49
50
51
const fs = require('fs').promises;
const path = require('path');

// 这里使用参数arrayOfFiles递归收集所有文件,思路很巧妙。
async function getAllFiles(dirPath, arrayOfFiles) {
const files = await fs.readdir(dirPath);

arrayOfFiles = arrayOfFiles || [];

for (const file of files) {
const filepath = path.join(dirPath, file);
const stat = await fs.stat(filepath);

if (stat.isDirectory()) {
arrayOfFiles = await getAllFiles(filepath, arrayOfFiles);
} else {
arrayOfFiles.push(filepath);
}
}

return arrayOfFiles;
}

async function copyFilesWithNumberedNames(sourceDir, targetDir) {
try {
// Create target directory if it does not exist
await fs.mkdir(targetDir, { recursive: true });

// Get all files from the source directory
const filesToCopy = await getAllFiles(sourceDir);

// Copy each file with a new numbered name
let fileNumber = 1;
for (const file of filesToCopy) {
const newFilename = `${fileNumber}${path.extname(file)}`;
const targetPath = path.join(targetDir, newFilename);
await fs.copyFile(file, targetPath);
console.log(`Copied ${file} to ${targetPath}`);
fileNumber++;
}

console.log('All files have been copied successfully.');
} catch (err) {
console.error('An error occurred:', err);
}
}

const sourceDirectory = 'xxx'; // Replace with your source directory path
const targetDirectory = 'xxx'; // Replace with your target directory path

copyFilesWithNumberedNames(sourceDirectory, targetDirectory);