0%

Introduction

Reflow and repaint are two important concepts in the browser rendering process. Understanding them can help us optimize the performance of our web pages.

Reflow

Reflow is the process of recalculating the position and size of all elements in the DOM tree. When the layout of the page changes, the browser needs to reflow the page to recalculate the position and size of all elements. The following changes can trigger a reflow:

  • Resizing the window
  • Changing the width or height of an element
  • Changing the padding, margin, or border of an element
  • Changing the font size of an element
  • Changing the position of an element

Repaint

Repaint is the process of updating the pixels on the screen. When the layout of the page changes, the browser needs to repaint the affected elements to update the pixels on the screen. The following changes can trigger a repaint:

  • Changing the background color of an element
  • Changing the text color of an element
  • Changing the visibility of an element
  • Changing the opacity of an element
  • Changing the z-index of an element

How Browser render pages

The browser rendering process consists of several steps:

  1. Parse HTML: The browser parses the HTML code and creates a DOM tree.
  2. Parse CSS: The browser parses the CSS code and creates a CSSOM tree.
  3. Combine DOM and CSSOM: The browser combines the DOM tree and CSSOM tree to create a render tree.
  4. Layout: The browser calculates the position and size of all elements in the render tree.
  5. Paint: The browser paints the pixels on the screen based on the render tree.
  6. Composite: The browser combines the painted pixels to create the final image on the screen.
  7. In the process of rendering a web page, the browser may need to trigger reflows and repaints to update the layout and appearance of the page.
    1. Reflow: Recalculating the position and size of all elements in the DOM tree.
    2. Repaint: Updating the pixels on the screen.
    3. Reflow will trigger repaint, but repaint does not necessarily trigger reflow.

References

  1. https://www.explainthis.io/en/swe/repaint-and-reflow
  2. https://dev.to/gopal1996/understanding-reflow-and-repaint-in-the-browser-1jbg
  3. https://medium.com/sessionstack-blog/how-javascript-works-the-rendering-engine-and-tips-to-optimize-its-performance-7b95553baeda

1. Url changed but page not loaded

Reason: The <router-outlet> is not in the html template.
Solution: Add the <router-outlet> to the template file.

1
2
3
4
5
6
7
8
9
<!-- app.component.html -->
<nav>
<ul>
<li><a routerLink="/home">Home</a></li>
<li><a routerLink="/product">Product</a></li>
<li><a routerLink="/about">About</a></li>
</ul>
</nav>
<router-outlet></router-outlet> <!-- Add this line -->

2. ERROR RuntimeError: NG04002: Cannot match any routes. URL Segment: ‘login’

Reason: Route ‘login’ is not defined in the router configuration.
Solution: Add the route to the router configuration.

1
2
3
4
// app-routes.ts
const routes: Routes = [
{ path: 'login', component: LoginComponent },
]

Reason 2: You use canMatch guard in route configuration and the guard return false.
Solution: Make sure the guard returns true.

1
2
3
4
5
{
path: 'product',
loadComponent: () => import('./product/product.component').then(m => m.ProductComponent),
canMatch: [CanMatchGuard], // <-- CanMatchGuard return false cause this error.
},

3. NG8001: ‘router-outlet’ is not a known element

Reason: The RouterModule is not imported in the module.
Solution: Import the RouterModule in the module.

1
2
3
4
5
6
7
8
9
10
11
12
13
14
15
// Module based component(app.module.ts)
import { RouterModule } from '@angular/router';
@NgModule({
imports: [RouterModule] // <-- Add this line
})

// Standalone component
import { RouterModule } from '@angular/router';
@Component({
selector: 'app-root',
standalone: true,
imports: [RouterOutlet], // <-- Add this line
templateUrl: './app.component.html',
styleUrl: './app.component.scss'
})

What is Angular Router Guard?

Router Guard is a feature in Angular Router that allows you to run some code before the route is activated. It can be used to protect routes from unauthorized access, redirect users to a login page, or perform any other action before the route is activated.

canActivate

Use case: Only allow authenticated users to access the /product page, otherwise redirect them to the login page.

1
2
3
4
5
6
7
8
9
10
11
12
13
14
15
16
// app.routes.ts
export const routes: Routes = [
{
path: 'home',
component: HomeComponent,
},
{
path: 'product',
component: ProductComponent,
canActivate: [AuthGuard],
},
{
path: 'login',
component: LoginComponent,
}
];
1
2
3
4
5
6
7
8
9
10
11
12
13
14
// auth-guard.service.ts
export class AuthGuard implements CanActivate {
constructor(private authService: AuthService, private router: Router) {
}

canActivate(route: ActivatedRouteSnapshot, state: RouterStateSnapshot): MaybeAsync<GuardResult> {
if (this.authService.isAuthenticated()) {
return true;
} else {
this.router.navigate(['login']);
return false;
}
}
}
1
2
3
4
5
6
7
8
9
10
11
@Injectable({
providedIn: 'root'
})
export class AuthService {
constructor() { }

isAuthenticated() {
// Put authentication logic here
return false;
}
}

canActivateChild

Similar to canActivate, but it is used to protect child routes.
In the following example, only authenticated users can access the child routes of the /product page.

1
2
3
4
5
6
7
8
9
10
11
12
13
14
15
16
17
18
19
20
// app.routes.ts
export const routes: Routes = [
{
path: 'home',
component: HomeComponent,
},
{
path: 'product',
component: ProductComponent,
children: [
{ path: 'detail', component: ProductDetailComponent },
{ path: 'edit', component: ProductEditComponent },
],
canActivateChild: [AuthGuard],
},
{
path: 'login',
component: LoginComponent,
}
];

canDeactivate

Use case: Confirm with the user before leaving the page. For example, make sure the user wants to leave the page without saving changes.

1
2
3
4
5
6
7
8
9
10
11
12
// app.routes.ts
export const routes: Routes = [
{
path: 'home',
component: HomeComponent,
},
{
path: 'post',
component: PostComponent,
canDeactivate: [SaveGuard],
},
];
1
2
3
4
5
6
7
8
9
10
11
12
13
// save-guard.service.ts
export class SaveGuard implements CanDeactivate<any> {
constructor(private saveService: SaveService) {
}

canDeactivate(component: any, currentRoute: ActivatedRouteSnapshot, currentState: RouterStateSnapshot, nextState: RouterStateSnapshot): MaybeAsync<GuardResult> {
if (this.saveService.hasSavedData()) {
return true;
} else {
return confirm('You have unsaved changes. Do you really want to leave?');
}
}
}
1
2
3
4
5
6
7
8
9
// save.service.ts
export class SaveService {
constructor() { }

hasSavedData() {
// Put logic to check if data is saved
return false;
}
}

canLoad

Use case: Guard when calling loadChildren in the route configuration. Note that canLoad not works for loadComponent.

1
2
3
4
5
6
7
const routes: Routes = [
{
path: 'premium',
canLoad: [PremiumFeatureGuard], // Apply PremiumFeatureGuard to prevent lazy loading
loadChildren: () => import('./premium-feature.module').then(m => m.PremiumFeatureModule)
},
];

Note that canLoad is deprecated, use canMatch instead.

canMatch

Use case: Guard when matching the route. If the guard returns false, the route will not be matched.

1
2
3
4
5
6
// app.routes.ts
{
path: 'product',
loadComponent: () => import('./product/product.component').then(m => m.ProductComponent),
canMatch: [CanMatchGuard],
},
1
2
3
4
5
6
7
8
9
// can-match.guard.ts
export class CanMatchGuard implements CanMatch {
constructor() {
}

canMatch(route: Route, segments: UrlSegment[]): MaybeAsync<GuardResult> {
return false;
}
}

This post will show you how to style the active link in Angular Router with routerLinkActive and routerLinkActiveOptions.

routerLinkActive

routerLinkActive is a directive that adds a CSS class to the element when the link’s route becomes active.

We set a class name active to the active link, and apply a red background color to the active link. When user click the home or about link, the background color of the active link will change to red.

1
2
3
4
5
6
<ul>
<li><a routerLink="/home" routerLinkActive="active">Home</a></li>
<li><a routerLink="/about" routerLinkActive="active">About</a></li>
</ul>

<router-outlet/>
1
2
3
.active {
background-color: red;
}

routerLinkActiveOptions

routerLinkActiveOptions is an input property of routerLinkActive directive that allows you to set the options for the active link. It provides a finer-grained control over the behavior of the active link.

Let’s take a look at the definition of routerLinkActiveOptions:

1
2
3
4
5
6
7
8
9
10
routerLinkActiveOptions: {
exact: boolean;
} | IsActiveMatchOptions;

export declare interface IsActiveMatchOptions {
matrixParams: 'exact' | 'subset' | 'ignored';
queryParams: 'exact' | 'subset' | 'ignored';
paths: 'exact' | 'subset';
fragment: 'exact' | 'ignored';
}

Scenario 1: exact: true

When exact: true, the active link will only be set when the URL is exactly the same as the link’s URL.

1
2
3
4
<ul>
<li><a routerLink="/home" routerLinkActive="active" [routerLinkActiveOptions]="{exact: true}">Home</a></li>
<li><a routerLink="/about" routerLinkActive="active" [routerLinkActiveOptions]="{exact: true}">About</a></li>
</ul>

With this settings, when user input /home/123 in the browser, the home link will not be active, since /home is not exactly the same as /home/123.

Scenario 2: match fragment

When fragment: 'exact', the active link will only be set when the URL’s fragment is exactly the same as the link’s fragment.

1
2
3
4
5
6
const isActiveMatchOptions: IsActiveMatchOptions = {
matrixParams: 'exact',
queryParams: 'exact',
paths: 'exact',
fragment: 'exact'
};
1
2
3
4
<ul>
<li><a routerLink="/home" routerLinkActive="active" [routerLinkActiveOptions]="isActiveMatchOptions">Home</a></li>
<li><a routerLink="/about" routerLinkActive="active" [routerLinkActiveOptions]="isActiveMatchOptions">About</a></li>
</ul>

With this settings, when user input /home#section1 in the browser, the home link will not be active, since the fragment is not exactly the same as the link’s fragment.

You can also config the matrixParams, queryParams, and paths in the IsActiveMatchOptions object to control the active link behavior.

Introduction

Today I got the following error after upgrade to Android Studio LadyBug.

1
Your build is currently configured to use Java 21.0.3 and Gradle 8.0.

So I reinstall the old version android studio Koala and the error still exists. So I google it and found the following solution on stackoverflow.

  1. Open File | Settings | Build, Execution, Deployment | Build Tools | Gradle
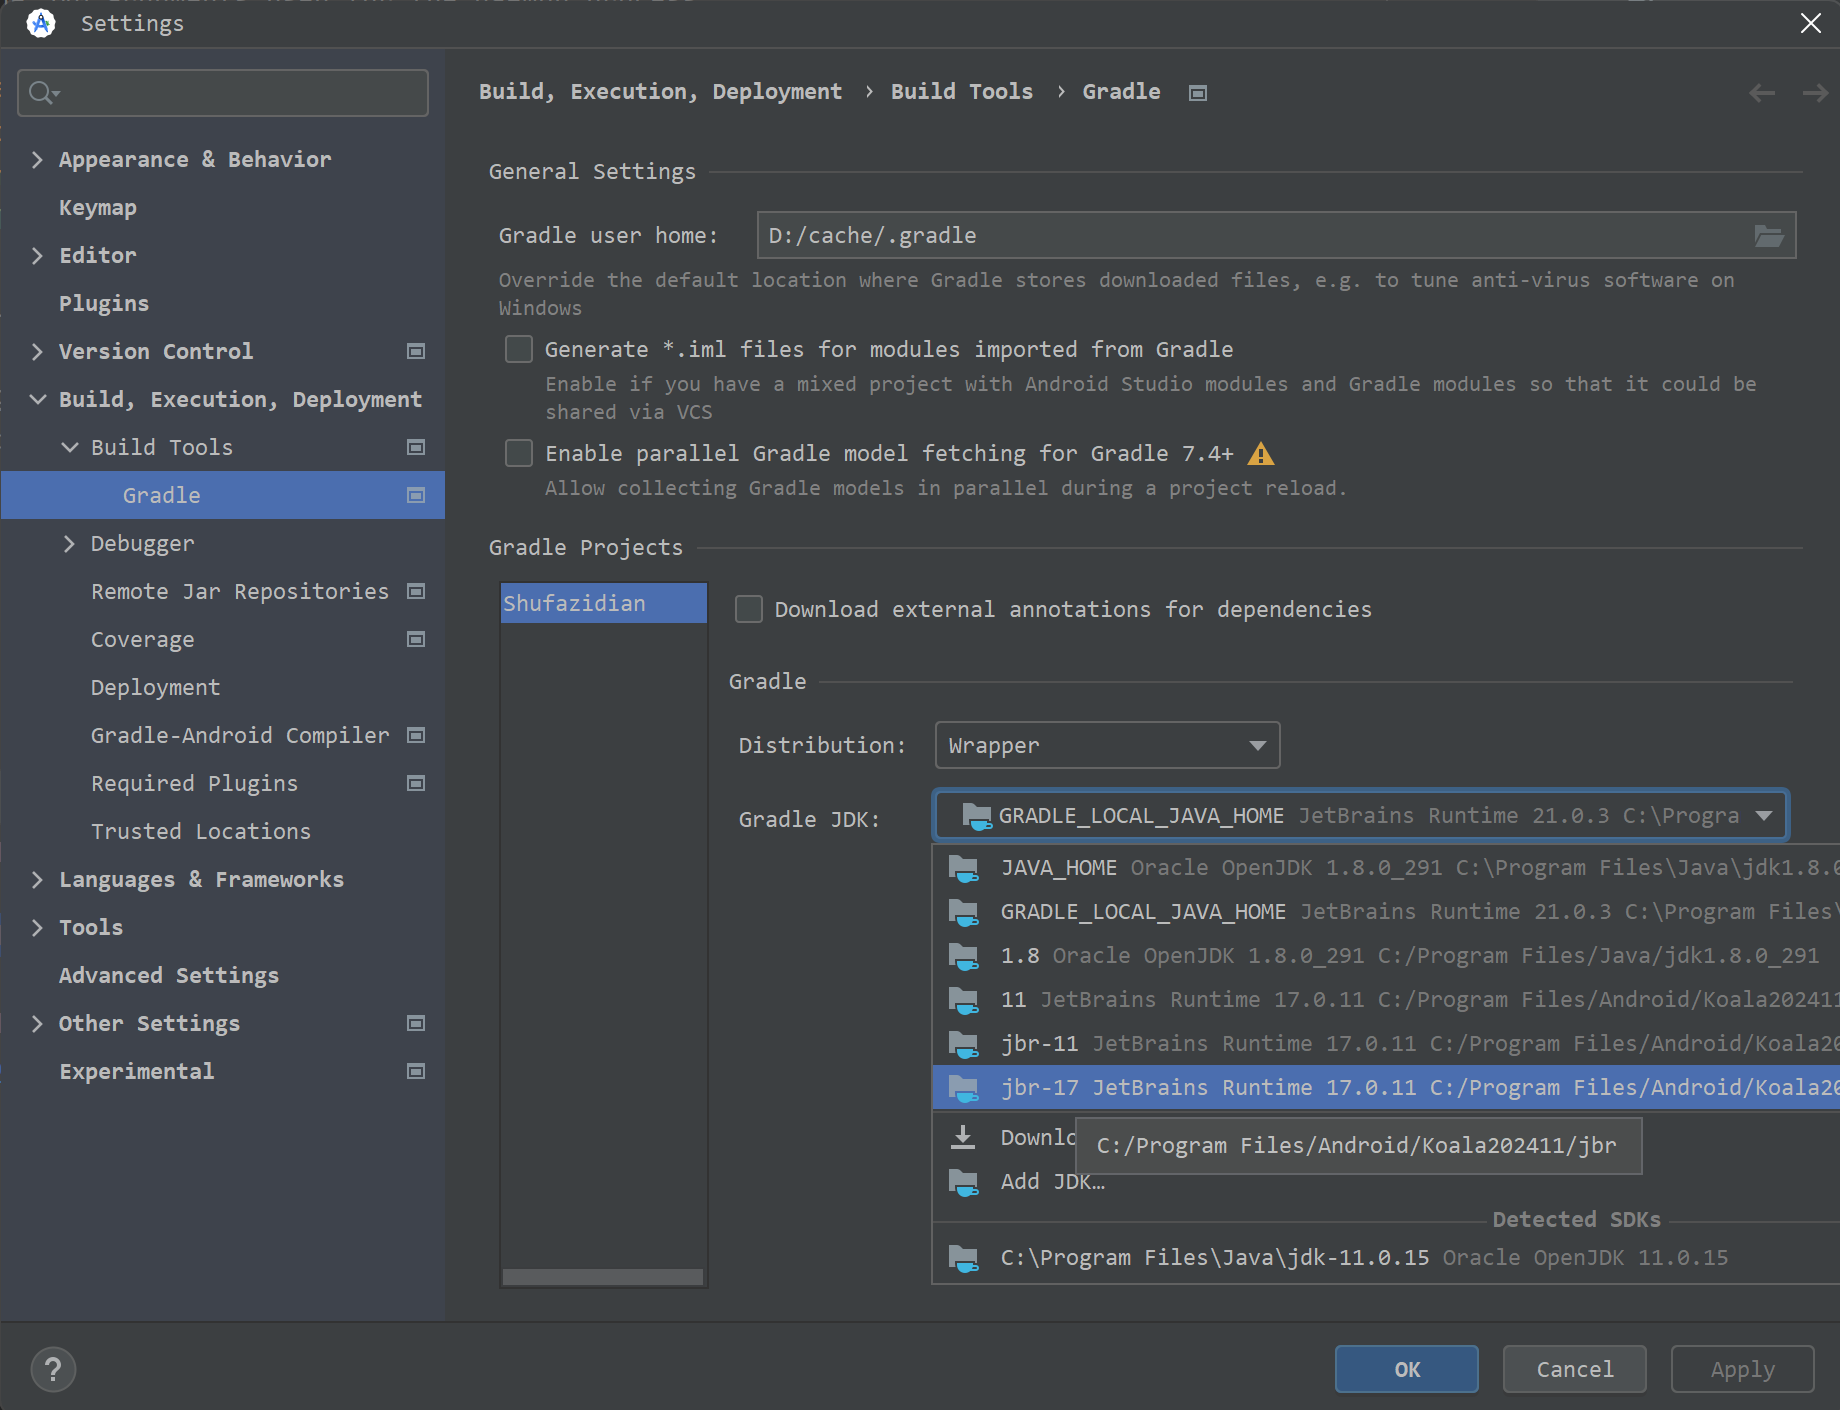
  2. Downgrade the JDK version to previous version, for example jbr-17.

android-grade-settings

The reason that old version still not work is because after upgrade Android Studio to LadyBug, it automatically set Java 21.0.3 and Gradle 8.0. Even if you downgrade the Android Studio, the settings still remain the same. So you need to manually change the settings to make it work.

Introduction

There are two types of SDK location in Android, global SDK location which is used by all projects and project SDK location which is used by a specific project.
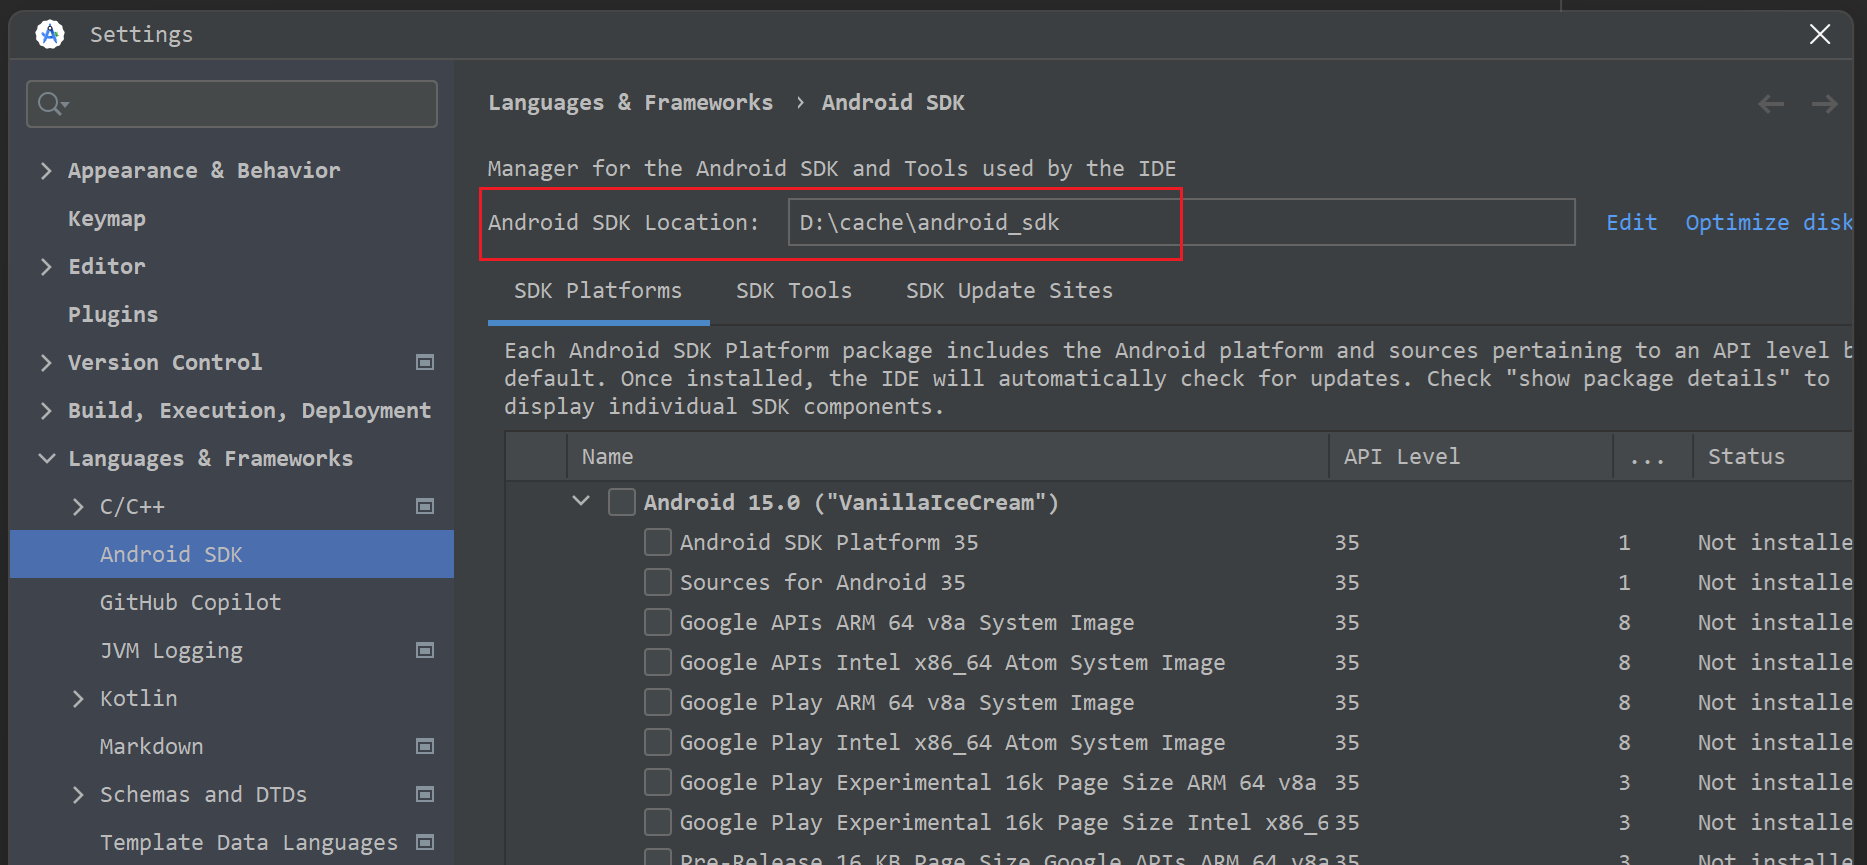
Global SDK Location

In Android Studio, open File | Settings | Languages & Frameworks | Android SDK. Here you can see the global SDK location.
Android SDK Location

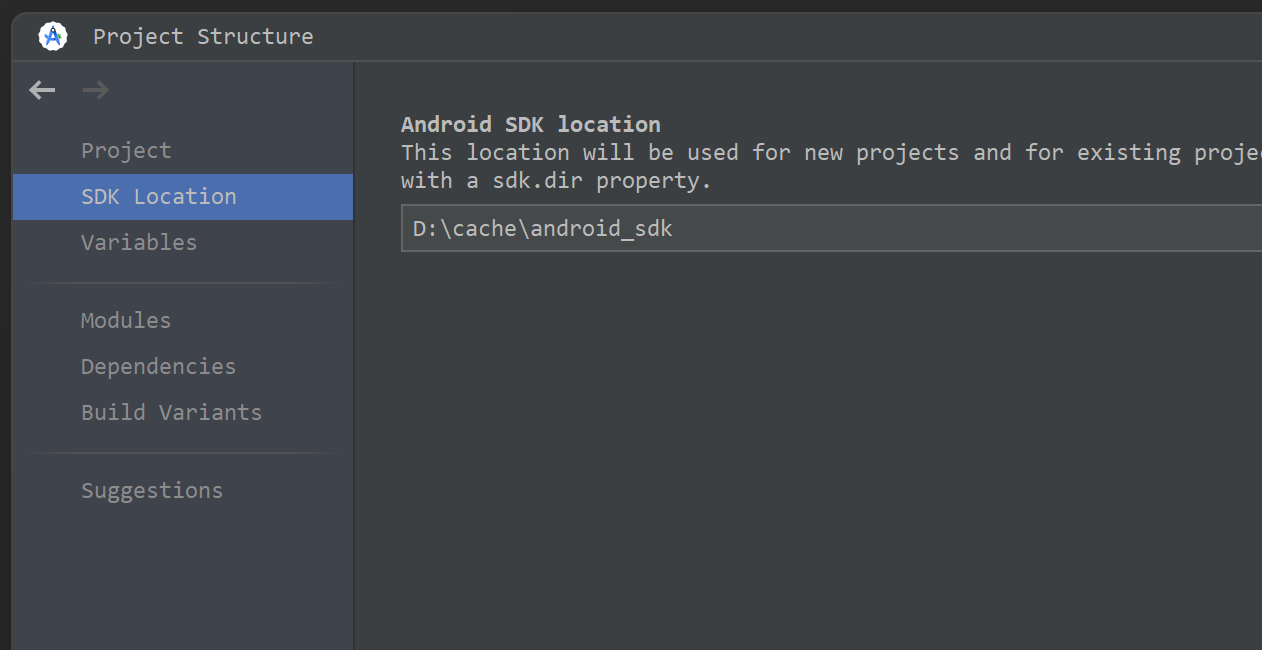
Project SDK Location

  1. Open Android Studio, go to File -> Project Structure -> SDK Location. Here you can see the project SDK location.
    Android SDK Location
  2. If your project has file local.properties, you can specify the project SDK location by adding sdk.dir=/path/to/android/sdk in the file. For example:
1
sdk.dir=D\:\\cache\\android_sdk

A question from stackoverflow

The following code does not work, do you know why? When you run the code, you will got the error TypeError: Cannot read properties of undefined (reading 'navigate').

1
2
3
4
5
6
7
8
9
10
11
12
13
14
15
16
17
18
19
20
21
22
23
24
25
import {Component, OnInit} from '@angular/core';
import {Router, RouterOutlet} from '@angular/router';
import {TestComponent} from "./test/test.component";

@Component({
selector: 'app-root',
standalone: true,
imports: [RouterOutlet, TestComponent],
templateUrl: './app.component.html',
styleUrl: './app.component.scss'
})
export class AppComponent implements OnInit {
title = 'angular-18';

constructor(private router: Router) {
}

gotoProduct() {
this.router.navigate(['product']);
}

ngOnInit() {
setTimeout(this.gotoProduct, 1000);
}
}

Reason:
Code executed by setTimeout() is called from an execution context separate from the function from which setTimeout was called. The usual rules for setting the this keyword for the called function apply, and if you have not set this in the call or with bind, it will default to the window (or global) object, even in strict mode. It will not be the same as the this value for the function that called setTimeout. - From MDN- The this problem for setTimeout

That means router is undefined in gotoProduct function. The reason is that this in gotoProduct function is not the instance of AppComponent. It is the instance of Window object.

How to fix it?

Use Arrow function

Arrow function doesn’t have its own this binding, it will inherit the this from the parent scope. So, you can use arrow function in setTimeout function to keep the context of the parent scope.

1
2
3
setTimeout(() => {
this.gotoProduct();
}, 1000);

Use bind

You can also use bind function to bind the this to the gotoProduct function.

1
setTimeout(this.gotoProduct.bind(this), 1000);

Conclusion

Becareful when using setTimeout function in Angular.
Always use arrow function in setTimeout function to keep the context of the parent scope.

Introduction

HostListener is an Angular Decorator that declares a DOM event to listen for, and provides a handler method to run when that event occurs.

What is a Host?

先看一下Host的含义,Host是指Directive或者Component的宿主元素,假设有一个ProductComponent组件,它的模板如下:

1
2
3
4
5
6
7
8
9
10
import {Component} from '@angular/core';

@Component({
selector: 'app-product',
template: `
<div>Product</div>
`,
})
export class ProductComponent {
}

我们在app.component.html中使用ProductComponent组件,代码如下:在这里,app-product就是ProductComponent的Host。

1
<app-product></app-product>

Render后的DOM结构如下:

1
2
3
<app-product>
<div>Product</div>
</app-product>

也可以这样理解,一个组件(指令)的Host就是在使用组件(指令)时,它们的选择器对应的元素。

See here for details.

Here is an example of using HostListener to listen for the click event on a button element:

1
2
3
4
5
6
7
8
9
10
11
12
13
14
15
16
import {Component, HostListener} from '@angular/core';

@Component({
selector: 'app-test',
standalone: true,
imports: [],
template: `
<button>Click me</button>
`,
})
export class TestComponent {
@HostListener('click')
onClick() {
console.log('Button clicked');
}
}

The above code is equivalent to the following code:

1
2
3
4
5
6
7
8
9
10
11
12
13
14
15
import {Component, HostListener} from '@angular/core';

@Component({
selector: 'app-test',
standalone: true,
imports: [],
template: `
<button (click)="onClick()">Click me</button>
`,
})
export class TestComponent {
onClick() {
console.log('Button clicked');
}
}

HostListener is a more powerful way to listen for events because it allows you to listen for events on any element, not just the element that the HostListener is attached to. For example, you can listen for the events from document or window object.

  • document:click
  • window:keydown
  • window:scroll
  • window:resize
1
2
3
4
5
6
7
8
9
10
11
12
13
14
15
16
17
18
19
20
21
22
23
24
25
26
27
28
29
30
31
32
33
34
35
import {Component, HostListener} from '@angular/core';

@Component({
selector: 'app-test',
standalone: true,
imports: [],
template: `
<button (click)="onClick()">Click me</button>
`,
})
export class TestComponent {
onClick() {
console.log('Button clicked');
}

@HostListener('document:click', ['$event'])
documentClick(event: MouseEvent) {
console.log(`Document clicked at (${event.clientX}, ${event.clientY})`);
}

@HostListener('window:keydown', ['$event'])
keydown(event: KeyboardEvent) {
console.log(`event.key: ${event.key} was pressed`);
}

@HostListener('window:scroll', ['$event'])
onScroll(event: Event) {
console.log(`Window scrolled`);
}

@HostListener('window:resize', ['$event'])
onResize(event: Event) {
console.log(`Window resized`);
}
}

References

https://angular.dev/api/core/HostListener?tab=usage-notes

Introduction

In this article, we will explore the Angular Module Federation feature in depth. Please read the first article in this series to get a basic understanding of Module Federation.

remoteEntry.js

Each time you call loadRemoteModule, Angular will fetch the remoteEntry.js file first from the remote server. What is this file? Let’s take a look at the remoteEntry.js file in the remote project.

You can find the remoteEntry.js file in the dist folder of the remote project. The file is generated by the ModuleFederationPlugin in the webpack configuration. But the file under the dist folder is minimized and hard to read. You can read it on Chrome network tab when you call loadRemoteModule.

This file is very large and contains lots of code, you can scroll down to the bottom or search container entry to find key part.

remoteEntry.js mainly contains the following information:

1. The list of modules that are exposed by the remote project.

In the following example, the remote project exposes a module named ./Component from its ./projects/mfe1/src/app/product/product.component.ts file.

1
2
3
4
5
var moduleMap = {
"./Component": () => {
return __webpack_require__.e("projects_mfe1_src_app_product_product_component_ts").then(() => (() => ((__webpack_require__(/*! ./projects/mfe1/src/app/product/product.component.ts */ 1585)))));
}
};

2. The list of shared libraries.

From the following code in remoteEntry.js the remote project shares the common angular and rxjs libraries.

1
2
3
4
5
6
7
8
9
10
11
12
13
switch(name) {
case "default": {
register("@angular/common/http", "17.3.0", () => (__webpack_require__.e("node_modules_angular_common_fesm2022_http_mjs-_f9340").then(() => (() => (__webpack_require__(6443))))));
register("@angular/common", "17.3.0", () => (__webpack_require__.e("node_modules_angular_common_fesm2022_common_mjs-_b4621").then(() => (() => (__webpack_require__(316))))));
register("@angular/core/primitives/signals", "17.3.0", () => (__webpack_require__.e("node_modules_angular_core_fesm2022_primitives_signals_mjs").then(() => (() => (__webpack_require__(5689))))));
register("@angular/core", "17.3.0", () => (__webpack_require__.e("node_modules_angular_core_fesm2022_core_mjs").then(() => (() => (__webpack_require__(7580))))));
register("@angular/platform-browser", "17.3.0", () => (__webpack_require__.e("node_modules_angular_platform-browser_fesm2022_platform-browser_mjs-_e89f0").then(() => (() => (__webpack_require__(436))))));
register("@angular/router", "17.3.0", () => (__webpack_require__.e("node_modules_angular_router_fesm2022_router_mjs-_5a221").then(() => (() => (__webpack_require__(5072))))));
register("rxjs/operators", "7.8.0", () => (__webpack_require__.e("node_modules_rxjs_dist_esm_operators_index_js").then(() => (() => (__webpack_require__(8219))))));
register("rxjs", "7.8.0", () => (__webpack_require__.e("node_modules_rxjs_dist_esm_index_js").then(() => (() => (__webpack_require__(845))))));
}
break;
}

Conclusion

  1. remoteEntry.js is a file that contains the list of modules that are exposed by the remote project.
  2. Angular fetches the remoteEntry.js file first before loading the remote module.
  3. The remoteEntry.js file is generated by the ModuleFederationPlugin in the webpack configuration.
  4. shell/host project does not have a remoteEntry.js file.

loadRemoteModule

How loadRemoteModule works in Angular Module Federation? Let’s take a look at the source code of the loadRemoteModule function in the @angular-architects/module-federation package.

The entry point is from the router file, we call loadRemoteModule function to load the remote module. The loadRemoteModule function is defined in the load-remote-module.ts file in the @angular-architects/module-federation package.

1
2
3
4
5
6
7
8
9
{
path: 'product',
loadComponent: () =>
loadRemoteModule({
type: 'module',
remoteEntry: 'http://localhost:4201/remoteEntry.js',
exposedModule: './Component'
}).then(m => m.ProductComponent)
}

Here is the source code of the loadRemoteModule function from webpack:///node_modules/@angular-architects/module-federation-runtime/fesm2022/angular-architects-module-federation-runtime.mjs

1
2
3
4
5
6
7
8
9
10
11
12
13
14
15
16
17
18
19
20
21
22
23
24
25
26
27
28
29
30
31
32
33
34
35
36
37
38
39
40
41
42
43
44
45
46
47
48
49
50
51
52
53
54
55
56
async function loadRemoteModule(optionsOrRemoteName, exposedModule) {
let loadRemoteEntryOptions;
let key;
let remoteEntry;
let options;
if (typeof optionsOrRemoteName === 'string') {
options = {
type: 'manifest',
remoteName: optionsOrRemoteName,
exposedModule: exposedModule,
};
}
else {
options = optionsOrRemoteName;
}
// To support legacy API (< ng 13)
if (!options.type) {
const hasManifest = Object.keys(config).length > 0;
options.type = hasManifest ? 'manifest' : 'script';
}
if (options.type === 'manifest') {
const manifestEntry = config[options.remoteName];
if (!manifestEntry) {
throw new Error('Manifest does not contain ' + options.remoteName);
}
options = {
type: manifestEntry.type,
exposedModule: options.exposedModule,
remoteEntry: manifestEntry.remoteEntry,
remoteName: manifestEntry.type === 'script' ? options.remoteName : undefined,
};
remoteEntry = manifestEntry.remoteEntry;
}
else {
remoteEntry = options.remoteEntry;
}
if (options.type === 'script') {
loadRemoteEntryOptions = {
type: 'script',
remoteEntry: options.remoteEntry,
remoteName: options.remoteName,
};
key = options.remoteName;
}
else if (options.type === 'module') {
loadRemoteEntryOptions = {
type: 'module',
remoteEntry: options.remoteEntry,
};
key = options.remoteEntry;
}
if (remoteEntry) {
await loadRemoteEntry(loadRemoteEntryOptions);
}
return await lookupExposedModule(key, options.exposedModule);
}

The key part is the last if branch in this file.
first: it load the remoteEntry.js file by calling loadRemoteEntry function.

1
2
3
if (remoteEntry) {
await loadRemoteEntry(loadRemoteEntryOptions);
}

loadREmoteEntry function then calls loadRemoteModuleEntry function to load the remote module.

1
2
3
4
5
6
7
8
9
10
// remoteEntry = 'http://localhost:4201/remoteEntry.js'
async function loadRemoteModuleEntry(remoteEntry) {
if (containerMap[remoteEntry]) {
return Promise.resolve();
}
return await import(/* webpackIgnore:true */ remoteEntry).then((container) => {
initRemote(container, remoteEntry);
containerMap[remoteEntry] = container;
});
}

We can see that it uses the import function to load the remoteEntry.js file. The import function is a dynamic import function that fetches the remoteEntry.js file from the remote server. After loading the remoteEntry.js file, it calls the initRemote function to initialize the remote container. This container is used to get the remote module later.

After loading the remoteEntry.js file, then it calls lookupExposedModule function to get the module from the remote project.

1
2
3
4
5
6
7
8
// key = 'http://localhost:4201/remoteEntry.js'
// exposedModule = './Component'
async function lookupExposedModule(key, exposedModule) {
const container = containerMap[key];
const factory = await container.get(exposedModule);
const Module = factory();
return Module;
}

Constructor vs ngOnInit

What’s the difference between constructor and ngOnInit in Angular?
constructor is a TypeScript class constructor while ngOnInit is an Angular lifecycle hook called by Angular to indicate that Angular is done creating the component. a common question is when to use constructor and when to use ngOnInit?

1
2
3
4
5
6
7
8
9
10
11
12
13
14
15
16
17
18
import {Component, OnInit} from '@angular/core';

@Component({
selector: 'app-product',
standalone: true,
imports: [],
templateUrl: './product.component.html',
styleUrl: './product.component.scss'
})
export class ProductComponent implements OnInit {
constructor() {
// What should be done here?
}

ngOnInit() {
// What should be done here?
}
}
  • constructor is used to initialize the class properties, but it’s not the right place to do any initialization that depends on Angular services or inputs. ngOnInit is the right place to do such initialization.
  • ngOnInit is an Angular lifecycle hook that is called after Angular has initialized all data-bound properties of a directive. It’s the right place to put initialization logic that depends on Angular services or inputs.
1
2
3
4
5
6
7
8
9
10
11
12
13
14
15
16
17
18
19
20
21
22
23
24
import {Component, OnInit} from '@angular/core';
import {DataService} from "../data.service";

@Component({
selector: 'app-product',
standalone: true,
imports: [],
templateUrl: './product.component.html',
styleUrl: './product.component.scss'
})
export class ProductComponent implements OnInit {
private products: any[] = [];

// Dependency Injection goes here.
constructor(private dataService: DataService) {
// What should be done here?
}

ngOnInit() {
this.dataService.fetchData().subscribe((data: any) => {
this.products = data;
});
}
}

Conclusion

When to call Call count What to do Comments
constructor When create class 1 1. Initialize class properties, 2. DI
ngOnInit after constructor and the first ngOnChanges 1 1. Init @Input, 2. Call service to fetch data

References