The version history of HTTP
| Version |
Year introduced |
Current status |
Usage in August 2024 |
Support in August 2024 |
| HTTP/0.9 |
1991 |
Obsolete |
0 |
100% |
| HTTP/1.0 |
1996 |
Obsolete |
0 |
100% |
| HTTP/1.1 |
1997 |
Standard |
33.8% |
100% |
| HTTP/2 |
2015 |
Standard |
35.3% |
66.2% |
| HTTP/3 |
2022 |
Standard |
30.9% |
30.9% |
HTTP/0.9
HTTP/0.9 is the first version of the HTTP protocol. It was a simple protocol that allowed clients to request a file from a server. The server would then send the file back to the client. The protocol did not support headers or status codes, and the client and server communicated using plain text.
HTTP/1.0
HTTP/1.0 was released in 1996 and introduced several new features to the protocol. These features included support for headers, status codes, and the ability to send multiple files in a single request. HTTP/1.0 also introduced the concept of persistent connections, which allowed clients to reuse a single connection to send multiple requests.
HTTP/1.1
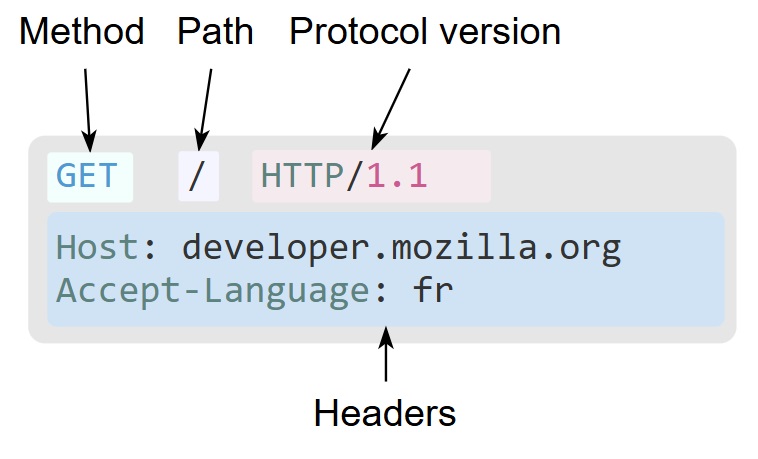
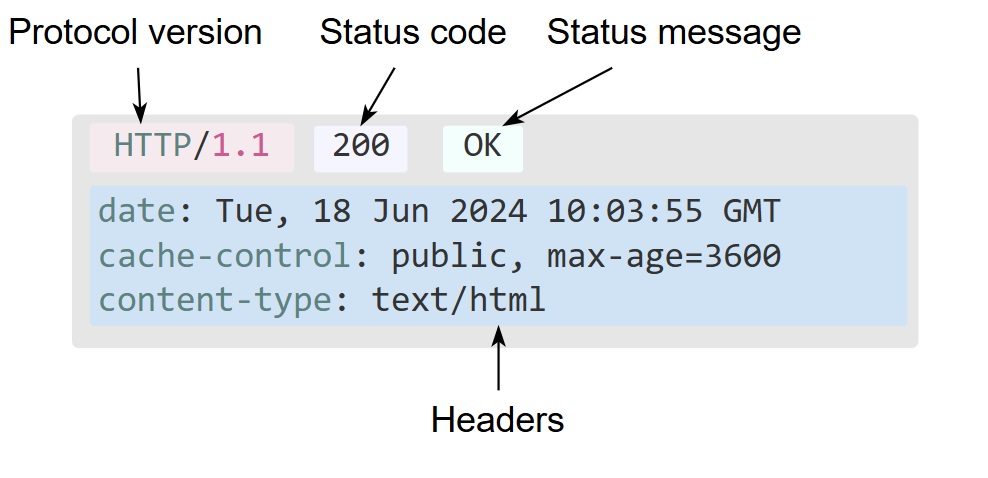
HTTP/1.1 was released in 1999 and is the most widely used version of the HTTP protocol today. It introduced several new features, including support for chunked transfer encoding, which allows servers to send data in chunks, and the ability to reuse connections for multiple requests. HTTP/1.1 also introduced several new status codes, such as 100 Continue and 206 Partial Content.
Details about HTTP/1.1:
- HTTP/1.1 is a text-based protocol.
HTTP/2
HTTP/2 was released in 2015 and introduced several new features to the protocol. These features included support for multiplexing, which allows clients to send multiple requests over a single connection, and server push, which allows servers to send resources to clients before they are requested. HTTP/2 also introduced several new status codes, such as 103 Early Hints and 421 Misdirected Request.
Details about HTTP/2:
- HTTP/2 Message is binary, instead of textual.
HTTP/3
HTTP/3 is the latest version of the HTTP protocol and is currently in development. It is based on the QUIC protocol, which is a new transport protocol that is designed to improve the performance of web applications. HTTP/3 introduces several new features, including support for multiplexing, which allows clients to send multiple requests over a single connection, and server push, which allows servers to send resources to clients before they are requested. HTTP/3 also introduces several new status codes, such as 103 Early Hints and 421 Misdirected Request.
| Version |
Release Date |
Feature |
Comments |
| Http 0.9 |
1991 |
只支持Get请求,没有Head,没有Status Code |
只支持Plain Text,不支持图片,视频,语音等 |
| Http 1.0 |
1996 |
无状态、短连接,队头阻塞 |
每个请求都要建立一个TCP连接,请求处理完TCP就关闭。下一个请求必须在前一个请求完成时才能开始,可能导致队头阻塞问题 |
| Http 1.1 |
1999 |
- 持久连接(keep alive)
- 请求管道化(pipeling)
- 增加缓存处理(新增Cache-Control字段)
- 增加Host字段、支持断点续传
|
TCP连接可以复用。客户端可同时发送多个请求,但是服务端仍是一个一个处理,仍然存在队头阻塞问题。 |
| Http 2.0 |
2015 |
- 二进制分帧
- 多路复用(或连接共享)
- 头部压缩
- 服务器推送
|
仍然基于TCP,虽然没有Http队头阻塞,但是有TCP队头阻塞 |
| Http 3.0 |
2020 |
不再基于TCP,而是基于UDP,采用由Google在UDP协议上进行封装而形成的QUIC协议,保证传输的可靠性,并且一路传输失败不影响其他路。 |
|