Introduction
Data Binding是Angular中最重要的概念之一。它是Angular中组件和模板间的通信机制。Angular中有四种数据绑定方式,注意数据绑定都发生在html模板中。
Interpolation
字符串插值是Angular中最简单的数据绑定形式。它使用双大括号{{}}将模板表达式包裹在其中。模板表达式是一段JavaScript代码,它会被Angular解析并插入到HTML中。
1 | <!--app.component.html--> |
1 | //app.component.ts |
需要注意的是{{}}仅支持简单值的插值,比如数字,字符串,布尔值等。如果要插入对象,数组等复杂值,需要使用属性绑定。
Interpolation的数据流向是从组件传递到模板,不能反向传递。
Property Binding
Angular中属性绑定可以为HTML元素的属性赋值。属性绑定使用如下语法:
1 | [property]="expression" |
当Angular编译器遇到[property]时,它会对右侧的表达式expression进行求值,并将结果赋值给property属性。
比如我们要为一个图片的src属性赋值,可以使用如下代码,这里src是img标签的一个属性,imageUrl又是组件的属性,属性绑定因此得名。
1 | <!--app.component.html--> |
1 | //app.component.ts |
属性绑定的数据流向是从组件传递到模板,不能反向传递。
Event Binding
事件绑定是Angular中将模板中的事件和组件中的方法关联起来的机制。事件绑定使用如下语法:
1 | (event)="eventHandler()" |
其中event是一个事件名,比如click、keydown、mousemove等等。eventHandler是组件中的某个方法,用来处理该事件。
下面的代码用于绑定button的click事件,当用户点击按钮时,Angular会调用组件中的updateName方法来更新name属性。
1 | <!--app.component.html--> |
1 | //app.component.ts |
在确定事件目标(event target)时,Angular首先判断指令是否有一个输出属性,如果有,Angular会调用这个输出属性,如果没有,Angular会调用DOM元素的事件。
比如下面这段代码,clickable对应一个自定义指令ClickDirective。Angular在处理myClick事件时,会首先检查ClickDirective是否有myClick输出属性,如果没有,会调用DOM元素button上的myClick事件。 — 注意myClick在这里只是一个名字,可以泛指任何事件。
1 | <h4>myClick is an event on the custom ClickDirective:</h4> |
事件绑定的数据流向是从模板传递到组件,不能反向传递。
Two-way Binding
双向数据绑定是Angular中最强大的数据绑定方式,双向数据绑定使用如下语法:Angular团队给这个语法起了一个非常形象的名字,叫banana in a box。这个语法是将属性绑定和事件绑定结合在一起,实现了数据的双向绑定。
1 | [(ngModel)]="property" |
双向数据绑定的数据流向是双向的:
- 当组件内的数据变化时,页面上的内容跟着变化。
- 反之,当页面内容变化时,组件内的数据也会跟着变化。
下面是一个双向绑定的例子,当用户在input框中输入内容时,name属性会跟着变化,页面上显示的内容也会跟着变化。初始化的时候,name属性的值是Philip,页面上输入框内显示的内容也是Philip。
1 | <!--app.component.html--> |
注意:使用双向绑定时,必须导入FormsModule模块。
1 | //app.component.ts |
需要注意:使用双向绑定的ngModel指令时,必须在imports数组中导入FormsModule模块。
下图显示了Angular中四种数据绑定方式的数据流向。
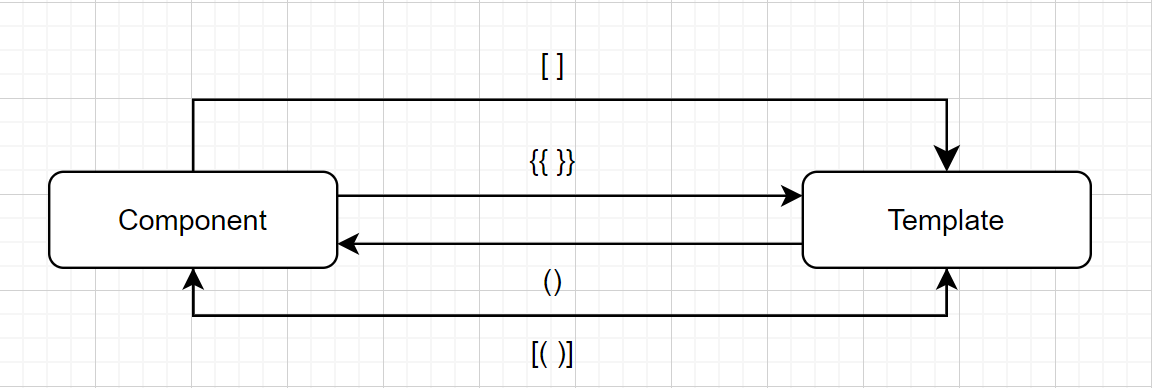
[ ]- property binding{{ }}- interpolation( )- event binding[( )]- two-way binding
Two-way binding between components
双向数据绑定不仅可以在组件内部使用,还可以在组件之间使用。比如下面的例子,我们定义了一个Counter组件,为了方便我们把所有代码都写到了一个文件里面。
Counter组件中的count是一个Input属性,由父组件传入。当用户点击增加或者减少按钮时,Counter组件会调用updateCount方法,更新count属性,并且通过changeCount事件将新的count值传递给父组件。
1 | import {Component, EventEmitter, Input, Output} from '@angular/core'; |
需要注意的是:这里面的Output函数必须是xxxChange的形式,xxx是Input属性的名字,比如代码中的count。那么对应的Output属性就是countChange,
这是Angular的约定。如果不是这个形式,Angular会认为这是一个普通的输出属性,而不是双向绑定的输出属性。(实测这种情况IDE会报错,但仍能运行)。
在父组件中调用Counter组件:
1 | ({ |
@Input and @Output
Angular中的@Input和@output和属性绑定和事件绑定有些类似,但是它们是用来在父子组件之间传递数据的。@Input用来从父组件向子组件传递数据,@Output用来从子组件向父组件传递数据。
上面的例子中已经介绍了,词不赘述。